First Custom Map
This tutorial involves creating a very simple custom map, and packaging it to be ready for release.
This page assumes that you have already set up Everest 🔗.
Click to expand the Table of Contents
Install Lönn 🔗 through Olympus 🔗, or by downloading and extracting (un-zipping) the latest GitHub Release 🔗.
Follow the Mod Setup Tutorial to set up your mod.
Create the following folders inside your mod folder. The Maps folder should be next to the everest.yaml file:
Celeste
- Mods
  - MyExampleMod
    - Maps
      - MyName
        - MyExampleMod
Launch Lönn, and select the Celeste.exe file (or Celeste.dll if you're on the core branch) in your Celeste install folder when prompted.
By default, Lönn opens the vanilla Summit map. DO NOT EDIT IT. Select File -> New in the menu to create a new map.

Start by creating a room with Room -> Add. In the window that appears, enter a name for your room (ex: "a-00") and click Save changes, then Close window.
 Scroll to zoom in and out, and drag the canvas while holding right click to center the room on your screen.
Now add some tiles. In the menu to the right of the screen, select Brush -> Foreground Tiles -> Stone, then click and drag inside the room to paint some tiles in.

Lastly, add a spawn point by selecting Placements -> Entities -> Player (Spawn Point). Make note of the search bar at the bottom of the selection menu, as a common mistake is to leave something in it that would cause no placements or tiles to show up.

Select File -> Save in the menu to open a save window. Within the window, navigate to the folder you created for your mod in Mod Setup. Save your map in Celeste/Mods/MyExampleMod/Maps/MyName/MyExampleMod/ with the name MyMap.bin.
Launch Everest using the DEBUG save file and navigate to the map selection screen. Here you can use the up and down arrows to switch between campaigns (level sets), or press the Journal button to search.
Find your map and open it. It will currently be displayed as MyName_MyExampleMod_MyMap in the MyName_MyExampleMod campaign. These issues will be addressed later in this tutorial.
If you encounter any errors when trying to load the map, post them in the #modding_help channel of the Celeste Discord 🔗.
Back in Lönn, open the Room -> Add menu once more. Give it a new name (ex: "a-01"), and press Save changes and Close window.
ℹ️ The new room may be created on top of your existing room, making it look like it is empty.
The new room can be moved with the arrow keys while holding Alt. Move it next to the existing room, so that they are touching, but not overlapping.
Now, repeat the process of adding some tiles and a Player (Spawn Point) entity.

Saving the map should cause it to be refreshed in Everest to show the new changes.
As mentioned previously, the name displayed for the map is currently MyName_MyExampleMod_MyMap, which reflects the location of the .bin file.
It can be set to anything you want by adding the appropriate dialog keys to the game.
Start by adding a folder next to the Maps folder in your mod, and name it Dialog. Within it, create a text file called English.txt. Your mod should now have this structure:
Celeste
- Mods
  - MyExampleMod
    - Dialog
      - English.txt
    - Maps
      - MyName
        - MyExampleMod
          - MyMap.bin
    - everest.yaml
Open the English.txt file and add the following text:
MyName_MyExampleMod= A Cool Campaign
MyName_MyExampleMod_MyMap= My First Map
This will set both the name of the map and the name of the campaign in the level select menu.
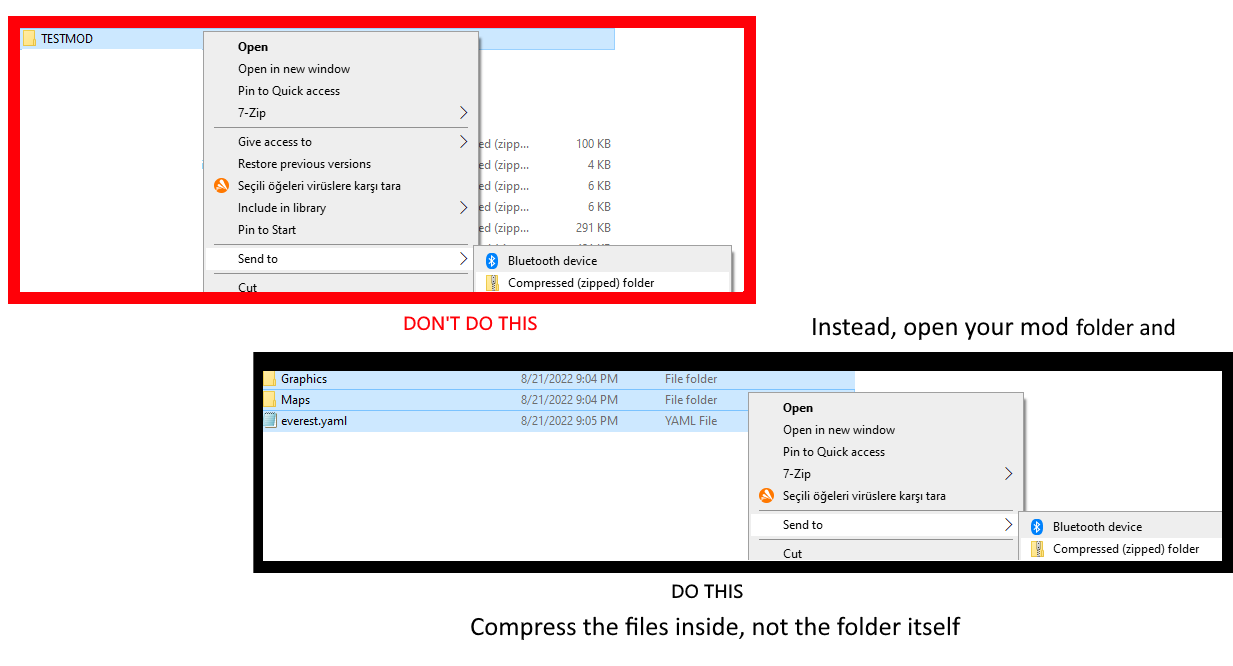
Since you already have the everest.yaml set up for your mod, all that is needed to package it is to compress it into a zip archive.
A level can be ended using a Complete Area trigger, or with a Crystal Heart when End Level on Heart is enabled in the map metadata.
The standard way of preventing the player from returning to a previous room is to place an Invisible Barrier just off-screen of the room you want the player to stay in. The barrier will only be loaded when they enter the room, so it will not prevent them from leaving the previous room.
If you're unsure what an entity is called, make sure to check the vanilla Entity and Trigger List 🔗 and the Custom Entity List 🔗 for modded entities.