Zombie AI Setup
This example demonstrates how KLEP enables autonomous decision-making by an AI agent, highlighting the use of sensors, routers, goals, and dynamic actions. The setup builds upon the character controller example, transitioning from manual input control to fully autonomous AI behavior.
- Detect nearby mobs using a sensor.
- Process detected data through a router to generate mock input.
- Move toward the target using the same movement action as the character controller.
- Initiate an "attack" when within range, changing the target's color to visualize the attack state.
- Duplicate the character controller setup from the previous example.
-
Disable user input:
- Remove or disable the Input Sensor.
- The zombie will no longer respond to keyboard and mouse events.
- In KLEP, disabled behaviors are treated as removed from the system.
-
Navigate to the Key Loader (or create a new one) and add a new property:
- Property Name: TeamID
- Property Type: Integer (int)
- Right-click in the Project panel and select KLEP/Key.
- Rename the new key to TeamA_KEY.
- Set the key name to Team_KEY, and TeamID to 1.
- Duplicate the key, rename it to TeamB_KEY, and set TeamID to 2.
- Assign TeamA_KEY to the player mob and TeamB_KEY to the zombie mob.
-
Attach a sensor to the zombie:
- This sensor will generate a Mob_KEY for any detected target within a specified radius.
- The Mob_KEY will carry data about the target's transform, which is necessary for both movement and attack actions.
- The sensor will check the target's neuron for a TeamID_KEY. If the target's team is not the same as the zombie's team, it will generate a Mob_KEY as a valid target.
- Create an empty GameObject under the goal object, rename it to Routers, and add a child GameObject.
- Rename this object to MoveToEnemy.
-
Assign the
Zombie_MoveToEnemyrouter script to this object.
- The router will emit mock input keys, such as:
- W_Hold, A_Hold, S_Hold, D_Hold for movement controls.
- MouseData_KEY to simulate the camera focusing on the target.
- The movement action will interpret these keys as if they were real player input, causing the zombie to move autonomously.
- Create a new empty GameObject under the goal object, rename it to Actions, and add a child GameObject.
- Rename this object to AttackPlayer.
-
Assign the
AttackPlayerActionscript to this object.
- When the target is within attack range, the attack action will fire.
- The target's renderer will change color to red, indicating an attack state.
- If the target moves out of range, the renderer resets to its default color.
- Toggle the "Managed By Goal" boolean to true for both AttackPlayerAction and Zombie_MoveToEnemy.
- This ensures that only the goal will control when these executables fire, preventing the agent from independently choosing them.
- Goals can manage other goals, so nested goals will also be treated as managed.
- Create a new script if you have not already done so, call it AttackPlayerGoal.
-
Inherit from
KLEPGoal, leaving the script body empty (all necessary functionality is handled by the base class). - Assign this script to the parent object that holds the router and attack executables.
-
Navigate to the
Executable Layerslist in the goal inspector. -
Add a new layer and assign the router (
Zombie_MoveToEnemy) to Layer 1. -
Set the execution requirement to "None Need to Fire":
- This allows the goal to progress to the next layer without waiting for the router to complete.
-
Add another layer and assign the
AttackPlayerActionto it.
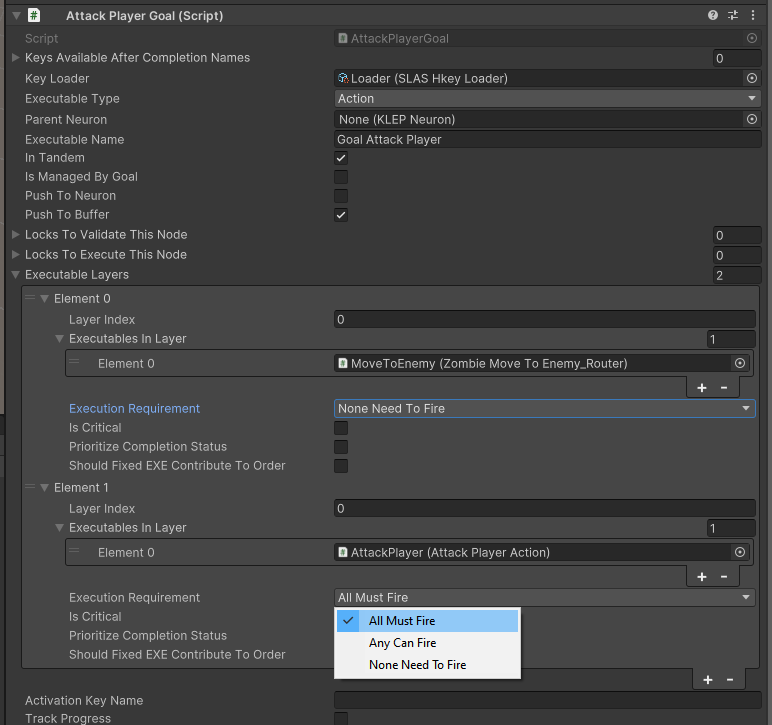
- Layer 1: The router provides mock input to move towards the target.
- Layer 2: The attack action will activate if the target is within range.
- The goal can be set to complete when the attack action fires, or remain active until specific conditions are met (e.g., goal completion criteria).
- Routers translate data into actionable input for executables.
- Goals manage complex AI behavior, enabling layered decision-making.
- The AI agent can fluidly switch between actions, utilizing the KLEP framework for smart behavior orchestration.
- Experiment with additional routers to introduce behaviors like fleeing, seeking cover, or patrolling.
- Create advanced goals that allow the zombie to prioritize actions based on dynamic environmental cues.
By utilizing KLEP's modular architecture, you can easily extend AI behaviors, adding new reactions, adaptive responses, and complex interactions with minimal additional coding. This example showcases how symbolic reasoning can create powerful, adaptive AI systems for games and simulations.