
Discover the power of AI with our Kotlin Multiplatform app. Choose from the latest open-source text and image models to boost your creativity. Pick the model that fits you, create unique texts or images. and keep everything safe and in sync across your devices.
-
Android app
Download the latest version directly from the Release section
-
WebAssembly
Check the about section
-
Desktop(macOS/Windows/Linux):
1- Build the release by running this command:
./gradlew packageReleaseDistributionForCurrentOS
2- Find binaries in:
composeApp/build/compose/binaries/
-
iOS:
Run iOS emulator via Xcode, Intellij Idea or Android Studio
chat.mp4
Imagine.mp4
You.mp4
Our development process is divided into five key steps:
- Status: 🎯 Done
- Status: 🎯 Done
- Status: 🎯 Done
- Status: 🎯 Done
- Status: 🔄 in progress
-
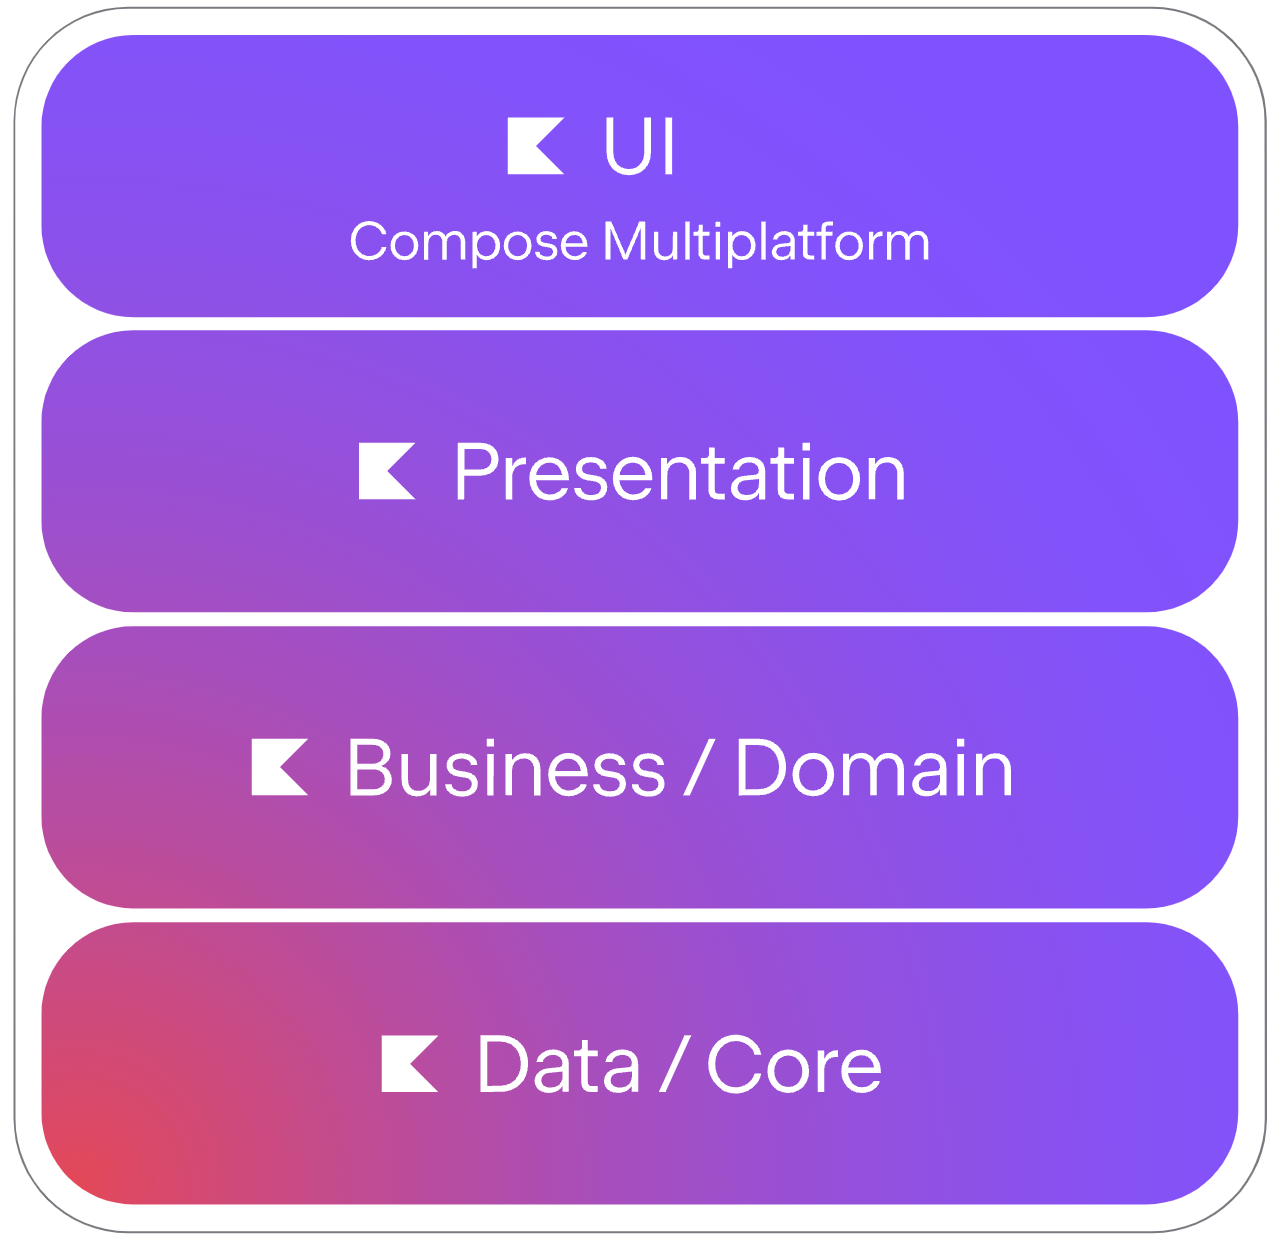
User Interface: Uses Compose multiplatfrom.
-
Layers: All data handling, business logic, and presentation layers are implemented using kotlin multiplatform
-
backend: The backend is developed using Ktor framework.
- Material 3 Adaptive (creates adaptive UIs that will adapt themselves automatically)
- Compose Navigation (Navigates between composables with built-in infrastructure and features)
- Kodein (Painless Kotlin Dependency Injection)
- Coroutines (asynchronous or non-blocking)
- Sketch (Image loading)
- Ktor Client (HTTP client)
- Markdown renderer (Markdown renderer)
- Drag Select (adding Google Photos style drag-to-select multi-selection to a LazyGrid)
- SQLDelight (SQLDelight generates typesafe Kotlin APIs from your SQL statements.)
- KotlinMultiplatformAuth (Authentification Library Targeting Android, iOS, Desktop and Web Kotlin/Js and Kotlin/Wasm both)
app/
├── core/
│   ├── data
│   │   ├── local
│   │   └── remote
│   ├── di
│   ├── navigation
│   ├── sharedViews
│   ├── theme
│   └── util
└── feature/
    ├── chat/
    │   ├── data
    │   │   └── model
    │   └── ui
    │       ├── chat
    │       ├── history
    │       ├── listDetailPane
    │       └── view
    ├── imagine/
    │   ├── data
    │   │   └── model
    │   └── ui
    │       ├── supportingPane
    │       ├── util
    │       └── view
    └── you/
        ├── model
        └──  ui
            ├── util
            └── view
This project supports Google Authentication for data syncing across devices (part of Step 5 in Progress). Keys and sensitive files (e.g., google-services.json, GoogleService-Info.plist) are hidden and not committed to GitHub for security. To enable real Google auth after cloning the repo, follow these platform-specific steps. We've included fake data in the code (e.g., in commonMain/YouViewModel.kt) for testing without setup—uncomment the real auth code when ready.
If you are confused in the process, watch this video: https://youtu.be/-5Ws4HSaYJc?si=uHhDbmnhC7GBZEL3.
- Go to the Firebase Console.
- Create a new Firebase project (or select an existing one).
- Enable Authentication → Sign-in method → Google.
- For multiplatform support, also go to Google Cloud Console → APIs & Services → Credentials to create OAuth 2.0 Client IDs as needed.
- In Firebase, click “Add app” → Android.
- Register your package name (e.g.,
com.yassineabou.llms), add SHA-1 fingerprints (debug/release). - Download
google-services.json. - Replace the placeholder in
composeApp/google-services.jsonwith your file. - In Google Cloud Console, create an “Android” OAuth Client ID with the same package name and SHA-1.
- In
androidMain/MainActivity.kt, uncomment the init code forKMAuthInitializer. - In
commonMain/YouViewModel.ktandcommonMain/App.kt, uncomment the Google auth-related code. - Sync Gradle and rebuild.
- In Firebase, click “Add app” → iOS.
- Register your bundle ID, App Store ID (optional), and nickname.
- Download
GoogleService-Info.plist. - Replace the placeholder in
iosApp/GoogleService-Info.plistwith your file. - Drag it into Xcode (check “Copy items if needed”).
- Add the Google Sign-In SDK via Xcode:
File→Add Packages…→ URL:https://github.com/google/GoogleSignIn-iOS→ Add GoogleSignIn to your target. - In
iosApp/Info.plist, uncomment and paste:<key>GIDClientID</key><string>PASTE CLIENT_ID FROM GoogleService-Info.plist HERE</string>- For
<key>CFBundleURLTypes</key>, add the<dict>with<key>CFBundleURLSchemes</key><array><string>PASTE REVERSED_CLIENT_ID FROM GoogleService-Info.plist HERE</string></array>.
- In Google Cloud Console, create a “Web application” OAuth Client ID.
- Add authorized redirect URIs (e.g.,
http://localhost:8080/callback). - Copy the generated
CLIENT_IDandCLIENT_SECRET. - Paste them into
commonMain/GoogleOAuthConfig.kt(replace the empty constants). - In
desktopMain/main.kt, uncomment the init code forKMAuthInitializer.initClientSecret. - In
commonMain/App.ktandcommonMain/YouViewModel.kt, uncomment the Google auth-related code.
We welcome contributions to our project! Please follow these guidelines when submitting changes:
- Report bugs and feature requests by creating an issue on our GitHub repository.
- Contribute code changes by forking the repository and creating a new branch.
- Ensure your code follows our coding conventions.
- Improve our documentation by submitting changes as a pull request.
Thank you for your interest in contributing to our project!
Copyright 2025 Yassine Abou

Licensed under the Apache License, Version 2.0 (the "License");
you may not use this file except in compliance with the License.
You may obtain a copy of the License at

    http://www.apache.org/licenses/LICENSE-2.0

Unless required by applicable law or agreed to in writing, software
distributed under the License is distributed on an "AS IS" BASIS,
WITHOUT WARRANTIES OR CONDITIONS OF ANY KIND, either express or implied.
See the License for the specific language governing permissions and
limitations under the License.