/***********************************************************************************
This program is provided as is, use it at your own risk
The program was constructed using WebSockets and Qt 5.9.1. Compiling it with previous versions of qt is not recommended. The following Qt modules are used: core, serialport and websockets.
Qt can be obtained at: https://www.qt.io/download
The program is strongly based on QSerialPort and QWebSockets examples.
Vitor A. M. Jorge
***********************************************************************************/
This program is a very simple example on how to control a Neato Robot using a web browser. Neato must be connected to a computer through a serial port and this computer should be able to run a simple web server (in this document we use a Python3 http server).
The main purpose of this project is to enable a simple demonstration of robot usage and naive control directed to school grade students.
Use QtCreator. If you don't have it, we recommend you to install it -- also available using Qt's web installer. Open the .pro project file, run qmake and then build the project. Note that you can, instead, use command line if your Qt distribution is properly installed (qmake, then make).
Be aware that Qt default system packages are old and some do not install qserialport and libqt5websockect5. QWebScokets are not available bedore 5.3, On Ubuntu you can install these packages using
`$sudo apt-get install libqt5serialport5`
`$sudo apt-get install libqt5websockets5*`
However we do not guarantee it will work with different Qt versions than those tested.. PReferrably, install it using the web installer, which seems to be the best way to control Qt versions. So far, the project was tested using Qt 5.9.1 running Ubuntu 16.04 64 bits and Ubuntu Mate 16.04 with qtcreator and libs installed on a Raspberry Pi 2.
In order to test the program it is necessary to perform the following steps:
-
The robot must be connected via USB to the robot
-
Identify the controller computer IP address and replace the IP address at line 82 of controller.html with it. Note that the port is 65001
-
Launch the WebSocketApplication using:
$ ./WebSocketServer -d -p 65001which will launch the command receiver at all network interface addresses at port 65001. Note that you can change the port if necessary Details about the parameters are presented in the WebSocketApplication section. If the serial port presents errors, it means its config is probably incorrect and the robot will not respond.
-
Start a web server pointing to the folder containing the file controller.html. If you do not know how to do it, and you are running Ubuntu with python3, start the server as follows
$ cd ~
$ mkdir public
$ cd <CODE_DIR>
$ cp contoller.html ~/public
$ cd ~/public
$ sudo python3 -m http.server 1234which will start a simple web server listening on port 1234, containing the controller web page which can be accessed using conventional web browsers.
-
Connect your mobile or computer to the same network where the robot is.
-
Now you can access the web server from your web browser on your phone. At the menu bar add the following url
<http://<ROBOT_COMPUTER_IP>:1234/controller.html>A window should open with buttons, to connect and control the robot.
-
If the WebSocketApplication is running, press the |Connect| button.
-
Once connected, the robot should respond to user commands.
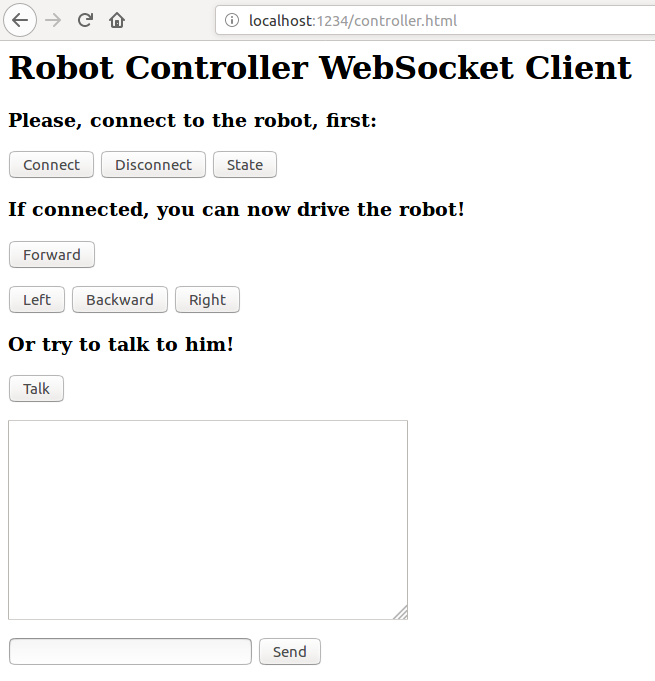
First connect to the robot clicking the Connect button Then, if connection is successful you will be able to send commands to the robot pressing any of the control buttons. An example of web interface using Firefox is shown below:
The WebSocketApplication is the server listening to the requests via web browser in your mobile. Its usage is simple, with the following options available:
-h, --help Displays this help.
-d, --debug Debug output [default: off].
-p, --port Port for the robot control server [default: 65001].
The app echoes each and every command sent by the client and checks if the command matches any robot command
- At this time, the browser client cannot request sensor information.
- Currently only movements and playing sound are supported. Even though they are somewhat straightforward to extend.
- Connection to other robots is currently under development.
Enjoy