제어문 #40
Description
Swift는 다양한 제어 흐름 문을 제공
작업을 여러 번 수행하기 위해 루프하는 동안,
if, guard, switch 문이 특정 조건에 따라 다른 코드 분기를 실행하도록 하고,
break and continue와 같은 구문이 포함
Swift는 배열, 사전, 범위, 문자열 및 기타 시퀀스에서 쉽게 반복할 수 있는 for-in 루프를 제공
switch 문은 많은 C언어 유형의 언어들의 대응문보다 훨씬 더 강력
case는 interval을 통한 범위, 튜플 및 특정 타입으로 캐스팅을 포함하여 다양한 패턴을 제공
switch case의 일치된 값은 케이스의 본문 내에서 사용하기 위해 임시 상수 또는 변수에 바인딩 가능하며
복잡한 일치 조건은 각 경우에 대한 where 절로 표현 가능
For-In 반복문
배열, 숫자의 범위, 문자열과 같은 시퀀스를 순회하는 데 사용
let names = ["Anna", "Alex", "Brian", "Jack"]
for name in names {
    print("Hello, \(name)!")
}
// Hello, Anna!
// Hello, Alex!
// Hello, Brian!
// Hello, Jack!
딕셔너리 또한 (key, value) 형태의 튜플로 순회할 수 있으며,
튜플의 요소를 블록 내에서 사용하기 위해 명시적인 이름의 상수로 선언 가능
딕셔너리는 순서가 없기 때문에 순회를 할 때 순서대로 검색이 될 것이라는 보장을 하지 못함
삽입한 순서가 순회에서의 순서를 정의하지 않는다
let numberOfLegs = ["spider": 8, "ant": 6, "cat": 4]
for (animalName, legCount) in numberOfLegs {
    print("\(animalName)s have \(legCount) legs")
}
// cats have 4 legs
// ants have 6 legs
// spiders have 8 legs
숫자의 범위를 지정해 반복문을 사용 가능
for index in 1...5 {
    print("\(index) times 5 is \(index * 5)")
}
// 1 times 5 is 5
// 2 times 5 is 10
// 3 times 5 is 15
// 4 times 5 is 20
// 5 times 5 is 25
// 예제에서 index는 순회가 시작할 때 자동으로 세팅이 되며, 사용하기 전 따로 선언을 해 줄 필요가 없다
만약 시퀀스로부터의 값이 필요 없다면, 언더스코어(_)를 사용하여 무시 가능
let base = 3
let power = 10
var answer = 1
for _ in 1...power {
    answer *= base
}
print("\(base) to the power of \(power) is \(answer)")
// Prints "3 to the power of 10 is 59049"
반 열린 범위 연산자를 사용하여 lower bound는 포함하지만 upper bound는 포함하지 않는 범위를 지정 가능
반 열린 범위 연산자에 간격을 설정하고 싶을 경우 stride(from:to:by:) 메서드를 사용
닫힌 범위 연산자에도 stride(from:through:by:) 메소드를 사용하여 적용이 가능
let minutes = 60
for tickMark in 0..<minutes {
    // render the tick mark each minute (60 times)
}

let minuteInterval = 5
for tickMark in stride(from: 0, to: minutes, by: minuteInterval) {
    // render the tick mark every 5 minutes (0, 5, 10, 15 ... 45, 50, 55)
}

let hours = 12
let hourInterval = 3
for tickMark in stride(from: 3, through: hours, by: hourInterval) {
    // render the tick mark every 3 hours (3, 6, 9, 12)
}
While 반복문
while 반복문은 조건이 거짓이 될 때까지 구문을 실행
Swift는 두 가지 형태의 while문을 제공
while : 각 반복을 시작할 때 조건을 판단
repeat-while : 각 반복이 끝날 때 조건을 판단
1) While
while문은 하나의 조건 판단함으로써 시작
만약 조건이 참이라면, 조건이 거짓이 될 때까지 조건이 반복
while condition {
  statements
}
1부터 25까지의 숫자가 새겨진 보드판과 그 위에 몇 가지 사다리와 뱀이 있다고 가정
주사위를 반복문을 통해 굴려가며 게임을 진행
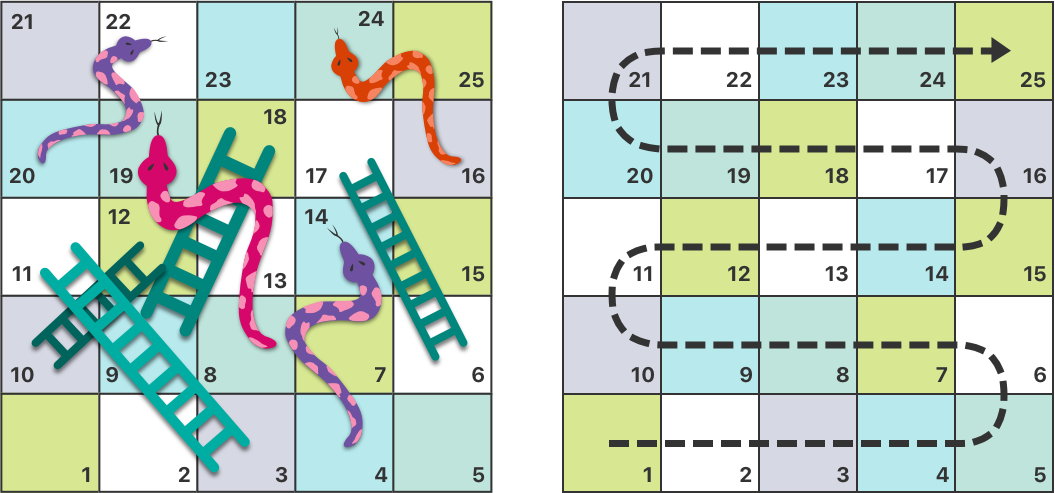
let finalSquare = 25
var board = Array<Int>.init(repeating: 0, count: finalSquare + 1)
let diceSet = [1, 2, 3, 4, 5, 6]

board[3] = 8
board[6] = 11
board[9] = 9
board[10] = 2
board[14] = -10
board[19] = -11
board[22] = -2
board[24] = -8

var square = 0
var diceRoll = 0
var count = 0

while square < finalSquare {
    count += 1
    diceRoll = diceSet.randomElement()!
    print("\(diceRoll)의 주사위가 나왔습니다")
    square += diceRoll
    print("\(diceRoll)만큼 이동하여 \(square)번의 칸에 도착했습니다")
    if board[square] != 0 {
        print("특정 위치에 도착하여 \(board[square]) 만큼 이동합니다.")
        square += board[square]
        print("\(square)번의 칸에 도착했습니다")
    }
}

print("총 \(count)회 주사위를 던졌습니다")
print("Game over!")
Repeat-While
repeat-while문은 처음 한 번 구문을 실행한 뒤 조건을 검사
이후 조건이 거짓이 될 때까지 반복문을 실행
repeat {
    statements
} while condition
다른 언어의 do-while문과 같은 역할
앞선 보드 게임의 예제를 Repeat-While문으로 재구성
조건문이 끝에서 평가되는 것이 다르다
let finalSquare = 25
var board = Array<Int>.init(repeating: 0, count: finalSquare + 1)
let diceSet = [1, 2, 3, 4, 5, 6]

board[3] = 8
board[6] = 11
board[9] = 9
board[10] = 2
board[14] = -10
board[19] = -11
board[22] = -2
board[24] = -8

var square = 0
var diceRoll = 0
var count = 0

repeat {
    if board[square] != 0 {
        assert(board[square] != 0)
        print("특정 위치에 도착하여 \(board[square])만큼 이동합니다.")
        square += board[square]
        print("\(square)번의 칸에 도착했습니다")
    }
    count += 1
    diceRoll = diceSet.randomElement()!
    print("\(diceRoll)의 주사위가 나왔습니다")
    square += diceRoll
    print("\(diceRoll)만큼 이동하여 \(square >= finalSquare ? 25 : square)번의 칸에 도착했습니다")
} while square < finalSquare

print("총 \(count)회 주사위를 던졌습니다")
print("Game over!")
조건문
Swift는 조건부 분기를 코드에 추가하는 두 가지 방법, 즉 if 문과 switch 문을 제공
- if : 몇 가지 가능한 결과에 대한 간단한 조건을 판단하는 데 사용
- switch : 보다 복잡한 조건에 적합. 또한 패턴 매칭이 실행할 코드 분기를 선택하는 데 도움이 될 수 있는 경우 유용
1) If
가장 간단하게, if 조건 하나만으로 표현. 조건이 참일 경우 실행
조건이 거짓일 때 실행되어야 하는 구문이 존재할 경우 else 키워드를 사용
다수의 조건이 있다면 else if를 사용하여 분기
var temperatureInFahrenheit = 30
if temperatureInFahrenheit <= 32 {
    print("It's very cold. Consider wearing a scarf.")
}
// Prints "It's very cold. Consider wearing a scarf."

temperatureInFahrenheit = 40
if temperatureInFahrenheit <= 32 {
    print("It's very cold. Consider wearing a scarf.")
} else {
    print("It's not that cold. Wear a t-shirt.")
}
// Prints "It's not that cold. Wear a t-shirt."

temperatureInFahrenheit = 90
if temperatureInFahrenheit <= 32 {
    print("It's very cold. Consider wearing a scarf.")
} else if temperatureInFahrenheit >= 86 {
    print("It's really warm. Don't forget to wear sunscreen.")
} else {
    print("It's not that cold. Wear a t-shirt.")
}
// Prints "It's really warm. Don't forget to wear sunscreen."
2) Switch
switch 구문은 몇 가지 매칭이 가능한 패턴과 대조하여 값을 판단
처음으로 패턴과 매칭이 되는 곳에서 코드가 실행
다음과 같은 형태에서, switch문은 값을 하나 혹은 그 이상의 다른 값과 비교
switch some value to consider {
case value 1:
    respond to value 1
case value 2,
     value 3:
    respond to value 2 or 3
default:
    otherwise, do something else
}
switch문에서 모든 가능한 값들은 반드시 케이스 중 하나와 매칭
만약 모든 값에 대해 케이스를 제공하지 못할 경우, default 케이스를 반드시 설정
해당 케이스는 항상 마지막에 위치
let someCharacter: Character = "z"
switch someCharacter {
case "a":
    print("The first letter of the alphabet")
case "z":
    print("The last letter of the alphabet")
default:
    print("Some other character")
}
// Prints "The last letter of the alphabet"
1) 암시적 진행을 사용하지 않음 (No Implicit Fallthrough)
C 또는 Objective-C와 반대로, Swift의 switch 구문은 암시적인 진행을 하지 않음
C나 Objective-C에서는 기본적으로 모든 케이스를 순회하여 default를 만날 때까지. 따라서, 항상 break 키워드를 명시
Swift에서는 break를 적지 않아도 특정 케이스가 완료되면 자동으로 switch구문을 빠져 나오게 된다
이런 사용법으로 인해 실수로 break를 빠뜨려 의도하지 않은 케이스가 실행되는 것을 방지
각각의 케이스 안에는 반드시 실행 가능한 구문이 있어야 한다
콤마(,)를 사용해 동일한 구문을 실행하는 여러가지 케이스를 결합 가능
break를 사용하여 케이스 안의 특정 지점에서 멈추도록 하는 것도 가능은 하다
let anotherCharacter: Character = "a"
switch anotherCharacter {
case "a": // Invalid, the case has an empty body
case "A":
    print("The letter A")
default:
    print("Not the letter A")
}
// This will report a compile-time error.
// 다음의 코드는 첫 번째 케이스가 비어 있기 때문에 컴파일 에러를 발생

let anotherCharacter: Character = "a"
switch anotherCharacter {
case "a", "A":
    print("The letter A")
default:
    print("Not the letter A")
}
// Prints "The letter A"
// 가독성 때문에 혼합해 사용하는 경우, 여러 코드라인에 나눠서 적을 수도 있다
명시적으로 switch-case 문의 특정 지점의 끝까지 실행하고 싶다면 fallthrough 키워드를 사용할 수 있다
2) 인터벌 매칭 (Interval Matching)
숫자의 특정 범위를 조건으로 지정
let approximateCount = 62
let countedThings = "moons orbiting Saturn"
let naturalCount: String
switch approximateCount {
case 0:
    naturalCount = "no"
case 1..<5:
    naturalCount = "a few"
case 5..<12:
    naturalCount = "several"
case 12..<100:
    naturalCount = "dozens of"
case 100..<1000:
    naturalCount = "hundreds of"
default:
    naturalCount = "many"
}
print("There are \(naturalCount) \(countedThings).")
// Prints "There are dozens of moons orbiting Saturn."
3) 튜플
동일한 구문을 실행하는 다양한 값을 테스트하기 위해 튜플을 사용 가능
튜플 내의 각각의 원소가 다른 값 또는 범위와 맞는지 검사
언더스코어(_)를 사용할 수 있는데, 이는 가능한 모든 값에 매치되는 와일드카드 역할
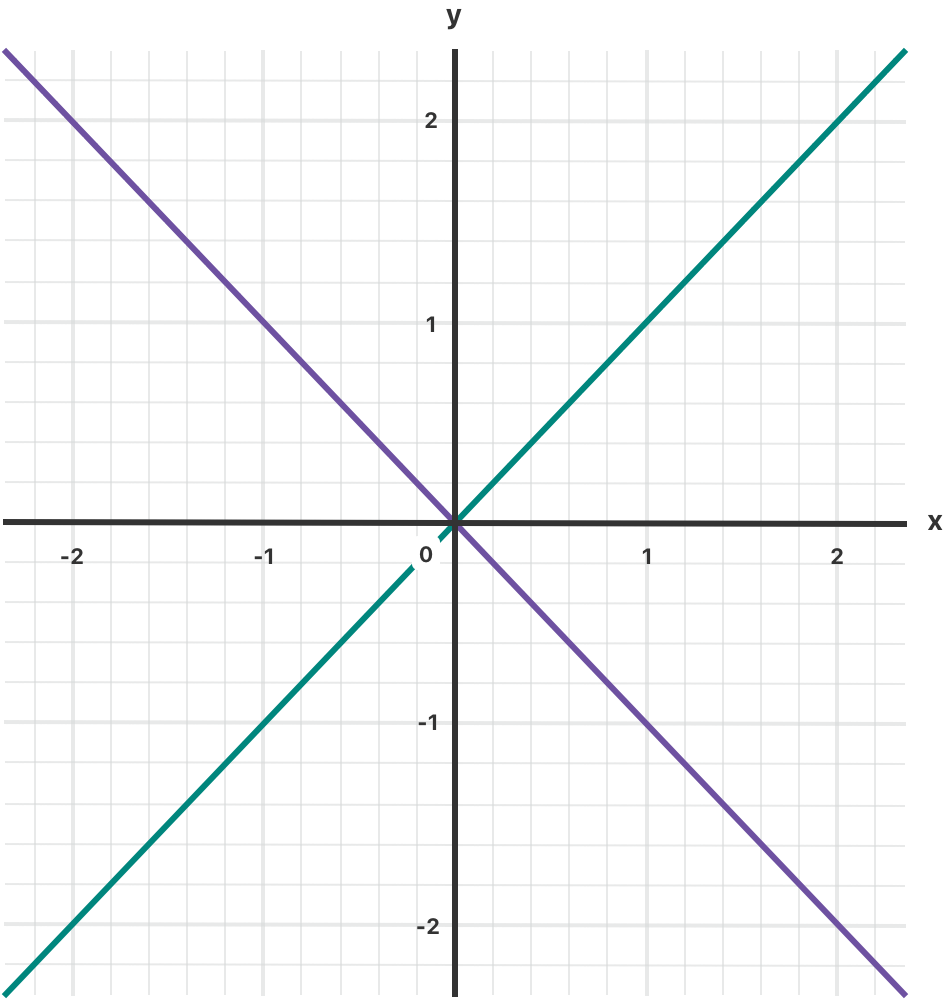
let somePoint = (1, 1)
switch somePoint {
case (0, 0):
    print("\(somePoint) is at the origin")
case (_, 0):
    print("\(somePoint) is on the x-axis")
case (0, _):
    print("\(somePoint) is on the y-axis")
case (-2...2, -2...2):
    print("\(somePoint) is inside the box")
default:
    print("\(somePoint) is outside of the box")
}
// Prints "(1, 1) is inside the box"
4) 값 바인딩 (Value Binding)
switch 케이스는 케이스 안에서 사용할 임시적인 상수, 변수에 매치되는 값 또는 값들을 명명할 수 있다
let anotherPoint = (2, 0)
switch anotherPoint {
case (let x, 0):
    print("on the x-axis with an x value of \(x)")
case (0, let y):
    print("on the y-axis with a y value of \(y)")
case let (x, y):
    print("somewhere else at (\(x), \(y))")
}
// Prints "on the x-axis with an x value of 2"
// 위 예제의 첫 번째 케이스에서, x에 매치되는 값(2)이 임시 상수인 x에 할당
// 이렇게 선언된 임시 상수는 케이스의 코드 블록 안에서 사용
// default 케이스가 존재하지 않는데, 마지막 케이스인 case let (x, y)는 가능한 모든 값과 매치가 되기 때문
5) Where
추가적인 조건을 확인하기 위해 where절을 사용 가능
let yetAnotherPoint = (1, -1)
switch yetAnotherPoint {
case let (x, y) where x == y:
    print("(\(x), \(y)) is on the line x == y")
case let (x, y) where x == -y:
    print("(\(x), \(y)) is on the line x == -y")
case let (x, y):
    print("(\(x), \(y)) is just some arbitrary point")
}
// Prints "(1, -1) is on the line x == -y"
// 위의 예시에서 세 가지 케이스는 yetAnotherPoint로부터 두 튜플 값들을 임시적으로 가져올 placeholder 상수 x와 y를 선언
// 해당 상수들은 동적 필터로 생성되어 where 구문의 일부분으로써 사용 - 추가적인 분기 처리
6) 복합 케이스
동일한 실행부를 공유하는 여러 케이스들을 콤마로 구분하여 작성 가능
하나라도 패턴에 매치되면 그 케이스가 실행
목록이 길 경우 여러 줄에 나눠서 작성 - 가독성
let someCharacter: Character = "e"
switch someCharacter {
case "a", "e", "i", "o", "u":
    print("\(someCharacter) is a vowel")
case "b", "c", "d", "f", "g", "h", "j", "k", "l", "m",
     "n", "p", "q", "r", "s", "t", "v", "w", "x", "y", "z":
    print("\(someCharacter) is a consonant")
default:
    print("\(someCharacter) is not a vowel or a consonant")
}
// Prints "e is a vowel"
복합 케이스는 값 바인딩을 포함 가능
복합 케이스의 모든 패턴은 반드시 값 바인딩의 구성이 동일해야 한다
복합 케이스의 모든 패턴으로부터 동일한 타입의 값을 얻을 수 있어야 한다
케이스의 값 바인딩 중 하나만 일치해도 구문이 실행
let stillAnotherPoint = (9, 0)
switch stillAnotherPoint {
case (let distance, 0), (0, let distance):
    print("On an axis, \(distance) from the origin")
default:
    print("Not on an axis")
}
// Prints "On an axis, 9 from the origin"
제어 전송 구문 (Control Transfer Statements)
제어 전송 구문(Control Transfer Statements)는 제어권을 코드의 한 부분에서 다른 부분으로 넘김으로써 실행 중인 코드의 순서를 바꾼다
Swift는 다섯 가지 제어 전송 구문을 갖고 있다.
- continue
- break
- fallthrough
- return - 함수에서 반환
- throw - 함수에서 에러 핸들링
1) Continue
continue 구문은 반복문에게 하던 것을 멈추고 다음 순회로 넘어가 처음부터 다시 시작하라고 전한다
해당 키워드는 "현재 순회 단계에서는 할 일을 다 끝냈다"는 말과 같다
let puzzleInput = "great minds think alike"
var puzzleOutput = ""
let charactersToRemove: [Character] = ["a", "e", "i", "o", "u", " "]
for character in puzzleInput {
    if charactersToRemove.contains(character) {
        continue
    }
    puzzleOutput.append(character)
}
print(puzzleOutput)
// Prints "grtmndsthnklk"
2) Break
break 구문은 전체적인 제어 흐름 상태의 실행을 즉시 종료
일반적으로 switch문의 실행을 멈추고 싶거나 반복문을 보다 일찍 끝내고 싶을 경우 사용
1) 반복문에서의 break
반복문 안에서 break 구문을 사용했을 때, 반복문의 실행은 즉시 종료
반복문 블록 바깥으로 제어를 넘김
현재 순회 이전, 이후 모두 실행되지 않는다
2) switch문 안에서의 break
switch문 안에서 사용한다면 switch문을 종료하고 제어를 블록 바깥으로 넘김
하나 또는 그 이상의 케이스를 무시하고자 할 때 종종 사용
switch문은 빈 케이스를 허용하지 않기 때문
케이스 구문의 break는 switch문의 실행을 즉시 종료한다.
주석만 있는 케이스는 컴파일 에러를 발생하기에 케이스를 무시하고 싶다면 break를 사용
let numberSymbol: Character = "三"
// Chinese symbol for the number 3
var possibleIntegerValue: Int?

switch numberSymbol {
case "1", "١", "一", "๑":
    possibleIntegerValue = 1
case "2", "٢", "二", "๒":
    possibleIntegerValue = 2
case "3", "٣", "三", "๓":
    possibleIntegerValue = 3
case "4", "٤", "四", "๔":
    possibleIntegerValue = 4
default:
    break
}

if let integerValue = possibleIntegerValue {
    print("The integer value of \(numberSymbol) is \(integerValue).")
} else {
    print("An integer value could not be found for \(numberSymbol).")
}
// Prints "The integer value of 三 is 3."
3) Fallthrough
Swift에서는 switch문이 매치되는 케이스의 아래로 지나가지 않는다
처음으로 매치되는 케이스가 완료되는 대로 switch문이 끝남(break가 없다면 매치된 이후의 모든 케이스를 실행하는 C와는 다름)
fallthrough 키워드는 이후의 case에 대해서도 실행하게 만든다
자동으로 break가 사용되는 것을 막는 효과
let integerToDescribe = 5
var description = "The number \(integerToDescribe) is"

switch integerToDescribe {
case 2, 3, 5, 7, 11, 13, 17, 19:
    description += " a prime number, and also"
    fallthrough
default:
    description += " an integer."
}

print(description)
// Prints "The number 5 is a prime number, and also an integer."
// fallthrough 키워드는 케이스 조건을 확인하지 않고 다음 케이스를 실행하게 한다
4) 라벨 구문(Labeled Statements)
Swift에서는 복잡한 제어문 구조를 만들기 위해 조건문이나 반복문 안에 다른 조건문, 반복문을 중첩 가능
이러한 제어문들은 그들의 실행을 조기에 끝내기 위해 break문을 사용하게 됨
때문에, 어떤 제어문 블록을 끝내고 싶은지 명시하는 것이 유용(continue문을 사용할 때 역시 마찬가지)
이를 위해 조건문 또는 반복문에 라벨을 붙이는 것이 가능
라벨이 붙은 구문의 실행을 끝내기 위해 break문 또는 continue문을 라벨과 함께 사용
라벨 구문은 콜론(:)과 함께 제어문 키워드와 같은 라인에 위치한다.
label name: while condition {
    statements
}
위에서 보았던 게임 예시에서, while문에 라벨을 설정하여 switch문과 함께 사용할 수 있다.
gameLoop: while square != finalSquare {
    diceRoll += 1
    if diceRoll == 7 { diceRoll = 1 }
    switch square + diceRoll {
    case finalSquare:
        // diceRoll will move us to the final square, so the game is over
        break gameLoop
    case let newSquare where newSquare > finalSquare:
        // diceRoll will move us beyond the final square, so roll again
        continue gameLoop
    default:
        // this is a valid move, so find out its effect
        square += diceRoll
        square += board[square]
    }
}

print("Game over!")
이른 종료(Early Exit)
guard문을 이용해 특정 조건을 만족하지 않으면 이후의 코드를 실행하지 않도록 방어코드를 작성 - 옵셔널 바인딩에도 활용
if문과는 달리 guard문은 항상 else 구문을 갖고 있다. 만약 조건이 거짓이라면 코드 블록 내부의 else 구문이 실행
func greet(person: [String: String]) {
    guard let name = person["name"] else {
        return
    }

    print("Hello \(name)!")

    guard let location = person["location"] else {
        print("I hope the weather is nice near you.")
        return
    }

    print("I hope the weather is nice in \(location).")
}

greet(person: ["name": "John"])
// Prints "Hello John!"
// Prints "I hope the weather is nice near you."
greet(person: ["name": "Jane", "location": "Cupertino"])
// Prints "Hello Jane!"
// Prints "I hope the weather is nice in Cupertino."
guard문의 조건이 충족된다면, guard문의 닫는 중괄호 이후로 계속 코드 실행
옵셔널 바인딩을 사용하여 할당받은 상수/변수는 나머지 코드 블록에서 사용 가능
조건을 만족하지 않았다면, else문 안의 코드가 실행
return, break, continue, throw와 같은 제어 전송 구문이나 리턴 값이 없는 함수 / 메소드를 사용하여 에러를 방지
guard문의 사용은 if문과 비교했을 때 가독성이 높다
사용 가능한 API 확인
Swift에서는 기본으로 특정 플랫폼 (iOS, macOS, tvOS, watchOS)과 특정 버전을 확인하는 구문을 제공
if #available(platform name version, ..., *) {
    statements to execute if the APIs are available
} else {
    fallback statements to execute if the APIs are unavailable
}
해당 구문을 활용해 특정 플랫폼과 버전을 사용하는 기기에 대한 분기 처리 가능
if #available(iOS 10, macOS 10.12, *) {
    // Use iOS 10 APIs on iOS, and use macOS 10.12 APIs on macOS
} else {
    // Fall back to earlier iOS and macOS APIs
}

if #unavailable(iOS 10) {
    // Fallback code
}

@available(macOS 10.12, *)
struct ColorPreference {
    var bestColor = "blue"
}

func chooseBestColor() -> String {
    guard #available(macOS 10.12, *) else {
        return "gray"
    }
    let colors = ColorPreference()
    return colors.bestColor
}
// guard문을 사용하여 지원 가능 정보 구체화
// struct에 대한 플랫폼 지원 제한 설정
// 지원에 따른 동작 / 비지원에 따른 대체 동작 로직 구성