Flashing STM32 boards
Supported operating system for flashing STM32 boards other than STM32F4 Discovery is Ubuntu 22.04 only. For STM32F4 Discovery board any operating system can be used.
- Prerequisites
- Flashing STM32 Black Pill boards
- Flashing Waveshare Core STM32 boards
- Flashing STM32F4VE board
- Flashing TPyBoard board
- Flashing STM32F4 Discovery board
This section can be skipped if flashing STM32F4 Discovery board.
Follow this page up to the "Building the firmware section".
OpenDeck currently supports the following Black Pill boards:
All boards look identical with the only difference being slightly different MCU - even the pinout is the same. STM32F401CC might miss "Key" button but that is irrelevant for the OpenDeck firmware.
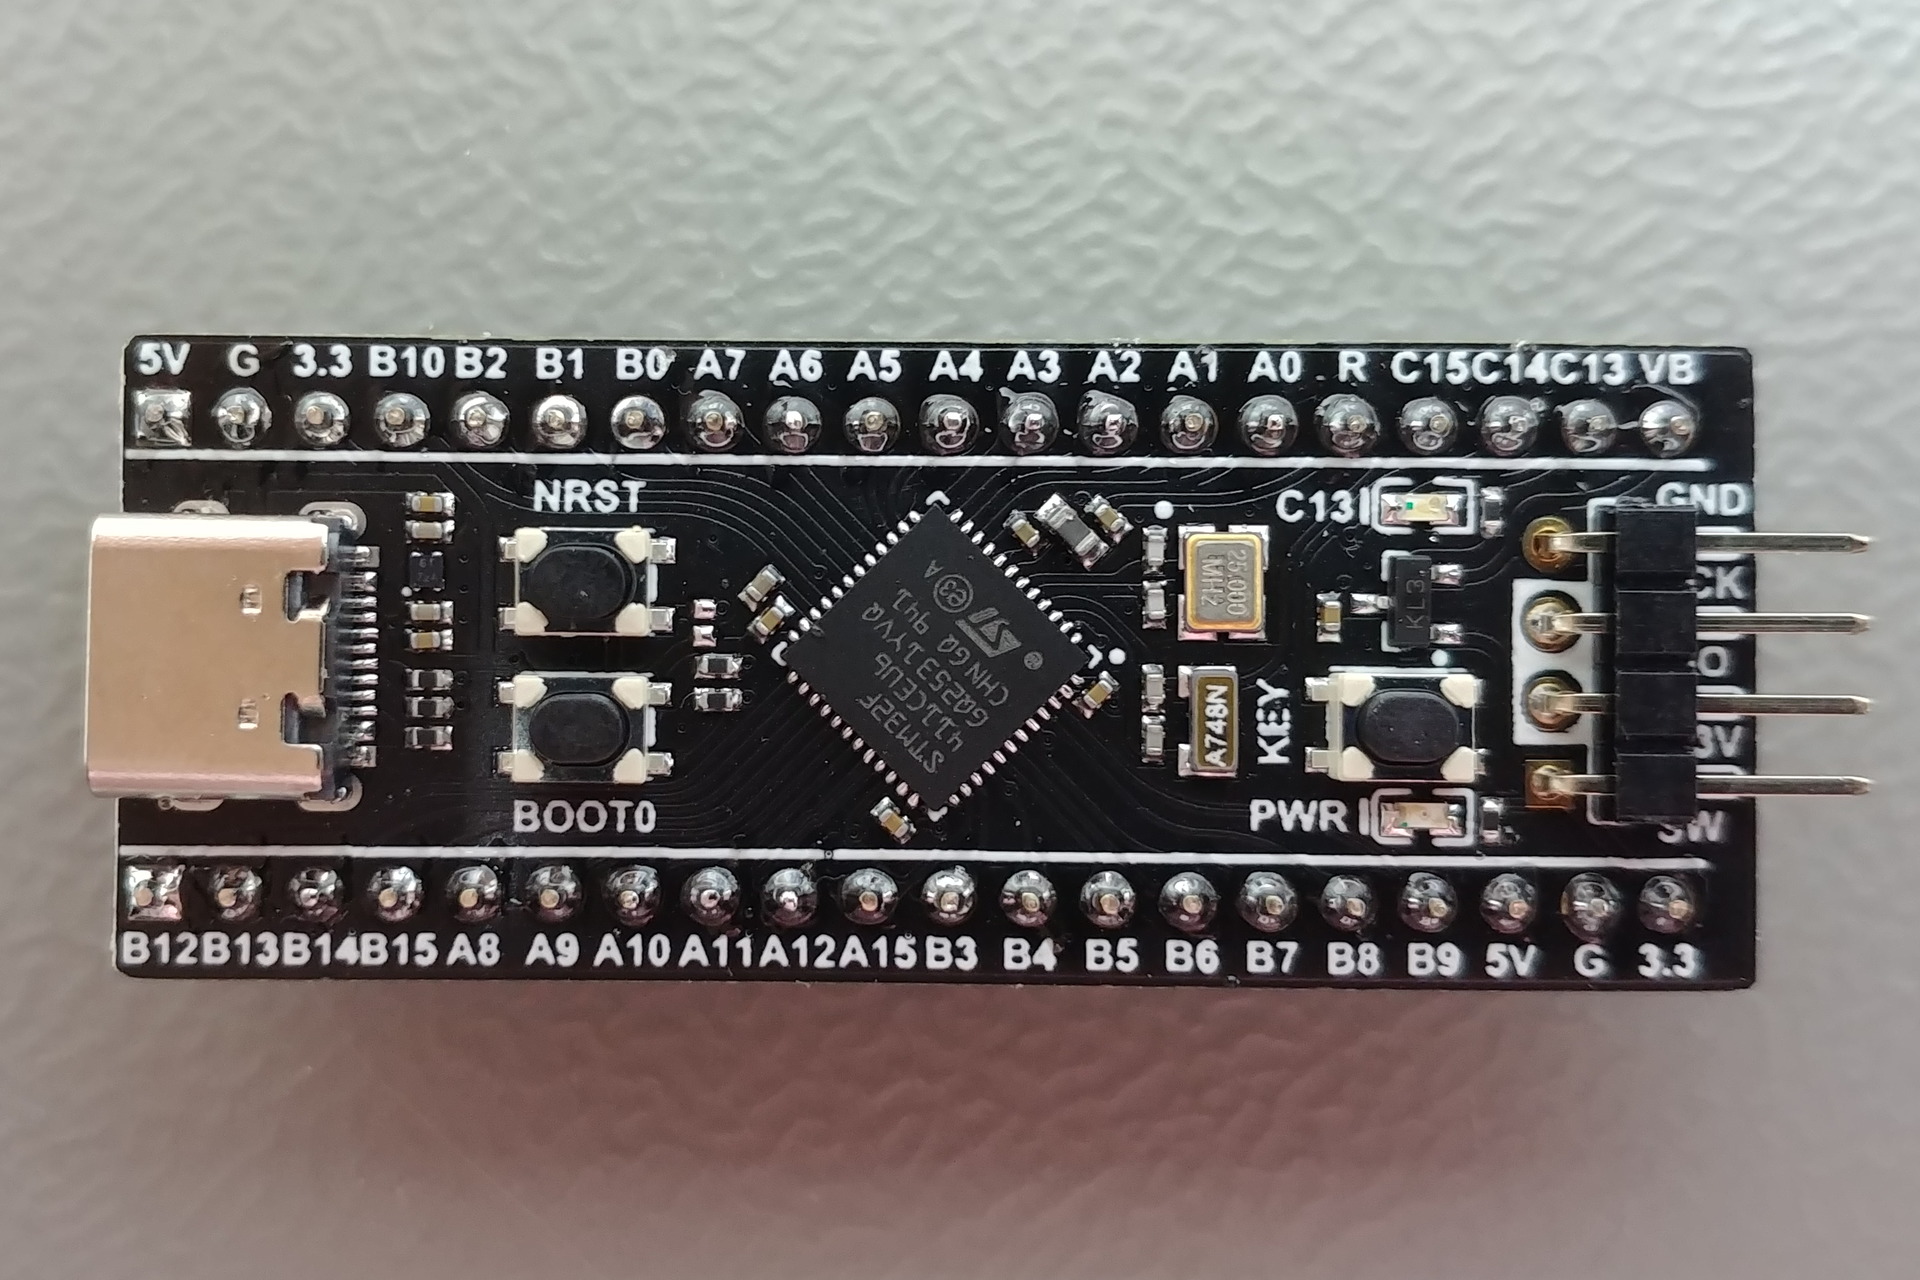
These boards have built-in bootloader which can be used to program them without the need for external tool.
To enter bootloader mode on these boards, follow this procedure:
- Connect the board to computer with USB C cable
- Hold down BOOT0 button
- While holding down BOOT0 button, press and hold NRST button for 1 second
- Release NRST button while still holding BOOT0 button for another 1 second
- Release BOOT0 button
- Run the following command in the container:
sudo dfu-util -l
When the board is in bootloader mode, output will look like following:
(.venv) ubuntu@opendeck ~/workspace/OpenDeck master
> sudo dfu-util -l
dfu-util 0.10

Copyright 2005-2009 Weston Schmidt, Harald Welte and OpenMoko Inc.
Copyright 2010-2020 Tormod Volden and Stefan Schmidt
This program is Free Software and has ABSOLUTELY NO WARRANTY
Please report bugs to http://sourceforge.net/p/dfu-util/tickets/

Deducing device DFU version from functional descriptor length
Found Runtime: [05ac:8213] ver=0208, devnum=4, cfg=1, intf=3, path="6-6.1", alt=0, name="UNKNOWN", serial="C8BCC8B0C70E"
Found DFU: [0483:df11] ver=2200, devnum=5, cfg=1, intf=0, path="6-4", alt=3, name="@Device Feature/0xFFFF0000/01*004 e", serial="319534513030"
Found DFU: [0483:df11] ver=2200, devnum=5, cfg=1, intf=0, path="6-4", alt=2, name="@OTP Memory /0x1FFF7800/01*512 e,01*016 e", serial="319534513030"
Found DFU: [0483:df11] ver=2200, devnum=5, cfg=1, intf=0, path="6-4", alt=1, name="@Option Bytes  /0x1FFFC000/01*016 e", serial="319534513030"
Found DFU: [0483:df11] ver=2200, devnum=5, cfg=1, intf=0, path="6-4", alt=0, name="@Internal Flash  /0x08000000/04*016Kg,01*064Kg,03*128Kg", serial="319534513030"
In case your output looks like this:
(.venv) ubuntu@opendeck ~/workspace/OpenDeck master
> sudo dfu-util -l
dfu-util 0.10

Copyright 2005-2009 Weston Schmidt, Harald Welte and OpenMoko Inc.
Copyright 2010-2020 Tormod Volden and Stefan Schmidt
This program is Free Software and has ABSOLUTELY NO WARRANTY
Please report bugs to http://sourceforge.net/p/dfu-util/tickets/

Deducing device DFU version from functional descriptor length
Found Runtime: [05ac:8213] ver=0208, devnum=4, cfg=1, intf=3, path="6-6.1", alt=0, name="UNKNOWN", serial="C8BCC8B0C70E"
repeat the bootloader mode procedure until you get the output as in first block.
Execute the following command in the container:
make flash TARGET=blackpill401cc FLASH_TOOL=dfu
Execute the following command in the container:
make flash TARGET=blackpill401ce FLASH_TOOL=dfu
Execute the following command in the container:
make flash TARGET=blackpill411 FLASH_TOOL=dfu
Just like Black Pill boards, all supported Waveshare Core boards have built-in bootloader which can be used to program them without the need for external tool.
Before plugging the Core boards to computer, make sure the jumpers on the board match with the picture for specific Core board (pictures below). All boards have a switch which is marked in red square on each picture. Pay close attention to it - when the switch is in Flash position, this means that the board boots whatever firmware is currently on the MCU. When the board is new, no firmware is loaded. Putting the switch in System position will make the board boot into DFU (Device Firmware Update) mode which will allow you to flash the board. Before flashing, make sure the switch is in System position, but after flashing, the switch must be in Flash position.


Execute the following command in the container:
make flash TARGET=ws_core405r FLASH_TOOL=dfu
Execute the following command in the container:
make flash TARGET=ws_core407i FLASH_TOOL=dfu
Execute the following command in the container:
make flash TARGET=ws_core407v FLASH_TOOL=dfu
This board has built-in bootloader which can be used to program it without the need for external tool.

To enter bootloader mode on this board, make sure to connect BT0 pin together with 3V pin, as shown in the picture below before turning the board on.

Once those pins are connected, connect the board to the computer and then remove the jumper.
Execute the following command in the container:
make flash TARGET=stm32f4ve FLASH_TOOL=dfu
This board has built-in bootloader which can be used to program it without the need for external tool.

To enter bootloader mode on this board, make sure to connect B0 pin together with 3V pin, as shown in the picture below before turning the board on.

Once those pins are connected, connect the board to the computer and then remove the jumper.
Execute the following command in the container:
make flash TARGET=tpyboard FLASH_TOOL=dfu

This board ships with mass-storage bootloader, which means that once it's plugged into computer via mini USB cable, it will show up as disk drive named DIS_F407VG. The disk drive can then be used to flash the board.
To flash the board, simply download the binary from discovery.bin file from the latest OpenDeck release to the drive. After a few seconds, the board will reboot and the integrated LEDs on board will flash 4 times, indicating that the firmware is loaded. To actually use the board as OpenDeck device, connect the micro USB cable to the board. More info about using this board without mini USB cable is available here.