
I came across @matklad's blog post where he mentions that one of the best ways to learn a programming language is by writing a ray tracer - so I decided to give it a shot.
He links to Build Your Own 3D Renderer by Avik Das, a guide aimed at people who aren’t super confident with the math side of things. It’s a great resource for looking up the necessary formulas. I initially planned to just skim it… but ended up following the entire guide.
This project had 6 main steps:
-
Clone the project repo
I skipped this since I wanted to build everything from scratch. -
Represent a 3D vector
Implemented aVectorstruct with several methods (e.g., addition, subtraction, dot product). -
Represent the image plane and camera
Defined 4 corner vectors for the image plane and a camera vector behind it. -
Determine where to cast rays
Used linear interpolation to find points across the image plane. -
Represent a ray
Modeled a ray by subtracting the camera position from each image plane point. -
Visualize the rays
This was the trickiest step. I used the image crate and wrote a loop to color each pixel in a256x192image, generating a nice gradient based on ray direction.
This was the result:

This one had 4 steps:
-
Add spheres to the world
Implemented aSpherestruct with two fields:center(aVector) andradius. -
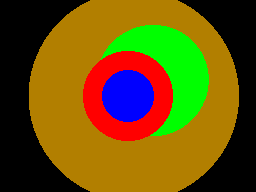
Add color to the spheres
Added a third field -color(a tuple with threef32values). -
Perform ray-sphere intersection tests
This was the challenging step. I got stuck for over an hour because of a bug in thelengthmethod I added to theVectorstruct. Once fixed, I looped through all objects for each ray and picked the first one it intersected. -
Figure out which sphere a ray sees
After getting the math right, I just had to return the color of the closest intersecting sphere.
And the result was... this!
-
Add lights to the world
Implemented aLightsstruct with three fields:location,diffuse_int, andspecular_int, and added some lights to the scene. -
Add materials to spheres
Added amaterialfield to theSpherestruct with multiple light-related properties. -
Calculate the point of intersection and surface normal
Wrote two lines to calculatep_intersectandsurf_normal. -
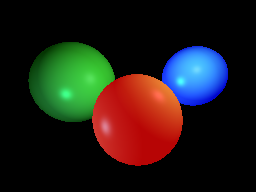
Calculate the ambient term
Straightforward implementation. -
Calculate the diffuse term
Involved a few additional formulas. -
Calculate the specular term
Slightly larger formulas, but nothing too complex. -
Clamp the resulting color
Combined all the lighting terms with the sphere color and clamped the result to the range [0, 1].And this was the result:
-
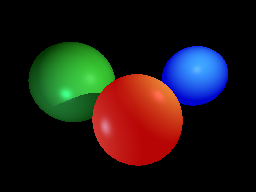
Cast shadow rays at each intersection point
Castedshadow_rays for every light from every intersection with a sphere -
Determine if a sphere is in shadow from a light
Did another for loop through spheres to see if theshadow_rayinteresects one and is casting a shadowWhew, this was short, but had some trouble with the second step:
-
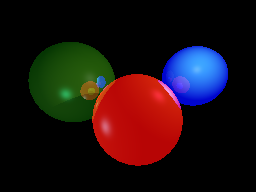
Model the reflectivity of a material
Added reflectivity constant to thematerialstruct -
Determine if a sphere is in shadow from a light
Packed the color creating part intoray_tracerfunction that takes ascene,ray,originvector and now added recursiondepthand made the function recursive -
Calculate the reflectance vector Did a little formula to calculate the reflectance vector
-
Recursively apply the ray tracing algorithm Ran the algorithm recursively for every ray coming from the camera
The recursion part took a little effort, but not too crazy:
-
Calculate multiple points within one pixel boundary
Created aSamplePatternenum with three common anti-aliasing parameters and tuples including the logic to split the pixel into multiple parts -
Average the results of the samples
Ran theray_tracerfor every pixel part, summed the resulingColorand divided it by the number of points to get the averageThe spheres are now more smooth with 9 SSAA:

Adding Anti-Aliasing was the last project in the guide, so I am free sailing now.
The last three projects added a lot of iterations and recursive calls making the algorithm much slower now.
But how much slower?
At the original resolution of 256×192, I didn’t notice any real difference - Rust is too fast.
To stress test the renderer, I increased the resolution to 2048×1536 (still a 4:3 aspect ratio) and ran a benchmark using hyperfine:
hyperfine 'cargo run'
Benchmark 1: cargo run
  Time (mean ± σ):     27.503 s ±  0.183 s    [User: 13.766 s, System: 0.257 s]
  Range (min … max):   27.360 s … 27.995 s    10 runs
That is 27ish seconds on average.
So in this step I was looking at multi-threading libraries and decided to go with rayon.
The issue that I had was that I originally created an image buffer and was iteratevely inserting each pixel in it.
This didn't work with multi-threading due to data race issues. Can't update the same image at the same time...
So instead I created a pixels: Vec<(u32, u32, Color)> that I concurrently populated with coordinates and color values.
Then I pushed them into the image buffer and Voila!
But what are the results?
Ta-da!
hyperfine 'cargo run'
Benchmark 1: cargo run
  Time (mean ± σ):      3.532 s ±  0.122 s    [User: 36.679 s, System: 0.132 s]
  Range (min … max):    3.382 s …  3.820 s    10 runs
We dropped from 27.5 to 3.5 seconds on average. That is almost 8 times better. Because I have 8 cores, I wanted to say... But I actually have 12 on the machine I made the benchmark. But still good.
Wanted to finish the performance-optimization part for closure, finally finishing this project to be able to fully focus on something else.