


Production-grade AI agents defined in YAML, powered by LangGraph, deployed on Databricks.


DAO is an infrastructure-as-code framework for building, deploying, and managing multi-agent AI systems. Instead of writing boilerplate Python code to wire up agents, tools, and orchestration, you define everything declaratively in YAML configuration files.
# Define an agent in 10 lines of YAML
agents:
  product_expert:
    name: product_expert
    model: *claude_sonnet
    tools:
      - *ai_search_tool
      - *genie_tool
    prompt: |
You are a product expert. Answer questions about inventory and pricing.New to DAO? Start with the DAO AI Workshop — a self-paced, hands-on workshop that takes you from zero to a deployed, governed multi-agent system. Designed for solution architects, data engineers, and analysts, it's organized as L100 → L200 → L300 with lectures and lab notebooks covering:
- Tool use — Unity Catalog SQL functions and managed MCP servers
- NL-to-SQL with Genie Spaces
- Vector search, memory, and chat-history summarization
- Prompts + guardrails and multi-agent orchestration
By the end you'll have built, tested, and deployed a multi-agent system — all defined in YAML and running as a Databricks App.
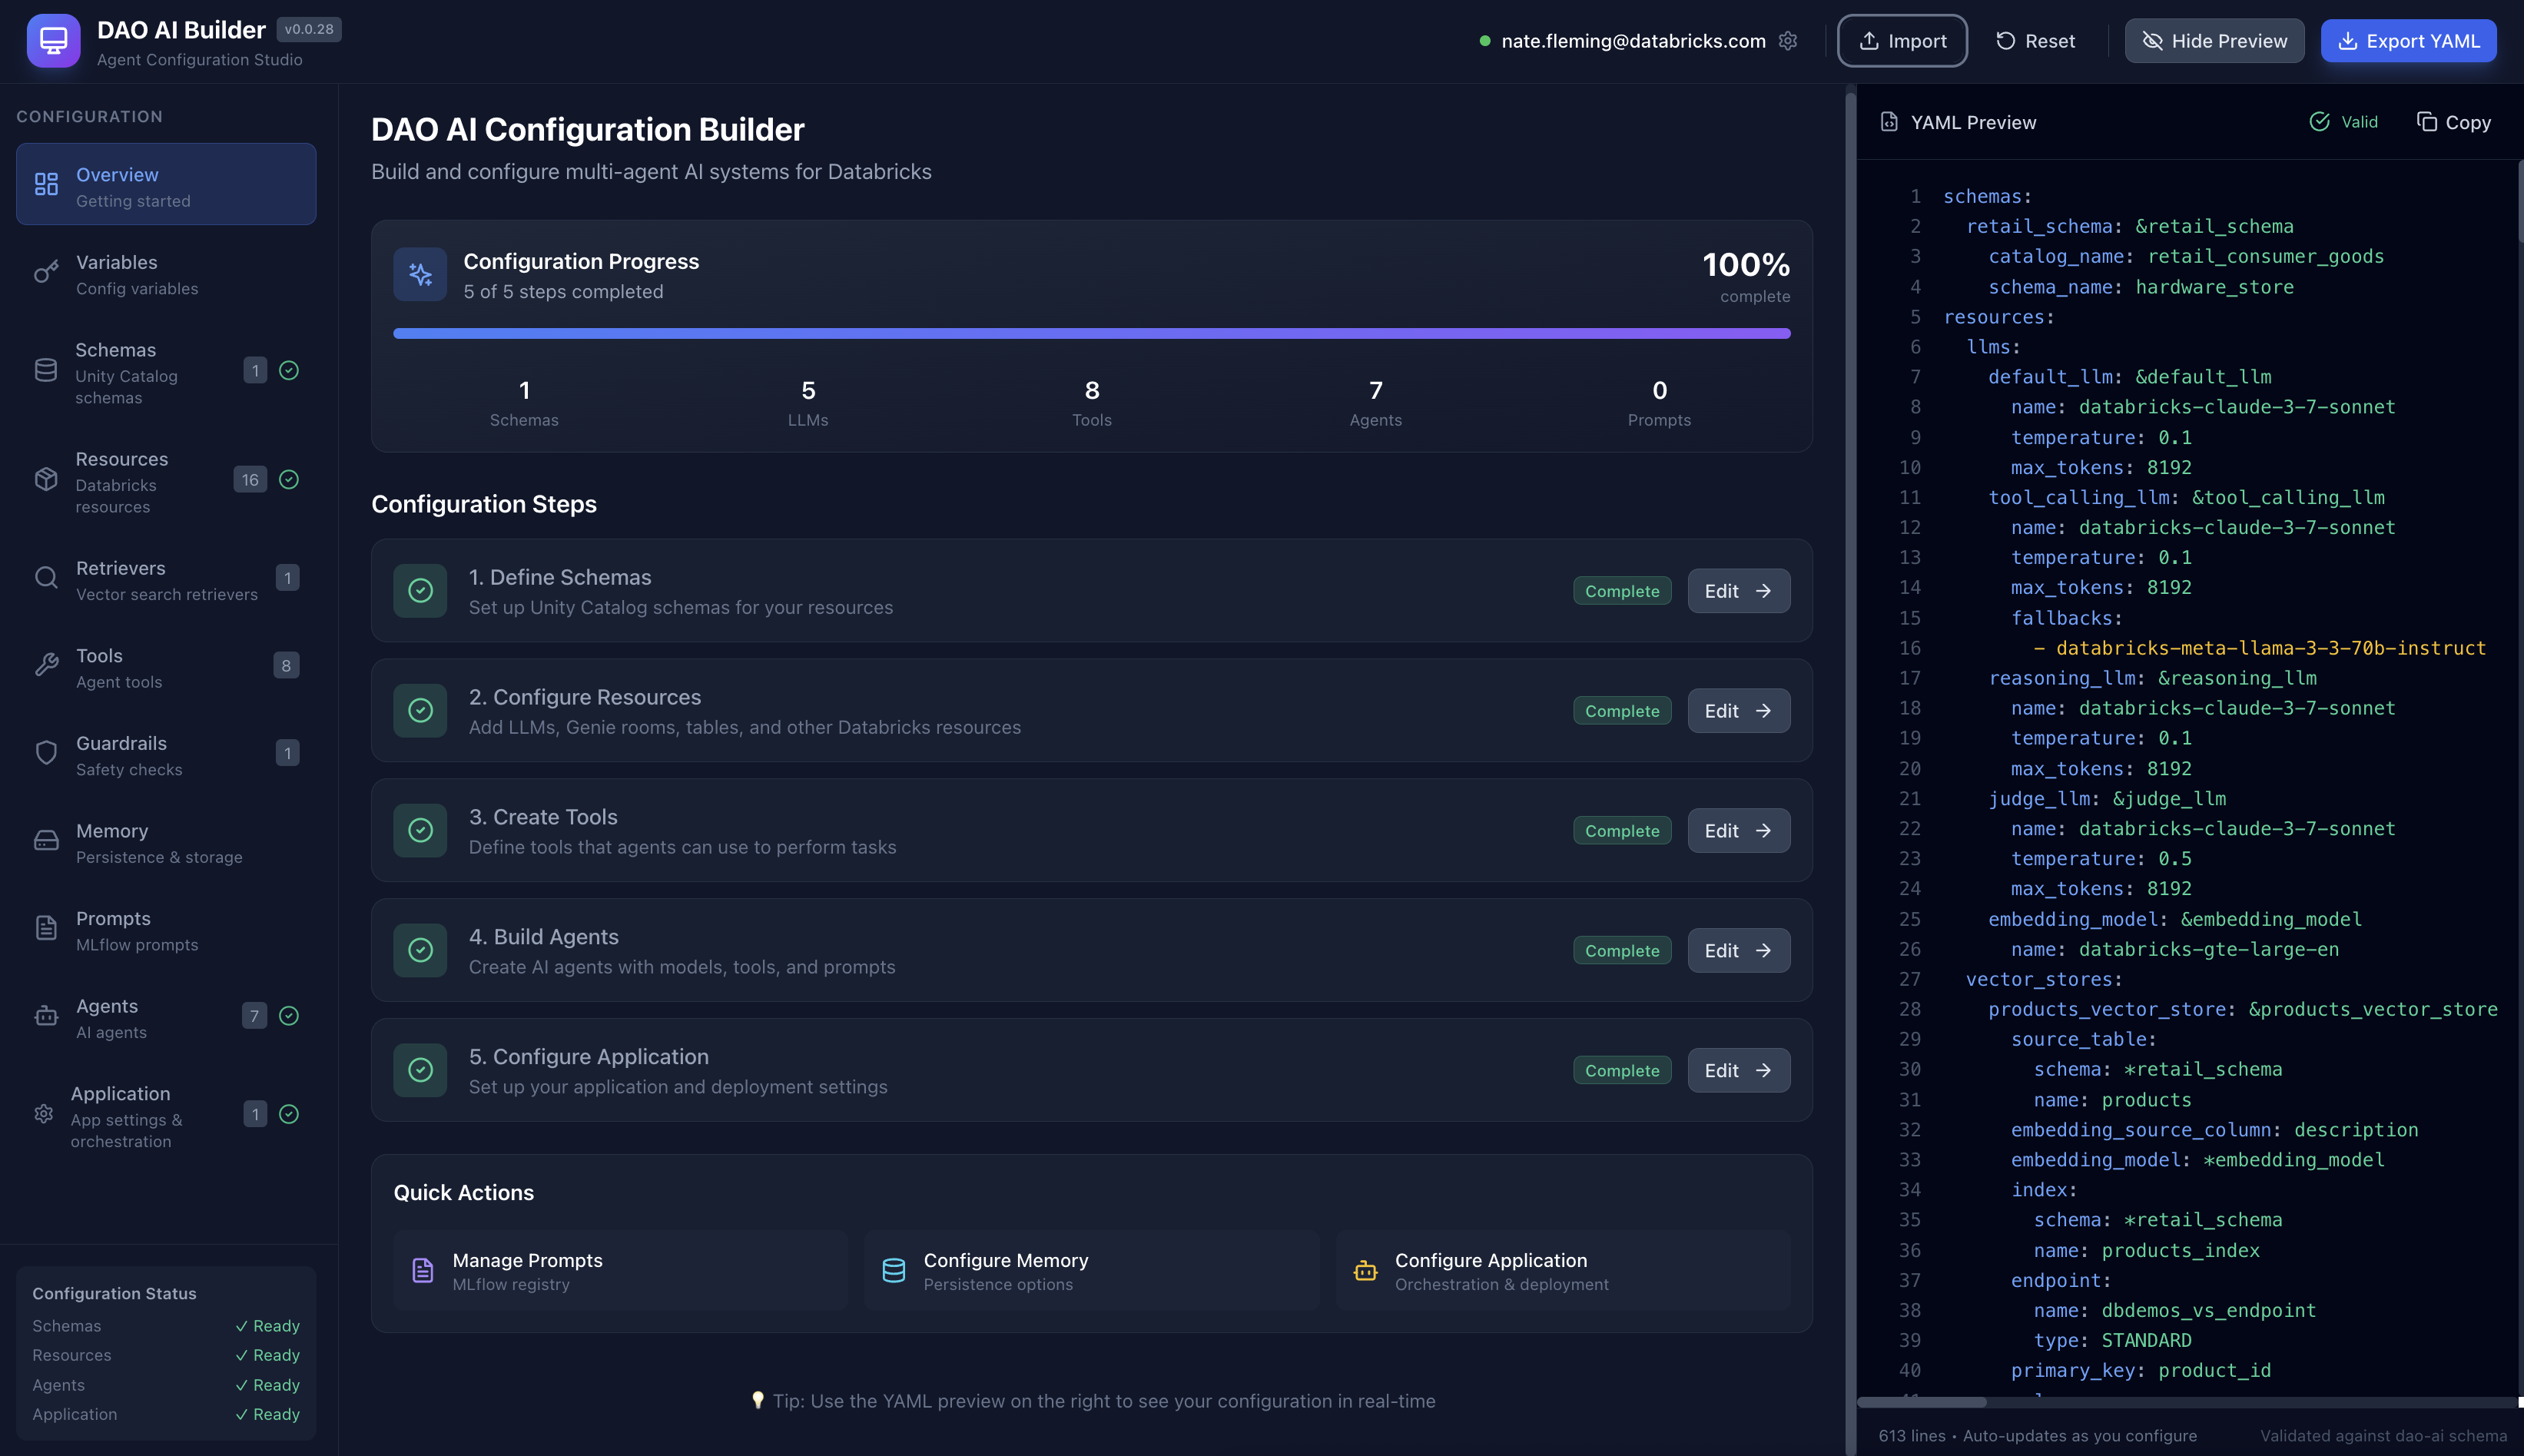
Prefer a visual interface? Check out DAO AI Builder — a React-based web application that provides a graphical interface for creating and editing DAO configurations. Perfect for:
- Exploring DAO's capabilities through an intuitive UI
- Learning the configuration structure with guided forms
- Building agents visually without writing YAML manually
- Importing and editing existing configurations
DAO AI Builder generates valid YAML configurations that work seamlessly with this framework. Use whichever workflow suits you best — visual builder or direct YAML editing.
- Why DAO? - Learn what DAO is and how it compares to other platforms
- Quick Start - Build and deploy your first agent in minutes
- Architecture - Understand how DAO works under the hood
- Key Capabilities - Explore 20 powerful features for production agents
- Configuration Reference - Complete YAML configuration guide
- Examples - Ready-to-use example configurations
- A2A Protocol - Google Agent2Agent endpoints on every Apps deployment
- MCP Server - Expose a dao-ai agent as a single MCP tool via
dao-ai agent build --as-mcp— for integrating dao-ai into external agent frameworks (Claude Desktop, Cursor, MAS, ADK, etc.) - Background Agents - kickoff/poll/cancel for multi-minute graph runs
- Auditable Tool Invocations - Tamper-evident approval receipts + agent-driven audit-trail queries (SOX / SOC2 / HIPAA-ready)
- CLI Reference - Command-line interface documentation
- Python API - Programmatic usage and customization
- FAQ - Frequently asked questions
- Contributing Guide - How to contribute to DAO

Before you begin, you'll need:
- Python 3.12 or newer installed on your computer (download here)
- A Databricks workspace (ask your IT team or see Databricks docs)
- Access to Unity Catalog (your organization's data catalog)
- Model Serving or Databricks Apps enabled (for deploying AI agents)
- Optional: AI Search (formerly Vector Search), Genie (for advanced features)
Not sure if you have access? Your Databricks administrator can grant you permissions.
Requires Python 3.12 or newer.
Option 1: Install from PyPI (Recommended)
Follow these five steps in order. Copy each command exactly.
Step 1 — Check your Python version. Open a terminal (Mac: Terminal.app; Windows: PowerShell; Linux: your terminal) and run:
python3 --version- You should see
Python 3.12.xor newer. - If you see
Python 3.11.xor older, or you get an error, install a newer Python from https://www.python.org/downloads/ before continuing. - Python 3.13 and 3.14 are supported only when using
uv(Step 2). Standardpipmay fail on 3.13+ with a "resolution exceeded maximum depth" error because dao-ai's dependency graph is deep.
Step 2 — Install uv (a fast Python package installer). uv is required because it can resolve dao-ai's dependencies on any recent Python version.
# Mac / Linux:
curl -LsSf https://astral.sh/uv/install.sh | sh

# Windows (PowerShell):
powershell -c "irm https://astral.sh/uv/install.ps1 | iex"
Close and reopen your terminal so uv is on your PATH, then verify:
uv --versionYou should see something like uv 0.11.x or newer.
Step 3 — Create a project folder and virtual environment. A virtual environment isolates dao-ai from other Python projects on your machine.
mkdir dao-ai-project
cd dao-ai-project
uv venv
uv venv prints a line like Using CPython 3.12.3 — uv picks a Python for you from whatever is available on your machine. Any 3.12 or newer is fine; it may differ from the version you saw in Step 1.
Then activate it:
# Mac / Linux:
source .venv/bin/activate

# Windows (PowerShell):
.venv\Scripts\Activate.ps1
You should see (dao-ai-project) or (.venv) at the start of your terminal prompt.
Step 4 — Install dao-ai.
uv pip install dao-aiThis downloads and installs dao-ai plus its dependencies (~230 packages). It typically finishes in under a minute.
Step 5 — Verify the install.
dao-ai versionYou should see output that starts with a version line, e.g.:
dao-ai 0.2.4
  Published: True
  Python:    3.12.x   (whichever 3.12+ `uv venv` picked in Step 3)
  Platform:  ...
  Dependencies:
    mlflow: ...
    langchain-core: ...
    langgraph: ...
    langchain: ...
    databricks-sdk: ...
If you see a version number and a dependency list, dao-ai is installed correctly. Continue to "Your First Agent" below.
Optional feature extras. A plain uv pip install dao-ai is all you need to
build and deploy agents. Some features pull in heavier dependency trees that are
gated behind extras so the base install stays lean — install only the ones your
config uses (the deploy path auto-selects the right extras into generated bundles;
at runtime a missing extra raises a friendly install dao-ai[<extra>] error):
| Extra | Adds | Install |
|---|---|---|
mcp |
FastAPI + Uvicorn for the MCP-server App | uv pip install "dao-ai[mcp]" |
a2a |
Google Agent2Agent (A2A) protocol endpoints | uv pip install "dao-ai[a2a]" |
rerank |
FlashRank reranking for AI Search / RAG | uv pip install "dao-ai[rerank]" |
deepagents |
Deep Agent orchestration (todo, filesystem, sub-agents, skills) | uv pip install "dao-ai[deepagents]" |
memory |
Long-term memory via langmem | uv pip install "dao-ai[memory]" |
search |
Web search tool | uv pip install "dao-ai[search]" |
excel |
Excel (.xlsx) file support via openpyxl |
uv pip install "dao-ai[excel]" |
databricks |
databricks-connect for local Model Serving deploys |
uv pip install "dao-ai[databricks]" |
all |
Every runtime feature extra above | uv pip install "dao-ai[all]" |
Option 2: For developers familiar with Git
# Clone this repository
git clone <repo-url>
cd dao-ai

# Create an isolated Python environment
uv venv
source .venv/bin/activate  # On Windows: .venv\Scripts\activate

# Install DAO and its dependencies
make install
Option 3: For those new to development
- Download this project as a ZIP file (click the green "Code" button on GitHub → Download ZIP)
- Extract the ZIP file to a folder on your computer
- Open a terminal/command prompt and navigate to that folder
- Run these commands:
# On Mac/Linux:
python3 -m venv .venv
source .venv/bin/activate
pip install -e .

# On Windows:
python -m venv .venv
.venv\Scripts\activate
pip install -e .
Verification: Run dao-ai --version to confirm the installation succeeded.
Why Python 3.12+? On Python 3.11, uv cannot install a recent pyarrow (25.x) — a
transitive dependency. Its cp311 wheel trips a uv wheel-parsing bug (Metadata field Name not found, or Invalid Wheel-Version in WHEEL file: None on newer uv) that upgrading uv
does not fix. Python 3.12 uses a different wheel that installs cleanly, so dao-ai requires
3.12+. This also matches where dao-ai runs on Databricks — serverless environment version 5
(Python 3.12.3) and Model Serving.
SyntaxError: source code string cannot contain null bytes (e.g. when importing
langgraph). A dependency file on disk is physically corrupted — usually the leftover of an
interrupted or failed install, not a dao-ai bug. Rebuild the environment cleanly:
# Mac / Linux (adjust paths for Windows):
rm -rf .venv
uv cache clean
uv venv                 # picks a 3.12+ interpreter
source .venv/bin/activate
uv pip install dao-ai # or `make install` in a cloned repoLet's build a simple AI assistant in 4 steps. This agent will use a language model from Databricks to answer questions.
Step 1: Create a configuration file
Create a new file called config/my_agent.yaml and paste this content:
schemas:
  my_schema: &my_schema
    catalog_name: my_catalog        # Replace with your Unity Catalog name
    schema_name: my_schema          # Replace with your schema name

resources:
  models:
    default_llm: &default_llm
      name: databricks-gpt-5-4-mini  # The AI model to use

agents:
  assistant: &assistant
    name: assistant
    model: *default_llm
    prompt: |
      You are a helpful assistant.

app:
  name: my_first_agent
  registered_model:
    schema: *my_schema
    name: my_first_agent
  agents:
    - *assistant
  orchestration:
    swarm:
      default_agent: *assistant
💡 What's happening here?
schemas: Points to your Unity Catalog location (where the agent will be registered)resources: Defines the AI model (databricks-gpt-5-4-miniin this case)agents: Describes your assistant agent and its behaviorapp: Configures how the agent is deployed and orchestrated
Step 2: Validate your configuration
This checks for errors in your YAML file:
dao-ai validate -c config/my_agent.yamlYou should see: ✅ Configuration is valid!
Step 3: Visualize the agent workflow (optional)
Generate a diagram showing how your agent works:
dao-ai graph -c config/my_agent.yaml -o my_agent.pngThis creates my_agent.png — open it to see a visual representation of your agent.
Step 4: Deploy to Databricks
Option A: Using Python (programmatic deployment)
from dao_ai.config import AppConfig

# Load your configuration
config = AppConfig.from_file("config/my_agent.yaml")

# Package the agent as an MLflow model
config.create_agent()

# Deploy to Databricks Model Serving
config.deploy_agent()
Option B: Using the CLI (one command)
dao-ai agent up -c config/my_agent.yamlThis single command:
- Validates your configuration
- Packages the agent
- Deploys it to Databricks
- Starts the deployed agent
Deploying to a specific workspace:
# Deploy to AWS workspace
dao-ai agent up -c config/my_agent.yaml --profile aws-field-eng

# Deploy to Azure workspace
dao-ai agent up -c config/my_agent.yaml --profile azure-retail
The bundle commands are verb-under-noun —
dao-ai <agent|workflow> <up|build|sync|start|down>. The verbs are plain-language names for the DAB lifecycle:buildbuilds the bundle (inspect / hand-edit),syncpushes it to the workspace (bundle deploy— does not start it;agent syncauto-builds if nothing is staged,workflow syncrequires a priorbuild/up),startmakes it live (bundle run— no re-sync: starts the app / runs the job), anddowntears it down.upis the idempotent one-command path: build (if unchanged, skipped) → sync (convergent re-sync) → start — safe to re-run. Use--as-mcpon theagentnoun to build the MCP-server App instead, or--mode model_servingfor a Model Serving endpoint. The old flatgenerate-agent,generate-mcp,generate-workflow, anddao-ai mcpcommands — the pre-v3generate/deploy/run/destroyverbs — and the one-shotgenerate --deploy/--runflags — have been removed. See the migration table.
Step 5: Interact with your agent
Once deployed, you can chat with your agent using Python:
from mlflow.deployments import get_deploy_client

# Connect to your Databricks workspace
client = get_deploy_client("databricks")

# Send a message to your agent
response = client.predict(
    endpoint="my_first_agent",
    inputs={
        "messages": [{"role": "user", "content": "Hello! What can you help me with?"}],
        "configurable": {
            "thread_id": "1",           # Conversation ID
            "user_id": "demo_user"      # User identifier
        }
    }
)

# Print the agent's response
print(response["message"]["content"])
🎉 Congratulations! You've built and deployed your first AI agent with DAO.
Next steps:
- Explore the
examples/folder for more advanced configurations - Try the DAO AI Builder visual interface
- Learn about Key Capabilities to add advanced features
- Read the Architecture documentation to understand how it works
Make one YAML re-usable across catalogs, schemas, environments, and users by declaring parameters: and referencing them with ${param.NAME} (or its alias ${var.NAME}). The config can also reference workspace context (host, current user) using the same ${workspace.*} namespace as Databricks Asset Bundles.
parameters:
  catalog:
    description: Unity Catalog catalog name
    default: main
  genie_parent_path:
    description: Workspace folder for the Genie space
    default: "/Users/${workspace.current_user.userName}/genie"

schemas:
  s:
    catalog_name: ${param.catalog}
    schema_name: dao_ai

genie_rooms:
  ops:
    parent_path: ${param.genie_parent_path}
    workspace_url: ${workspace.host}
Supported workspace references (match the DABs convention):
${workspace.host}— workspace URL, no trailing slash${workspace.current_user.userName}— full email${workspace.current_user.short_name}— email prefix, dots intact${workspace.current_user.domain_friendly_name}— email domain
Override declared parameters at runtime, or inspect them:
dao-ai chat -c dao_ai.yaml --param catalog=nfleming
dao-ai parameters list -c dao_ai.yaml      # see all declared parameters + resolved workspace values
dao-ai vars and --var remain as aliases for backwards compatibility.
Full reference: Parameters (Load-Time Substitution).

DAO provides powerful capabilities for building production-ready AI agents:
| Feature | Description |
|---|---|
| Dual Deployment Targets | Deploy to Databricks Model Serving or Databricks Apps with a single config |
| Long-Running Agents | OpenAI Responses API–compatible background kickoff + poll / stream retrieve backed by Lakebase; survives Model Serving's 5 min worker timeout and Databricks Apps' 120 s proxy timeout |
| Multi-Tool Support | Python functions, Unity Catalog, MCP, Agent Endpoints |
| Orchestration Patterns | Supervisor, Swarm, Deep Agent (langgraph deepagents — todo, filesystem, shell, sub-agents, skills, AGENTS.md memory) |
| On-Behalf-Of User | Per-user permissions and governance |
| Advanced Caching | Two-tier (LRU + Semantic) caching for cost optimization |
| AI Search Reranking | Improve RAG quality with FlashRank |
| Human-in-the-Loop | Approval workflows for sensitive operations |
| Auditable Tool Invocations | Tamper-evident approval receipts to Lakebase — args-hash bound, fail-closed on drift, hash-chained per thread. See docs/audit.md |
| Memory & Persistence | Long-term memory with structured schemas, background extraction, auto-injection; PostgreSQL, Lakebase, or in-memory backends |
| Reusable Prompts | Define prompts once as first-class config objects and reference them across agents via YAML anchors |
| Guardrails | Content filters, safety checks, validation |
| Middleware | Input validation, logging, performance monitoring, audit trails |
| Conversation Summarization | Handle long conversations automatically |
| Structured Output | JSON schema for predictable responses |
| Custom I/O | Flexible input/output with runtime state |
| Hook System | Lifecycle hooks for initialization and cleanup |
👉 Learn more: Key Capabilities Documentation

👉 Learn more: Architecture Documentation
The examples/ directory contains ready-to-use configurations organized in a progressive learning path:
01_getting_started/minimal.yaml- Simplest possible agent02_tools/vector_search_with_reranking.yaml- RAG with improved accuracy04_genie/genie_context_aware_cache.yaml- NL-to-SQL with PostgreSQL context-aware caching04_genie/genie_in_memory_context_aware_cache.yaml- NL-to-SQL with in-memory context-aware caching (no database)05_memory/conversation_summarization.yaml- Long conversation handling06_on_behalf_of_user/obo_basic.yaml- User-level access control07_human_in_the_loop/human_in_the_loop.yaml- Approval workflows07_human_in_the_loop/human_in_the_loop_audited.yaml- HITL with tamper-evident audit receipts
And many more! Follow the numbered path or jump to what you need. See the full guide in Examples Documentation.
# Validate configuration
dao-ai validate -c config/my_config.yaml

# Generate JSON schema for IDE support
dao-ai schema > schemas/model_config_schema.json

# Visualize agent workflow
dao-ai graph -c config/my_config.yaml -o workflow.png

# Generate + deploy + start a Databricks Apps bundle in one command
dao-ai agent up -c config/my_config.yaml -p <profile>

# Provision backing infra (Vector Search, Lakebase, Genie…) then deploy + run the agent
dao-ai workflow up -c config/my_config.yaml

# Deploy to a specific workspace (multi-cloud support)
dao-ai agent up -c config/my_config.yaml --profile aws-field-eng
dao-ai agent up -c config/my_config.yaml --profile azure-retail

# Re-deploy the already-staged bundle without regenerating (retry a transient failure)
dao-ai agent sync -c config/my_config.yaml -p <profile>

# Interactive chat with agent
dao-ai chat -c config/my_config.yaml

# Inspect declared parameters and resolved values
dao-ai parameters list -c config/my_config.yaml --param catalog=nflemingdao-ai agent build produces a deploy-ready Databricks Apps bundle: databricks.yaml, the app resource YAML (with the agent's UC resource wiring), a pyproject.toml, a portable uv.lock, and a copy of your config. The Apps build phase installs dependencies by running uv sync --locked --no-dev from the pyproject + lock (no requirements.txt — it would take precedence and force the slower pip path). The lock's internal-mirror URLs are rewritten to the public CDN so it resolves from Apps containers.
The simplest path is up (build + bundle deploy + trace-link/grant + bundle run):
dao-ai agent up -c config/my_config.yaml -p <profile>Or build first, optionally hand-edit the staged files, then ship exactly what's on disk with the sync verb, and make it live with start:
dao-ai agent build -c config/my_config.yaml -s ./my-bundle
# (optionally hand-edit ./my-bundle)
dao-ai agent sync -c config/my_config.yaml -s ./my-bundle -p <profile>
dao-ai agent start    -c config/my_config.yaml -s ./my-bundle -p <profile>

# ...or drive the bundle by hand
cd ./my-bundle
databricks bundle deploy -t dev -p <profile>
databricks bundle run <app-name> -t dev -p <profile>
The generated pyproject.toml pins dao-ai[<extras>]==<version> (published mode) so the deploy is reproducible, or redirects dao-ai to the bundled local wheel via [tool.uv.sources] under --development; either way uv lock captures the full closure into uv.lock. The app runtime command is bare python -m dao_ai.apps.start_app (chat-proxy variant) or python -m dao_ai.apps.server (no chat UI).
Pre-publish note: published-mode lock generation resolves
dao-ai==<version>from PyPI, so it only works once that version is published (locks are generated at release time in CI). For local/pre-release iteration use--development, which locks against the bundled wheel and works anytime.
MLflow's default control-plane trace export does not work on Databricks Apps today: the artifact-storage host (us-east-1.storage.cloud.databricks.com) is unreachable from App containers, so trace spans are silently dropped (you'll see WARNING mlflow.tracing.export.mlflow_v3: ... Connection refused in the App logs). To capture traces, set app.trace_location in your config so traces export through a SQL warehouse → UC OTEL tables (reachable from Apps):
app:
  name: my_app
  # ...
  trace_location:
    schema: *retail_schema                   # reference an existing SchemaModel anchor
    warehouse: "your-warehouse-id"           # or a *warehouse anchor
When trace_location is set, agent generate automatically attaches the SQL warehouse as an App resource (with CAN_USE for the App SP) and adds MLFLOW_TRACING_SQL_WAREHOUSE_ID to the App's env. The OTEL trace tables themselves are auto-created by MLflow at first trace write — dao-ai does not emit per-table grants because the tables don't exist at deploy time and the Apps platform would reject the bundle. After deploy, grant the App SP schema-level privileges so MLflow can create + write to the OTEL tables (one-time setup):
SP=$(databricks apps get <app-name> -p <profile> --output json | jq -r .service_principal_client_id)
databricks grants update catalog <catalog> -p <profile> \
  --json "{\"changes\":[{\"principal\":\"$SP\",\"add\":[\"USE_CATALOG\"]}]}"
databricks grants update schema <catalog>.<schema> -p <profile> \
  --json "{\"changes\":[{\"principal\":\"$SP\",\"add\":[\"USE_SCHEMA\",\"CREATE_TABLE\",\"MODIFY\",\"SELECT\"]}]}"
Run dao-ai trace link between bundle deploy and bundle run so the UC linkage is established from your machine on a fresh (0-traces) experiment — the app's own runtime link attempt is rejected on re-deploys with already contains traces, which causes silent trace loss. agent generate prints a one-line reminder in its "Next steps" when trace_location is set. See docs/cli-reference.md#trace-commands for details, including the migration playbook (Databricks does not allow un-linking or changing a UC destination once set — moving traces to a different catalog / schema / table_prefix requires a fresh experiment).
When trace_location is unset, agent generate emits a loud warning. Local notebook/CLI runs and Model Serving deploys are unaffected and continue to use the default control-plane path. See examples/01_getting_started/ai_gateway.yaml for a commented example.
DAO AI supports deploying to Azure, AWS, and GCP workspaces with automatic cloud detection:
# Deploy to AWS workspace
dao-ai workflow up -c config/my_config.yaml --profile aws-prod

# Deploy to Azure workspace
dao-ai workflow up -c config/my_config.yaml --profile azure-prod

# Deploy to GCP workspace
dao-ai workflow up -c config/my_config.yaml --profile gcp-prod
The CLI automatically:
- Detects the cloud provider from your profile's workspace URL (pass
--cloud {aws|azure|gcp}if it can't be detected) - Selects appropriate compute node types for each cloud
- Creates isolated deployment state per profile
👉 Learn more: CLI Reference Documentation
- Documentation: docs/
- Examples: examples/
- Issues: GitHub Issues
- Discussions: GitHub Discussions

We welcome contributions! See the Contributing Guide for details on:
- Setting up your development environment
- Code style and testing guidelines
- How to submit pull requests
- Project structure overview
This project is licensed under the MIT License - see the LICENSE file for details.