-
Notifications
You must be signed in to change notification settings - Fork 0
Part 3: DDA raycasting
In Part 2, we discussed the naive approach to raycasting, where rays were cast in small increments until they hit a wall. However, this approach has significant performance drawbacks due to the number of calculations per ray and the risk of missing walls altogether.
To improve both the speed and accuracy of our raycasting, we use the Digital Differential Analyzer (DDA) algorithm. The key idea behind DDA is that instead of incrementally moving the ray by a fixed distance, we calculate the exact distance needed to move to the next horizontal or vertical grid line.
We will once again loop through every screen column every frame:
for (int16_t screenCol = 0; screenCol < SCREEN_WIDTH; screenCol++)
{
// ...
}
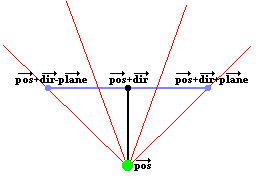
We need to convert X coordinate of our camera (current screen column) to screen space:
float cameraX = 2 * screenCol / static_cast<float>(SCREEN_WIDTH) - 1;Then, we calculate our ray vector. On the image, we can see rays when cameraX is -1, 0 and 1. Ray vector direction will tell us the direction of every next step (towards pos/neg X, pos/neg Y). We will also need the informate whether the ray hit a tile horizontally or vertically later.
Vec2f rayDir = { dir.x + cameraPlane.x * cameraX,
                 dir.y + cameraPlane.y * cameraX };
Vec2 step = { rayDir.x > 0 ? 1 : -1,
              rayDir.y > 0 ? 1 : -1 };
bool isHitVertical = false;
We will not use the distance of this ray vector in our algorithm, we only care about its direction. However, we will define deltaFactor. deltaFactor.x tells us the scalar by which we have to scale rayDir that its x-component will be 1 (since we will move by 1 tile horizontally at a time), Similarly, deltaFactor.y scales rayDir so that its y-component becomes 1 to help us move vertically one tile at a time.
We will not use any absolute vector magnitudes, we really only need to know the (relative) scaling factors.
Vec2f deltaFactor = { std::abs(1.0f / rayDir.x), std::abs(1.0f / rayDir.y) };Now, we need to figure out by what scalar factor we need to travel along ray direction from player position to first horizontal edge and first vertical edge.
Vec2f sideDist = {};
sideDist.x = rayDir.x > 0 ? (tile.x - playerPos.x + 1.0f) * deltaFactor.x : (playerPos.x - tile.x) * deltaFactor.x;
sideDist.y = rayDir.y > 0 ? (tile.y - playerPos.y + 1.0f) * deltaFactor.y : (playerPos.y - tile.y) * deltaFactor.y;
Now our DDA algorithm has all the information it needs that we can take one step at a time until we hit a wall. We are going to continuously move horizontally and vertically (whichever has overall shorter ray scaling factor will be the next step).
Vec2f totalDist = sideDist;
while (true)
{
    assert(tile.x >= 0 && tile.x < mapSize && tile.y >= 0 && tile.y < mapSize && "Map layout must be closed off at edges!");
    if (totalDist.x < totalDist.y)
    {
        totalDist.x += deltaFactor.x;
        tile.x += step.x;
        isHitVertical = false;
    }
    else
    {
        totalDist.y += deltaFactor.y;
        tile.y += step.y;
        isHitVertical = true;
    }
    wallType = MAP[tile.x + tile.y * MAP_SIDE];
    if (wallType != 0)
    {
        break;
    }
}
While loop will break when we find collision. We will subtract one tile, because collision actually happens at the edge of the wall (position + size of tile).
float distance = isHitVertical ? totalDist.y - deltaFactor.y : totalDist.x - deltaFactor.x;
int16_t wallHeight = static_cast<int>(floor(SCREEN_HEIGHT / fmax(distance, 1.0)));
float collisionAt = isHitVertical ? playerPos.x + rayDir.x * distance : playerPos.y + rayDir.y * distance;
collisionAt = collisionAt - floor(collisionAt); // [0.0f, 1.0f]
From distance we can also calculate brightness factor. At distance 1 it will be maximum (1.0), across whole map it will be almost completely dark (~0.0).
float brightness = (((mapSize + 1) - distance) / mapSize) * (((mapSize + 1) - distance) / mapSize);Now we are ready to call our function drawVLine to draw a vertical line representing slice of the wall.
int16_t rectY = SCREEN_HEIGHT / 2 - wallHeight / 2;
drawVLine(
    texData,
    fb,
    touchgfx::Rect{ screenCol, rectY, 1, wallHeight },
    wallType,
    collisionAt,
    brightness
);From here, drawing vertical lines is very straighforward. We just need to get appropriate wall texture from texture atlas and scale it, which will be explained in Part 4.
void Raycaster::drawVLine(const uint16_t* texFb, uint16_t* fb, touchgfx::Rect destRect, uint8_t wallType, float collisionAt, float brightness)
{
    assert(texFb != nullptr && fb != nullptr && "Invalid src/dest buffer");
    assert(destRect.x < SCREEN_WIDTH && "Invalid coordinates");
    assert(destRect.y + destRect.height <= SCREEN_HEIGHT && destRect.height > 0 && "Invalid height");
    auto texRect = getMapRect(wallType);
    texRect.x += static_cast<int>(collisionAt * texRect.width);
    Picture::copySrcDestRect(
	        texFb,
		fb,
		Vec2{TEXTURE_ATLAS_SIDE, TEXTURE_ATLAS_SIDE},
		Vec2{SCREEN_WIDTH, SCREEN_HEIGHT},
		texRect,
		destRect,
                brightness
    );
}In-depth explanation of efficient DDA raycasting algorithm. (Explanation images of grid taken from there)
