![]()
FM Transmitter Web UI and Controls Built with Python and Bash
Report a Bug
·
Request a Feature
Table of Contents
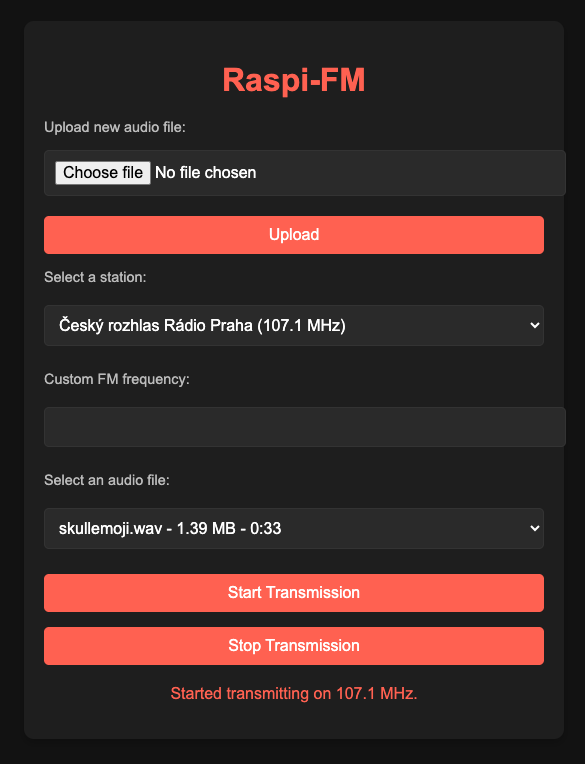
Raspi-FM is a lightweight and user-friendly FM transmitter project based on the fm_transmitter app made by markondej that makes it possible to broadcast an FM audio signal.
- Web Interface: Control the FM transmitter via a browser by connecting to the Wi-Fi AP and accessing
http://192.168.4.1:5000. - Audio Playback: Select audio files to play on the FM transmitter.
- Custom Frequency: Set the desired FM frequency for broadcasting.
- Predefined Stations: Choose from a list of all Prague FM stations (I want to add custom stations list option)
The installation process can take over 15 minutes, so please be patient.
To install Raspi-FM, run the following command on your Raspberry Pi::
curl -fsSL https://raw.githubusercontent.com/jsem-nerad/raspi-fm/refs/heads/main/install.sh | sudo bashI tested this only on my Pi Zero W, but it should work on most Raspberry Pi models with Wi-Fi, except the Pi 5 and Pi 4.
After successful installation:
- Connect to the Pi using WiFi. You should see the SSID
raspi-fm, which you can connect to using the passwordflipfmsignal. - Then open your web browser and go to its default IP address on port 5000:
http://192.168.4.1:5000 - If you experience issues connecting to Wi-Fi or accessing its IP address, try turning off your mobile data (if you are using a phone) and/or disabling auto-connect for known nearby Wi-Fi networks.
- Now you can choose a frequency, select an audio file, and click 'Start Transmission'.
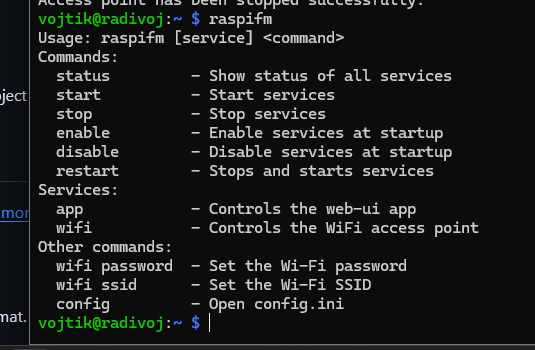
The general syntax for command control is as follows:
raspifm [service] <command>You can manage the following services:
app- Controls the web UI application.wifi- Controls the Wi-Fi access point.
You can use the following commands alone or specify a service:
| Command | Description |
|---|---|
status |
Show the status of all services. |
start |
Start the specified service(s). |
stop |
Stop the specified service(s). |
enable |
Enable the specified service(s) to start automatically at system startup. |
disable |
Disable the specified service(s) from starting automatically at system startup. |
restart |
Restart the specified service(s) by stopping and starting them. |
| Command | Description | Example Usage |
|---|---|---|
wifi password |
Set a new password for the Wi-Fi access point. | raspifm wifi password <new_password> |
wifi ssid |
Set a new SSID (network name) for the Wi-Fi access point. | raspifm wifi ssid <new_ssid> |
config |
Open the config.ini file for manual configuration. | raspifm config |
- Bash installer script
- Broadcast start timer
- Custom stations list
- Phone bluetooth audio stream (this will be hard)
- Existing audio file management (renaming, deleting)
If you're interested, here's an overview of how this project works.
Raspi-FM                           - Main app directory - on default /opt/raspifm
├── app                            - Python app directory
│   ├── static
│   │   └── styles.css             - Web ui CSS
│   ├── templates
│   │   └── index.html             - Web ui HTML
│   ├── app.py                     - Main flask app - the web ui
│   ├── fm_transmitter             - App for transmitting audio files using FM
│   ├── fm_transmitter.py          - My custom library for controling the fm_transmitter app
│   └── stations.json              - List of stations with frequencies
├── audio_files                    - Directory for audio files
│   └── ...
├── scripts
│   ├── setup_ap.sh                - Script to start the access point
│   └── stop_ap.sh                 - Script to stop the access point
├── systemd
│   ├── raspifm-app.service        - Systemd service that starts app.py in Python venv
│   └── raspifm-wifi.service       - Systemd service that starts the access point using setup_ap.sh
├── config.ini                     - Configuration file
├── install.sh                     - The script that installs this app
├── raspifm                        - The shell file for interacting using command line
└── requirements.txt               - Python library requirements
To make raspi-fm work properly, there needs to be quite a lot of things installed on the system and also some files placed in different locations of the system, so that is why I made a separate application for installing, rather than telling you to just clone the repo.
The installer code gets read from the GitHub repo and then gets executed using bash with sudo:
curl -fsSL https://...../install.sh | sudo bash
When the install.sh script is executed, the following steps occur:
- Check if it was executed using sudo
- Update using
apt update - Install the following packages:
| Package | Used for |
|---|---|
| dnsmasq | WiFi AP |
| hostapd | WiFi AP |
| git | Cloning this repo |
| python3 | Web-UI |
| python3-pip | Python packages |
| libraspberrypi-dev | fm_transmiter |
| sox | Convert audio |
| libsox-fmt-mp3 | Convert audio |
- Clone this repository to /opt/raspifm
- Copy service files to /etc/systemd/system
- Add the
raspifmcommand to PATH - Make some files executable
- Create a Python venv
- Install Python libraries from
requirements.txt - Enable and start the raspi-fm services.
And that's it. This whole install process usually takes over 15 minutes on my Pi Zero W with a slow network connection.
Right now, there are 2 bash scripts that are actively being used - it is the setup_ap.sh and stop_ap.sh and as the names suggests, those scripts are being used to turn the WiFi access point on and off.
This script uses dnsmasq and hostapd to host a WiFi access point, so your device can connect to your Raspberry Pi via Wi-Fi. The access point is hosted on interface wlan1 that is made on top of standard wlan0 used for connecting to WiFi. It is using the config.ini to set the SSID and password of the access point. DHCP is used to assign IP's to connected devices and its range is from 192.168.4.2 to 192.168.4.20 and the IP of the Pi itself is 192.168.4.1.
Basically all this does is, that it just reverts all the changes of setup_ap.sh, so for example it removes wlan1 interface, restores original hostapd config file, stops hostapd and dnsmasq...
There are two Python files in my project - app.py and fm_transmitter.py. Those files are ran in a Python venv, so it doesn't interfere with the system Python installation.
This is my custom made Python library used to control the fm_transmitter app.
This is the main app, that is running in the background to serve the web-ui controls. On default, it uses port 5000 to serve the website, so it doesn't colide with ports you may have opened before, but you can change that on the bottom of the code to any port you want.
This software is provided "as is", without warranty of any kind, express or implied. The author(s) shall not be liable for any claim, damages, or other liability arising from the use of this software.
This application is developed solely for educational purposes to demonstrate technical concepts. Using this application to broadcast FM radio signals is illegal in many countries, including the Czech Republic, without proper licensing and authorization. The author does not condone or encourage any unlawful use of this software. By using this repository, you agree that you are solely responsible for ensuring compliance with all applicable laws and regulations in your jurisdiction. The author assumes no liability for any misuse or legal consequences resulting from the use of this software. This disclaimer makes it clear that the project is intended for learning only and warns users about the legal implications of misuse.
This project is licensed under the Creative Commons Attribution-NonCommercial-ShareAlike 4.0 International.
You are free to:
- Share — copy and redistribute the material in any medium or format.
- Adapt — remix, transform, and build upon the material
Under the following terms:
- Attribution — You must give appropriate credit, provide a link to the license, and indicate if changes were made.
- NonCommercial — You may not use the material for commercial purposes.
- ShareAlike — If you remix, transform, or build upon the material, you must distribute your contributions under the same license as the original.