![]()
This is a complete end-to-end sample using the Logs Ingestion API in Azure Monitor on .NET 8.0. The sample retrieves weather forecasts from the U.S. National Weather Service API, then forwards them on to a Logs Analytics Workspace using a Data Collection Rule. It can be deployed as an Azure Function or run as a worker service on your local machine.
Let's say we have some important data available in an external service, and we want some of that data in our Log Analytics Workspace. However, we don't control the external service, so we can't simply modify it to upload logs directly. What we can do instead is:
- Extract the data using an Azure Function, then send to a Data Collection Endpoint, which will
- Transform it into our desired schema using the Data Collection Rule, and
- Load it into a Log Analytics Workspace table.
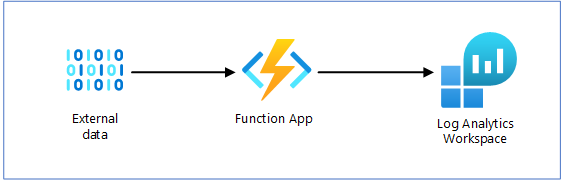
Our Azure Function application sits at the center of the system, doing all the work. It periodically pulls data from an external source (here, weather.gov) then forwards it to a Log Analytics Workspace using a Data Collection Endpoint and Data Collection Rule.
In order to follow the instructions shown here, and run this sample, you will first need:
- An Azure Account. Set up a Free Azure Account to get started.
- Azure CLI tool with Bicep
Please read through the Logs Ingestion API in Azure Monitor article carefully before proceeding. This sample will first follow that article closely, before moving on to demonstrate publishing an Azure Function.
The very first step is to Register an application with the Microsoft Identity Platform. This is helpful for running the sample locally. When running in Azure, this app registration is not needed. Instead, the function app will use its Managed Identity to connect with the DCR. Be sure to also Add a client secret as described on the page above.
Alternately, you can follow these steps using the Azure CLI:
az ad app create --display-name azlogs-ingestion --key-type Password --sign-in-audience AzureADMyOrg
In the output of that command, look for the AppId field, which you'll need for the following step.
"appId": "<client_id>",Next, you'll need a client secret to connect:
az ad app credential reset --id <client_id>
This produces critical information you'll need to record and later configure the apps to connect.
{
  "appId": "<client_id>",
  "password": "<client_secret>",
  "tenant": "<tenant_id>"
}
After registering the application, either using the portal or CLI, you'll also need the Service Principal ID. For more details, see Application and service principal objects in Microsoft Entra ID. The fastest way to get this is using the Azure CLI, supplying the Client ID for your new application.
az ad sp list --filter "appId eq '<client_id>'"
This displays a full list of information about the Service Principal for your application.
The piece you're looking for is the id field.
When you're done, you'll have four key pieces of information
- Tenant ID
- Client ID (aka 'appId')
- Client Secret (aka 'password')
- Service Principal ID
This sample requires five Azure resources: Log Analytics Workspace, Data Collection Rule, and Data Collection Endpoint, Azure Function, and Storage Account. There is an Azure Resource Manager (ARM) template here to set up everything you need, ready to go: azlogs-ingestion-fn.bicep. Be sure to clone this repo with submodules so you have the AzDeploy.Bicep project handy with the necessary module templates.
git clone --recurse-submodules https://github.com/jcoliz/AzLogs.Ingestion.gitFrom a PowerShell window in this folder, complete the following steps. You may choose any resource group that helps you remember what the group is for, and of course any Azure datacenter location.
$env:RESOURCEGROUP = "azlogs-ingestion"
az group create --name $env:RESOURCEGROUP --location "West US 2"
az deployment group create --name "Deploy-$(Get-Random)" --resource-group $env:RESOURCEGROUP --template-file .azure\deploy\azlogs-ingestion-fn.bicep --parameters .azure\deploy\azlogs-ingestion.parameters.json
You will be prompted to enter the Service Principal ID of the app you created earlier.
Please provide string value for 'principalId' (? for help):
After the deployment completes, take note of the outputs from this deployment. You will use some of these values to configure the sample so it points to your newly-provisioned resources.
Look for the outputs section of the deployment. Please refer the configuration section below to find where to put them.
"outputs": {
  "EndpointUri": {
    "type": "String",
    "value": "https://dcep-redacted.westus2-1.ingest.monitor.azure.com"
  },
  "DcrImmutableId": {
    "type": "String",
    "value": "dcr-redacted"
  },
  "Stream": {
    "type": "String",
    "value": "Custom-Forecasts_CL"
  },
  "StorageName": {
    "type": "String",
    "value": "storage000redacted"
  },
  "FunctionAppName": {
    "type": "String",
    "value": "fn-redacted"
  }
},Once you have deployed your Azure resources, you'll need to configure the sample with the App Registration you completed initially, as well as the details on your Data Collection Rule. You could follow the practices outlined in Safe storage of app secrets in development in ASP.NET Core.
Alternately, you can create a config.toml file containing these secrets in the BackgroundService folder. This file will not be committed to source control.
To begin, copy the existing config.template.toml file to a new file named config.toml. Then fill this in with the values unique to your deployment.
[Identity]
TenantId = "<tenant_id>" # Directory (tenant) ID
AppId = "<client_id>" # Application (client) ID
AppSecret = "<client_secret>" # Client secret value

[LogIngestion]
EndpointUri = "<data_collection_endpoint_uri>" # Data collection endpoint, be sure to include https://
Stream = "<stream_name>" # The stream name to send to, usually `Custom-<table>_CL`
DcrImmutableId = "<data_collection_rule_id>" # The Immutable ID for this Data Collection Rule
Optionally, you could elect to configure the options for connecting to the weather service. Out of the box, the sample requests a weather forecast for the area surrounding the Space Needle, checking once every 5 seconds. You can find these values in appsettings.json.
"Weather": {
  "Office": "SEW",
  "GridX": 124,
  "GridY": 69
},
"Worker": {
  "Frequency": "00:00:05"
}
The weather office, and grid x,y positions are specific to the NWS grid system. You can find values by calling the /points/{lat,long}
endpoint. The NWS has a handy Swagger UI on its API page, so you can try these out diretly.
Frequency is described in in Hours:Minutes:Seconds.
Once you have all that set up, simply build and run the BackgroundService project!
dotnet run --project BackgroundService

<6> [ 23/09/2024 12:04:42 ] AzLogs.Ingestion.Worker[1010] FetchForecastAsync: Received OK {"number":1,"name":"Today","startTime":"2024-09-23T11:00:00-07:00","endTime":"2024-09-23T18:00:00-07:00","isDaytime":true,"temperature":72,"temperatureUnit":"F","temperatureTrend":"","probabilityOfPrecipitation":{"value":null,"maxValue":0,"minValue":0,"unitCode":"wmoUnit:percent","qualityControl":"Z"},"dewpoint":null,"relativeHumidity":null,"windSpeed":"6 mph","windGust":null,"windDirection":"SSW","icon":"https://api.weather.gov/icons/land/day/sct?size=medium","shortForecast":"Mostly Sunny","detailedForecast":"Mostly sunny, with a high near 72. South southwest wind around 6 mph."}
<6> [ 23/09/2024 12:04:42 ] AzLogs.Ingestion.Worker[1020] UploadToLogsAsync: Sent OK 204
Note that the underlying services all log quite a bit of information to the application logger as well. If you want to see that in action, simply increase the default level in appsettings.json:
"Logging": {
  "LogLevel": {
"Default": "Information",After observing that logs are sent successfully to Log Analytics from the client application logs, it's time to turn our attention
to verifying the data has landed correctly in the service. Using the Azure Portal, navigate to the resource group you created above, e.g. azlogs-ingestion, then click into the Data Change Rule resource. In the navigation panel on the left, expand "Monitoring", then choose "Metrics". Click "Add Metric", then choose "Logs Ingestion Requests per Min". You should see a chart like the one below:

Next, we can look at the Log Analytics workspace itself to confirm that the logs have landed in their final destination. Again, navigate to the resource group page, but this time click into the Log Analytics resource. Click "Logs", and then enter this query:
Forecasts_CL
| summarize Count = count() by bin(TimeGenerated, 1min)
| render timechart
If all is well, you will see a chart like the one below:

Congratulations, you have successfully ingested logs into a Log Analytics Workspace custom table using a Data Collection Rule! Now we can move on to running as a function app.
We will now run the same code as above, built as an Azure Function. For this section, you'll need to have a Terminal Window open, in the FunctionApp folder.
You'll need to Install the Azure Functions Core Tools to follow the remaining steps in this article.
The Azure Function Core tools use local.settings.json to store local configuration, including secrets. Much like the config.toml in the previous steps, this
file is not committed to source control. Copy local.settings.template.json to a new file named local.settings.json, and fill out the details. The information needed is the same as previously set in config.toml.
The one additional piece of information you'll need in a connection string to the Storage Account where configuration is stored for the function information. You can retrieve this using the Azure CLI, using the name of the storage resource. This was displayed after you deployed resources above as the StorageName output.
az storage account show-connection-string --name <StorageName>
{
  "connectionString": "<storage_connection_string>"
}
Add the strong shown here to the AzureWebJobsStorage field in local.settings.json.
We'll first build the app, then run it using the tools:
func host start
We can watch the function running locally.
Azure Functions Core Tools
Core Tools Version:       4.0.6280 Commit hash: N/A +421f0144b42047aa289ce691dc6db4fc8b6143e6 (64-bit)
Function Runtime Version: 4.834.3.22875

[2024-10-07T21:08:37.740Z] Found AzLogs.Ingestion\FunctionApp\FunctionApp.csproj. Using for user secrets file configuration.
[2024-10-07T21:08:41.503Z] Worker process started and initialized.
[2024-10-07T21:08:50.040Z] Executing 'Functions.TransferLogs' (Reason='Timer fired at 2024-10-07T14:08:50.0203981-07:00', Id=9113238c-28cc-4e95-8e40-ca6ed1c49f18)
[2024-10-07T21:08:50.260Z] FetchForecastAsync: Received OK {"number":1,"name":"This Afternoon","startTime":"2024-10-07T13:00:00-07:00","endTime":"2024-10-07T18:00:00-07:00","isDaytime":true,"temperature":74,"temperatureUnit":"F","temperatureTrend":"","probabilityOfPrecipitation":{"value":null,"maxValue":0,"minValue":0,"unitCode":"wmoUnit:percent","qualityControl":"Z"},"dewpoint":null,"relativeHumidity":null,"windSpeed":"6 mph","windGust":null,"windDirection":"S","icon":"https://api.weather.gov/icons/land/day/few?size=medium","shortForecast":"Sunny","detailedForecast":"Sunny, with a high near 74. South wind around 6 mph."}
[2024-10-07T21:08:50.285Z] ClientSecretCredential.GetToken invoked. Scopes: [ https://monitor.azure.com//.default ] ParentRequestId: cffc2485-1fda-4770-8887-5e48b917c0c0
[2024-10-07T21:08:51.010Z] Request [cffc2485-1fda-4770-8887-5e48b917c0c0] POST https://dcep-redacted.westus2-1.ingest.monitor.azure.com/dataCollectionRules/dcr-redacted/streams/Custom-Forecasts_CL?api-version=2023-01-01
[2024-10-07T21:08:51.439Z] UploadToLogsAsync: Sent OK 204
[2024-10-07T21:08:51.439Z] Run: OK
[2024-10-07T21:08:51.460Z] Executed 'Functions.TransferLogs' (Succeeded, Id=9113238c-28cc-4e95-8e40-ca6ed1c49f18, Duration=1432ms)
To further confirm, we can go back to look at the the Azure Monitor metrics for the DCR, as described above
Now that you can see it all running locally, it's time to publish to Azure! You'll need the name of the function app which you deployed earlier. This was included in the outputs of the deployment, as the FunctionAppName output.
func azure functionapp publish <FunctionAppName>
Once it's complete, you can connect with the remote logstream:
func azure functionapp logstream <FunctionAppName>
This gives us easy access to watch the remote logs from the comfort of our terminal window:
2024-10-09T00:57:20Z   [Information]   Executing 'Functions.TransferLogs' (Reason='Timer fired at 2024-10-09T00:57:20.0008780+00:00', Id=7e58f0b2-91b6-4a43-b3c9-a61642e42f38)
2024-10-09T00:57:20Z   [Information]   FetchForecastAsync: Received OK {"number":1,"name":"This Afternoon","startTime":"2024-10-08T17:00:00-07:00","endTime":"2024-10-08T18:00:00-07:00","isDaytime":true,"temperature":67,"temperatureUnit":"F","temperatureTrend":"","probabilityOfPrecipitation":{"value":40,"maxValue":0,"minValue":0,"unitCode":"wmoUnit:percent","qualityControl":"Z"},"dewpoint":null,"relativeHumidity":null,"windSpeed":"6 mph","windGust":null,"windDirection":"S","icon":"https://api.weather.gov/icons/land/day/rain_showers,40?size=medium","shortForecast":"Chance Rain Showers","detailedForecast":"A chance of rain showers. Partly sunny, with a high near 67. South wind around 6 mph. Chance of precipitation is 40%. New rainfall amounts less than a tenth of an inch possible."}
2024-10-09T00:57:20Z   [Information]   Request [a2176ba6-b497-478e-8cf4-4dc4b0974eda] POST https://dcep-redacted.westus2-1.ingest.monitor.azure.com/dataCollectionRules/dcr-redacted/streams/Custom-Forecasts_CL?api-version=2023-01-01
2024-10-09T00:57:20Z   [Information]   UploadToLogsAsync: Sent OK 204
2024-10-09T00:57:20Z   [Information]   Run: OK
2024-10-09T00:57:20Z   [Information]   Executed 'Functions.TransferLogs' (Succeeded, Id=7e58f0b2-91b6-4a43-b3c9-a61642e42f38, Duration=74ms)
There are two different approaches to publishing your application in production via a pipeline:
In this sample, the build.yaml GitHub workflow creates a publish-ready ZIP archive, then attaches it to the build results to be retrieved manually. This follows the Publish your application guidance for .NET isolated process functions. You would then transfer this file into your deployment process. If you were creating a Sentinel Data Connector, for example, you would include this built package in your pull request.
Alternately, you could follow the guidance describing Continuous delivery by using GitHub Actions. In this case, you would set up a CD pipeline, which would deploy the latest bits to your running function resource.
When you're done, don't forget to tear down the resource group to avoid unexpected charges.
az group delete --yes --name $env:RESOURCEGROUP