今天开一个坑,模拟抖音实现互动功能,这篇文章会随着项目的进度更新,记录开发流程,遇到的问题也顺道写下解决方法。

- 上下滑切换视频,同时只能有一个视频正在播放;
- 可以展示评论列表;
- 可以发布评论。
第二和第三个功能要求的数据暂不涉及后端服务,直接mock数据。
视频数据是从马家挖来的,本项目仅供学习使用,如果侵权请联系删除。 评论数据来自JSONPlaceholder - Fake online REST API for developers,这次没有做网络请求,直接把数据以json格式保存在项目中了。如果要实现网络请求,直接替换对应方法就好。
回到第一个功能,分解一下需求:
- 可以上下分页的滚动视图;
- 可以播放视频的组件;
- 最新流行的从底下弹出的视图;
- 显示评论的组件
- 发布评论的组件
- 底栏tab

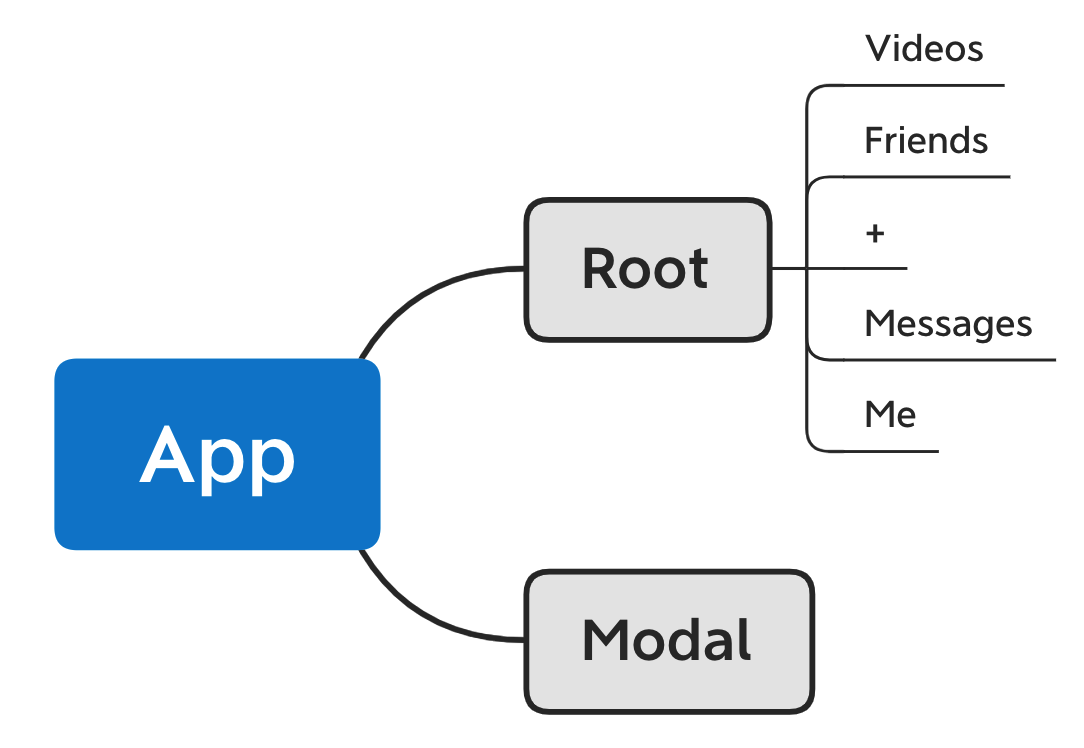
完成需求列表中的所有功能,其中第3点没有做成那种可以下拉关闭的效果,我们的实现不是直接使用的Modal,而是根据react-native-navigation提供的方案,把它做成了一个新的页面栈,这样,弹出来的页面可以很简单的实现弹出内容的页面跳转。
这样,整个App的页面逻辑关系如下:
- 双击点赞,显示❤️的动画

这次直接用typescript模版来新建项目,命令如下
npx react-native init TikTokLike --template react-native-template-typescript如果像我一样失败在第一步,😄不要着急,看看是不是react-native cli过时了。
react native项目众所周知更新特别快,相关的命令工具,和脚手架如果不更新,执行上面的命令有可能失败,比如我这边使用的淘宝源,会报没有typescript template的错误。解决方法也很简单,全局卸载掉react-native cli就行。
npm uninstall -g react-native-cli成功初始化项目之后,在模拟器中运行,正常跑通👌后就可以推送代码到了,该项目已经在github开源。
react native已经诞生多年,主要解决的问题是跨平台的UI构建。对于UI构建,有很多优秀的第三方库,能满足大部分需求,比如最开始就得到了官方的认可的react-navigation,炙手可热的react-native-paper等等,就不重复造轮子了,拿这些优秀的库来设计这个TikTok Like项目吧。
yarn add @react-navigation/native
yarn add react-native-reanimated react-native-gesture-handler react-native-screens react-native-safe-area-context @react-native-community/masked-view
yarn add @react-navigation/bottom-tabs
yarn add react-native-paper
yarn add react-native-vector-icons
yarn add react-native-video
npx pod-install ios安装的命令如上所述,需要注意的是如果使用react-native-vector-icons出现Unrecognized font family 'Material Design Icons'的错误,那么就需要link一下该库了,然后再把XCode里面Targets > Build Phases > Copy Bundle Resources里面的.ttf文件都删除,否则编译时会冲突
yarn react-native link接下来简单解释其中几个关键组件。
"@react-navigation/bottom-tabs": "^5.2.7",
"@react-navigation/native": "^5.1.6",
"@react-navigation/stack": "^5.2.13",react-navigation是一个解决app路由栈的库,记得刚开始使用react-navigation的时候还是1.X,是纯JS的实现,当它升级到2.X的时候还很高兴。同时它的设计思路一直保持与时俱进,自从react hooks出来之后,react-navigation很快也转向hooks的实现,组件也都变成了函数的写法,更新到5.X版本。另外最近流行的从页面底下弹出新的路由栈的功能也给开发者提供实现方法,不得不说,这个库非常好用👍。
"react-native-paper": "^3.8.0",react-native-paper提供了诸如按钮,文字,输入,表单等常用的组件以及主题的定制,遵循Material Design的设计思路,写的非常规范,效果也很好,如果要实现深色主题,会非常省心,所以这次的基础组件都来自于它。
另外再插一句,react-navigation的BottomTabNavigator就是基于react-native-paper提供的BottomNavigation实现,所以强强联手,怎能不好用呢。
"react-native-vector-icons": "^6.6.0",App实现通过字符文件实现矢量图标的组件。
"react-native-video": "^4.4.5"播放视频的组件,使用非常简单。
啰嗦了这么多,可以开始写代码了
这个组件是扩展了react-native的FlatList组件,启用pagingEnabled属性,同时把它的子组件,放在一个高度为列表高度的View中,这样就能实现这个需求;另外可以再增强一下,传入分页请求的query,这样不需要传入data,能够翻到制定的页面自动获取新数据。
| 扩展参数 | 功能 | 必填 |
|---|---|---|
| query | 传一个制定格式的分页请求,实现自动拉取数据 | |
| onPageIndexChanged | 翻页事件 | 可选 |
| 移除的参数 | 解释 |
|---|---|
| data | 通过query自动获取 |
| pagingEnabled | 分页滚动效果 |
| bounces | iOS的弹簧效果移除 |
| showsVerticalScrollIndicator | 拉杆移除 |
| scrollsToTop | iOS点击顶部自动回到顶部功能移除 |
| onLayout | 用于获取列表高度 |
| onScroll | 用于计算当前页面 |
- type声明
interface Props<ItemT, Variables>
  extends Omit<
    FlatListProps<ItemT>,
    | 'data'
    | 'pagingEnabled'
    | 'bounces'
    | 'showsVerticalScrollIndicator'
    | 'scrollsToTop'
    | 'onLayout'
    | 'onScroll'
  > {
  query: (
    variables: {
      afterIndex?: number;
      length?: number;
    } & Variables,
  ) => Promise<{data: Array<ItemT>; remain: number}>;
  variables?: Variables;
  onPageIndexChanged?: (index: number) => void;
}- 分页实现和内存优化
const DEFAULT_UNMOUNT_LENGTH_AWAY = 5;
export function PagingList<T extends {id: number}>(
  props: Props<T, {length?: number}>,
) {
  const [viewHeight, setViewHeight] = React.useState(0);
  const [currentPageIndex, setCurrentPageIndex] = React.useState(0);

  return (
    <FlatList
      {...props} // props should not be customized should be put under this line.
      pagingEnabled // 实现分页滚动
      bounces={false}
      showsVerticalScrollIndicator={false}
      scrollsToTop={false}
      renderItem={(item) => {
        const shouldMount =
          Math.abs(item.index - currentPageIndex) < DEFAULT_UNMOUNT_LENGTH_AWAY;
        // 每个子项包含在一个高度为列表高度的View中
        // 如果当前页面是20,那么16页之前的页面不再渲染,24页之后的页面不再渲染
        // 不再渲染的组件替换成null
        return (
          <View style={{height: viewHeight}}>
            {shouldMount && renderItem ? renderItem(item) : null}
          </View>
        );
      }}
      onLayout={(e) => {
        const {height} = e.nativeEvent.layout;
        setViewHeight(height);
      }}
      onScroll={(event) => {
        const offsetY = event.nativeEvent.contentOffset.y;
        if (viewHeight > 0) {
          const pageIndex = Math.ceil(offsetY / viewHeight);
          if (pageIndex !== currentPageIndex) {
            setCurrentPageIndex(pageIndex);
          }
        }
      }}
    />
  );
}- 自动分页拉取数据
const DEFAULT_PRE_FETCH_INDEX = 3; // if there is only 3 item left, then fetch more data
export function PagingList<T extends {id: number}>(
  props: Props<T, {length?: number}>,
) {
  const [data, setData] = React.useState<T[]>([]);
  const [remain, setRemain] = React.useState(0);
  const [loading, setLoading] = React.useState(false);

  const fetchData = async () => {
    try {
      if (loading) {
        return;
      }
      setLoading(true);
      const ret = await query({
        afterIndex: data.length > 0 ? data[0].id : -1,
        length,
      });
      setData(data.concat(ret.data));
      setRemain(ret.remain);
    } catch (error) {
    } finally {
      setLoading(false);
    }
  };

  React.useEffect(() => {
    // 第一次加载组件获取数据
    fetchData();
    // eslint-disable-next-line react-hooks/exhaustive-deps
  }, [query, variables]);

  const onPageChanged = (index: number) => {
    setCurrentPageIndex(index);
    if (
      remain > 0 &&
      data.length - currentPageIndex - 1 < DEFAULT_PRE_FETCH_INDEX
    ) {
      // 翻到倒数第3页,获取更多数据
      fetchData();
    }
    // 对外抛出翻页事件
    onPageIndexChanged && onPageIndexChanged(index);
  };

  return (
    <FlatList
      keyExtractor={(item) => `${item.id}`}
      initialNumToRender={20}
      {...props} // props should not be customized should be put under this line.
      onScroll={(event) => {
        const offsetY = event.nativeEvent.contentOffset.y;
        if (viewHeight > 0) {
          const pageIndex = Math.ceil(offsetY / viewHeight);
          if (pageIndex !== currentPageIndex) {
            onPageChanged(pageIndex);
          }
        }
      }}
    />
  );
}直接使用react-native-video,外面套一个TouchableWithoutFeedback实现点击播放和暂停之前的切换。
| 参数 | 功能 | 必填 |
|---|---|---|
| uri | 视频地址 | |
| paused | 设定暂停状态 | 可选 |
| onPausedChanged | 暂停状态更新事件 | 可选 |
使用react-navigation,独立出一组Modal路由栈,具体的可以查阅官方文档
const AppStack = createStackNavigator();

const App = () => {
  return (
    <NavigationContainer>
      <PaperProvider>
        <AppStack.Navigator mode="modal">
          <AppStack.Screen
            name="Main"
            component={RootViews} // RootViews是一个Bottom Tabs
            options={{headerShown: false}}
          />
          <AppStack.Screen
            name="Comment"
            component={CommentStream} // CommentStream单独的一个评论路由栈
            options={{
              headerShown: false,
              cardStyle: {backgroundColor: 'transparent'},
            }}
          />
        </AppStack.Navigator>
      </PaperProvider>
    </NavigationContainer>
  );
};export const CommentStream: React.FC<CommentStreamProps> = (props) => {
const navigation = useNavigation();
const {videoId} = props.route.params;
// 由于没有使用Redux/MobX状态管理机制,所以使用fetchTime处理兄弟组件间的状态传递。这里发布评论需要强制更新评论列表
const [fetchTime, setFetchTime] = React.useState(Date.now());
const [commentCount, setCommentCount] = React.useState<number>();
const onPosted = React.useCallback(() => {
setFetchTime(Date.now());
}, []);
return (
// 这里KeyboardAvoidingView是解决键盘遮挡的问题,一定要放在整个屏幕视图最外层才能正确padding
<KeyboardAvoidingView style={styles.container} behavior="padding">
<TouchableWithoutFeedback onPress={navigation.goBack}>
<View style={styles.shadowPanel} />
</TouchableWithoutFeedback>
<View style={styles.commentPanel}>
<CommentHeader
title={
commentCount === undefined ? 'comments' : `${commentCount} comments`
}
/>
<CommentList
videoId={videoId}
fetchTime={fetchTime}
onFetched={setCommentCount}
/>
<CommentPost videoId={videoId} onPosted={onPosted} />
</View>
</KeyboardAvoidingView>
);
};export const CommentPost: React.FC<CommentPostProps> = (props) => {
const {videoId, onPosted} = props;
const [text, setText] = React.useState('');
return (
// 这个组件已经是屏幕最底下的视图了,使用SafeAreaView来确保全面屏手机能正常使用
<TouchableWithoutFeedback>
<SafeAreaView style={styles.container}>
<TextInput
value={text}
onChangeText={setText}
style={styles.text}
placeholder={INITIAL_TEXT}
placeholderTextColor={Colors.grey100}
onFocus={() => setText('')}
onBlur={() => setText(INITIAL_TEXT)}
/>
<IconButton
icon="arrow-left-bold-circle"
size={32}
color={Colors.blue500}
onPress={async () => {
if (text) {
await postComment(videoId, text);
Keyboard.dismiss();
onPosted();
}
}}
/>
</SafeAreaView>
</TouchableWithoutFeedback>
);
};直接参考官方文档,很容易就把样式写完。
export const VideoTab: React.FC<VideoTabProps> = () => {
  const navigation = useNavigation();

  const [paused, setPaused] = React.useState(false); // paused和当前播放的Video组件同步
  const [pageIndex, setPageIndex] = React.useState(0); // pageIndex当前页

  React.useEffect(() => {
    const unsubscribeForBlur = navigation.addListener('blur', () => {
      setPaused(true); // 底栏tab切换之后,需要暂停视频
    });
    return unsubscribeForBlur;
  }, [navigation]);

  return (
    <PagingList
      query={fetchVideoStream}
      renderItem={({item, index}) => {
        return (
          <VideoSocials
            data={item}
            paused={paused || pageIndex !== index} // 非当前页的视频暂停
            onPausedChanged={setPaused}
          />
        );
      }}
      onPageIndexChanged={(index) => {
        setPageIndex(index);
        setPaused(false);
      }}
    />
  );
};在这里我们定义:一定时间内,视图进行位移、变形就是简单的动画。实质就是有一个值能随着时间按预定的方式更新,当这个值用在一个视图的样式中,就能实现动画。
我们将用react-native-reanimated来实现这个值,稍后会说。
先梳理动画交互逻辑:
- 视频增加单击和双击事件(这个事件放在视频所在的容器中会更加合理,状态在容器中管理)
- 单击视频暂停/继续播放
- 双击在事件所在位置生成一个爱心动画:�大小0到2倍拉伸;透明度从1到0
在之前的实现中,我们用的是官方库中的TouchableWithoutFeedback,他能很简单的实现单击的响应,要实现双击就需要自己记录两次点击的时间差了,繁琐。有没有更简单的实现呢?还记得我们装react-navigation这个库的时候是不是额外安装了react-native-gesture-handler这个库吗?在官网可以了解,它是一个为交互提供简单控制的方案,实现双击不在话下,直接上官网实现Cross handler interactions · React Native Gesture Handler
const onSingleTapped = (event: TapGestureHandlerStateChangeEvent) => {
  if (event.nativeEvent.state === State.ACTIVE) {
    const nextState = !paused;
    setPaused(nextState);
    onPausedChanged && onPausedChanged(nextState);
  }
};

const onDoubleTapped = (event: TapGestureHandlerStateChangeEvent) => {
  if (event.nativeEvent.state === State.ACTIVE) {
    onDoubleTap &&
      onDoubleTap({x: event.nativeEvent.x, y: event.nativeEvent.y});
  }
};

<TapGestureHandler
  waitFor={doubleTap}
  onHandlerStateChange={onSingleTapped}>
  <TapGestureHandler
    ref={doubleTap}
    onHandlerStateChange={onDoubleTapped}
    numberOfTaps={2}>
    <View style={styles.backgroundVideo}>
      <RNVideo repeat paused={paused} source={{uri}} style={styles.video} />
    </View>
  </TapGestureHandler>
</TapGestureHandler>继续说动画值用react-native-reanimated的原因:
- 流行,很多第三方库都在用;
- 强大,动画按条件判断渲染不同效果不需要通过JS,直接在原生完成。
现在,我们需要的就是一个能变化的scale值,和一个opacity值:
/**
 * @param params.init 初值
 * @param params.dest 目标值
 * @param params.duration 动画时间
 * @param params.clock 控制器
 * @param params.onFinished 动画结束的回调
 */
export const runNumberTiming = (params: {
  init: number;
  dest: number;
  duration?: number;
  clock?: Animated.Clock;
  onFinished?: () => void;
}) => {
  const {
    init,
    dest,
    duration = 2000,
    clock = new Clock(),
    onFinished = () => {},
  } = params;
  const state = {
    finished: new Value(0),
    position: new Value(init),
    time: new Value(0),
    frameTime: new Value(0),
  };

  const config = {
    duration,
    toValue: new Value(dest),
    easing: Easing.inOut(Easing.ease),
  };

  // 下面这些方法在动画的每一帧都将重新计算
  return block([
    cond(
      clockRunning(clock),
      [
        // 如果动画正在进行,且有新的目标值,则更新目标值
        set(config.toValue, dest),
      ],
      [
        // 启动控制器
        startClock(clock),
      ],
    ),
    // 动画值的更新方式
    timing(clock, state, config),
    // 动画结束,关闭控制器,调用callback
    cond(state.finished, [stopClock(clock), call([], onFinished)]),
    // 返回动画值
    state.position,
  ]);
};
视图部分:
export const HeartAnimation = React.memo((props: HeartAnimationProps) => {
  const {offsetX, offsetY} = props;
  const [finished, setFinished] = React.useState(false);

  // 为了节省空间,动画结束后,移除视图
  if (finished) {
    return null;
  }

  // 使用同一个动画控制器,动画opacity和scale属性
  const clock = new Clock();
  const opacity = runNumberTiming({
    clock,
    init: 1,
    dest: 0,
    onFinished: () => {
      setFinished(true);
    },
  });
  const scale = runNumberTiming({clock, init: 0, dest: 2});
  return (
    <Animated.View
      style={{
        position: 'absolute',
        top: offsetY - HEART_ICON_SIZE / 2,
        left: offsetX - HEART_ICON_SIZE / 2,
        opacity,
        transform: [{scale}],
      }}>
      <Heart />
    </Animated.View>
  );
});
当用户双击视频之后,我们拿到一个坐标,把这个坐标一一记录到一个数组中,然后将数组传递给爱心朦板,这个朦板需要占满视频,且不响应交互事件,然后在朦板中在对应的坐标绘制❤️动画
export const VideoSocials: React.FC<VideoSocialsProps> = (props) => {
  const [points, setPoints] = React.useState<iPointStamp[]>([]);
  const {data, paused, onPausedChanged} = props;

  const onVideoDoubleTap = React.useCallback((point: iPoint) => {
    setPoints((pre) =>
      pre.concat(Object.assign({timestamp: Date.now()}, point)),
    ); // 将坐标存入数组
  }, []);

  return (
    <View style={styles.container}>
      <Video
        uri={data.uri}
        paused={paused}
        onPausedChanged={onPausedChanged}
        onDoubleTap={onVideoDoubleTap}
      />
      <Comment videoId={data.id} comment={data.comment} style={styles.social} />
      {/* 坐标数组传到朦板中 */}
      <HeartAnimationFullView style={styles.heart} points={points} />
    </View>
  );
};
export const HeartAnimationFullView = React.memo(
(props: HeartAnimationFullViewProps) => {
const {points, style} = props;
// 朦板的pointerEvents别忘记设置
return (
<View style={style} pointerEvents="none">
{points.map((item) => (
<HeartAnimation
key={item.timestamp}
offsetX={item.x}
offsetY={item.y}
/>
))}
</View>
);
},
);完工
以上就是这次的需求内容,那么接下来会添加一些动画效果来提升用户体验。
❤️Like动画(已完成)- mock请求api的更新
tips
- babel plugin 需要
yarn start --reset-cache
refs
- Using TypeScript with React Native · React Native
- Getting Started · React Native Paper
- Opening a full-screen modal | React Navigation
- createBottomTabNavigator | React Navigation
- React Native Gesture Handler · Declarative API exposing platform native touch and gesture system to React Native.
- React Native Reanimated