Dynamic and completely modular configuration web page for the ESP8266 and ESP32 boards using the arduino core.
Features:
- WiFi network management and automatic connection.
- Environment variable management.
- Custom actions that can be triggered from the web page.
- OTA updates.
- File browser and management.
- Logs monitoring.
- (and completely free of charge 😉)
Access the config page in the url http://YOURBOARDIP/config. The default ip while in AP mode is 192.168.1.1.


Include the lib package with #include "esp-config-page.h". Create a WebServer (ESP32) or ESP8266WebServer (ESP8266) instance, call setup function of the package, call begin on the webserver and call the loop function from this package every loop iteration. Code example:
#include <Arduino.h>
#include "esp-config-page.h"

// Webserver instance
WebServer server(80);

void setup() {
    Serial.begin(115200);
    delay(2500);
    Serial.println("Started.");

    // Setup webpage modules
    ESP_CONFIG_PAGE::initModules(&server, "admin", "admin", "ESP32-TEST3");

    // Begin webserver
    server.begin();
    Serial.println("Setup complete.");
}

void loop() {
    // Call update every loop
    server.handleClient();
    ESP_CONFIG_PAGE::loop();
}
This will create a webpage containing a file browser and wireless network settings on the webserver instance that is passed to the setup function.
This feature allows the board to try to connect to a wireless network automatically, if it can't, it will start an access point using the SSID and password provided by you. You will then be able to connect to this AP and enter the configuration webpage for you to configure your desired wireless network.
First, call the setAPConfig function from the package to set the name and password for the access point created by the board, then call the function tryConnectWifi to try to connect to the configured network. This call is needed to run the AP if there are no configured credentials and is used in subsequent runs to try to connect to the configured network. You can use the isWiFiReady function to check if the board's connection is ready in your loop function.
#include <Arduino.h>
#include "esp-config-page.h"

// Webserver instance
WebServer server(80);

void setup() {
    Serial.begin(115200);
    delay(2500);
    Serial.println("Started.");

    // Set AP SSID and password for when the board can't connect to your network
    ESP_CONFIG_PAGE::setAPConfig("ESP32-TEST", "123");

    // Try to reconnect automatically if you already configured your board
    ESP_CONFIG_PAGE::tryConnectWifi(false);

    // Setup webpage modules
    ESP_CONFIG_PAGE::initModules(&server, "admin", "admin", "ESP32-TEST3");

    // Begin webserver
    server.begin();
    Serial.println("Setup complete.");
}

void loop() {
    // Call update every loop
    server.handleClient();
    ESP_CONFIG_PAGE::loop();

    if (ESP_CONFIG_PAGE::isWiFiReady()) {
        // Connection is ready
    }
}
If the board can't connect to the network, it will enable an AP network that you can connect to, allowing you to configure your wireless network using the web interface:

With this library, you can define environment variables for your board and modify them dynamically using the configuration web interface. These environment variables can be things like credentials for a service, API keys or IP addresses, for example (or any other text you'd like). This feature will prevent you from needing to upload code to your board every time you change any credential or setting.
To use this feature, you will have to define each environment variable as a pointer to the type ESP_CONFIG_PAGE::EnvVar and add these variables to the library manager using the ESP_CONFIG_PAGE::addEnvVar function.
You will need to create an instance of a storage class as well, this class will have the logic needed to save the variables in a persistent storage. This library already comes with the LittleFSEnvVarStorage class, this storage will save your variables to your board's LittleFS storage system, though you can implement you own subclass of the EnvVarStorage class too, if you'd like. The string passed as argument to the constructor is the name of the file where you want to store your variables. After creating the instance of your storage, you will need to use the function ESP_CONFIG_PAGE::setAndUpdateEnvVarStorage passing it as argument to use it effectively. This function will automatically recover all variables that are stored in subsequent calls too, if there are any.
After that, you will be able to access the loaded value for your variables anywhere you'd like, the value will be stored and updated automatically in the value property of your EnvVar* instance. See the server.on call below for a concrete example.
#include <Arduino.h>
#include "esp-config-page.h"

// Webserver instance
WebServer server(80);

// Define environment variables
ESP_CONFIG_PAGE::EnvVar *user = new ESP_CONFIG_PAGE::EnvVar{"MY_SERVICE_USER", ""};
ESP_CONFIG_PAGE::EnvVar *password = new ESP_CONFIG_PAGE::EnvVar{"MY_SERVICE_PASSWORD", ""};

void setup() {
    Serial.begin(115200);
    delay(2500);
    Serial.println("Started.");

    // Set AP SSID and password for when the board can't connect to your network
    ESP_CONFIG_PAGE::setAPConfig("ESP32-TEST", "123");

    // Try to reconnect automatically if you already configured your board
    ESP_CONFIG_PAGE::tryConnectWifi(false);

    // Add the variables to the config page
    ESP_CONFIG_PAGE::addEnvVar(user);
    ESP_CONFIG_PAGE::addEnvVar(password);

    // Create the storage instance for your environment variables
    // The project already includes a LittleFS storage, but you can create a new EnvVarStorage implementation and store
    // your variables however you like
    // (file path needs to always start with a / if you're using an ESP32 board)
    auto *storage = new ESP_CONFIG_PAGE::LittleFSEnvVarStorage("/env.cfg");

    // Setup storage and recover saved environment variables, if there are any
    ESP_CONFIG_PAGE::setAndUpdateEnvVarStorage(storage);

    // Setup webpage modules
    ESP_CONFIG_PAGE::initModules(&server, "admin", "admin", "ESP32-TEST3");

    server.on("/test-auth", HTTP_POST, []() {
        String body = server.arg("plain");

        // Use the environment variables values anywhere you like (to verify auth like this, for example).
        // The package will automatically update the values inside the EnvVar instances you created.
        if (body.equals(user->value + ";" + password->value)) {
            server.send(200, "text/plain", "OK");
        } else {
            server.send(401, "text/plain", "INCORRECT AUTH");
        }
    });

    // Begin webserver
    server.begin();
    Serial.println("Setup complete.");
}

void loop() {
    // Call update every loop
    server.handleClient();
    ESP_CONFIG_PAGE::loop();
}
This will show a list of fields in the configuration webpage, where you can modify the environment variables of your board anytime you want.

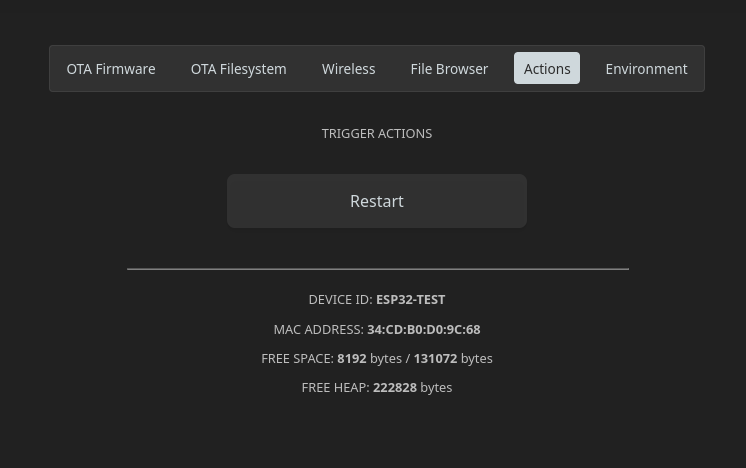
This library provides to you the ability to easily execute any code you would want remotely by clicking a button on the board's configuration web interface.
To add a custom action to the webpage you will only need to call the ESP_CONFIG_PAGE::addCustomAction function passing the action's name and a lambda or a function signature that will be called when the action's corresponding button is clicked in the web interface.
The example below will change pin 5 to HIGH when the button is clicked in the web interface:
#include <Arduino.h>
#include "esp-config-page.h"

// Webserver instance
WebServer server(80);

void setup() {
    Serial.begin(115200);
    delay(2500);
    Serial.println("Started.");

    // Set AP SSID and password for when the board can't connect to your network
    ESP_CONFIG_PAGE::setAPConfig("ESP32-TEST", "123");

    // Try to reconnect automatically if you already configured your board
    ESP_CONFIG_PAGE::tryConnectWifi(false);

    // Setup webpage modules
    ESP_CONFIG_PAGE::initModules(&server, "admin", "admin", "ESP32-TEST3");

    // Add a custom action to the webpage.
    // This action will appear as a button on the webpage and trigger the action defined below.
    ESP_CONFIG_PAGE::addCustomAction("some-action", [](ESP8266WebServer &server) {
        Serial.println("Triggering pin.");
        digitalWrite(5, HIGH);
        server.send(200);
    });

    // Begin webserver
    server.begin();
    Serial.println("Setup complete.");
}

void loop() {
    // Call update every loop
    server.handleClient();
    ESP_CONFIG_PAGE::loop();
}
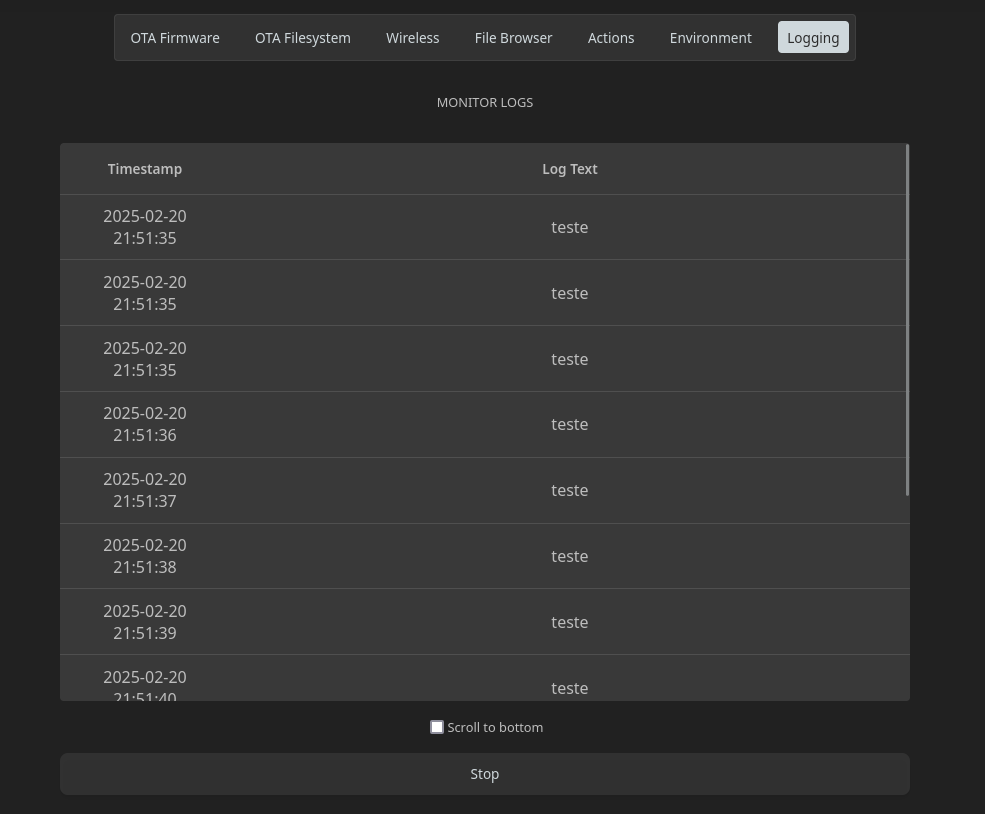
With this module, you can monitor the logs emitted by your board directly by the web interface using websockets, without the need to connect your board to a computer.
To use this module, you will need to include the https://github.com/ESP32Async/ESPAsyncWebServer library in your project. Just add the github link to your lib_deps if you are using platformio.
To start, you will need to create an instance of the ConfigPageSerial class, this class will function exactly the same as the original Arduino Serial, but all prints made with it will appear in the board's serial and will be shown on the configuration webpage. Call begin with your desired baud rate the same way you would with the original Arduino's Serial class
After that, to enable logging on the webpage, will you need to call the enableLogging function, passing as arguments the desired username and password that will be used to authenticate the websocket connection between your browser and the board, as well as the ConfigPageSerial instance you created before.
If you want, you can also call the setLogRetention function to enable log retention in flash storage. Things that are logged will be saved to the board's LittleFS filesystem, in the file you passed as parameter to the function. The file will be cleared if its size exceeds the maximum size limit that is passed to the function.
#include <Arduino.h>
#include "esp-config-page.h"
#include "esp-config-page-logging.h"

// Webserver instance
ESP_CONFIG_PAGE::WEBSERVER_T server(80);

// Web serial instance (use this for ESP32)
ESP_CONFIG_PAGE_LOGGING::ConfigPageSerial webserial;

// Web serial instance (use this for ESP8266)
ESP_CONFIG_PAGE_LOGGING::ConfigPageSerial webserial(Serial);

unsigned long last = 0;

void setup() {
    webserial.begin(115200);
    delay(2500);

    // Set the config page serial (optional, will show all config page logs on the webpage as well)
    ESP_CONFIG_PAGE::setSerial(&webserial);

    // ESP_CONFIG_PAGE::setSerial(&webserial);
    // Set AP SSID and password for when the board can't connect to your network
    ESP_CONFIG_PAGE::setAPConfig("ESP32-TEST", "123");

    // Try to reconnect automatically if you already configured your board
    ESP_CONFIG_PAGE::tryConnectWifi(false, 5000);

    ESP_CONFIG_PAGE::addEnvVar(new ESP_CONFIG_PAGE::EnvVar("teste", ""));
    ESP_CONFIG_PAGE::addEnvVar(new ESP_CONFIG_PAGE::EnvVar("teste2", ""));
    ESP_CONFIG_PAGE::setAndUpdateEnvVarStorage(new ESP_CONFIG_PAGE::LittleFSEnvVarStorage("/env.cfg"));

    // Setup webpage modules
    ESP_CONFIG_PAGE::initModules(&server, "admin", "admin", "ESP32-TEST3");

    ESP_CONFIG_PAGE::addCustomAction("Restart", [](ESP_CONFIG_PAGE::WEBSERVER_T &server)
    {
        ESP.restart();
        return true;
    });

    // Begin webserver
    server.begin();

    // Enable logging module
    ESP_CONFIG_PAGE_LOGGING::enableLogging("admin", "admin", webserial);

    // Enable log retention with 1kb of maximum log size (optional)
    ESP_CONFIG_PAGE_LOGGING::setLogRetention("/logs.txt", 1024);
}

void loop() {
    // Call update every loop
    server.handleClient();
    ESP_CONFIG_PAGE::loop();
    ESP_CONFIG_PAGE_LOGGING::loop();

    if (millis() - last > 1000)
    {
        // Log anything
        webserial.println("test");
        last = millis();
    }
}
This will show all logs made with the ConfigPageSerial instance in the webpage's logging tab, like so:
All configuration modules will be enabled by default, but you can define what modules you want to be enabled to save storage by using the build script included with this package.
Simply run the the python script located in the buildtool folder in the library's root directory (inside .pio/build if you are using platformio), you can choose what modules are enabled passing the desired module names as arguments to the script. Below is an example call to the script of all the available parameters.
python update_modules.py --wireless --ca --env --files --ota --logging
Or if you want only the wireless configuration module, for example:
python update_modules.py --wireless
This will automatically update the webpage's html file with only the modules you want to use.
(The python script needs Rust and Cargo to be installed in your machine to run).
You will then need to change your initModules function call, passing as arguments only the modules you need:
...
ESP_CONFIG_PAGE::Modules enabledModules[] = {ESP_CONFIG_PAGE::OTA, ESP_CONFIG_PAGE::WIRELESS};
ESP_CONFIG_PAGE::initModules(enabledModules, 2, &server, "admin", "admin", "ESP32-TEST3");
...