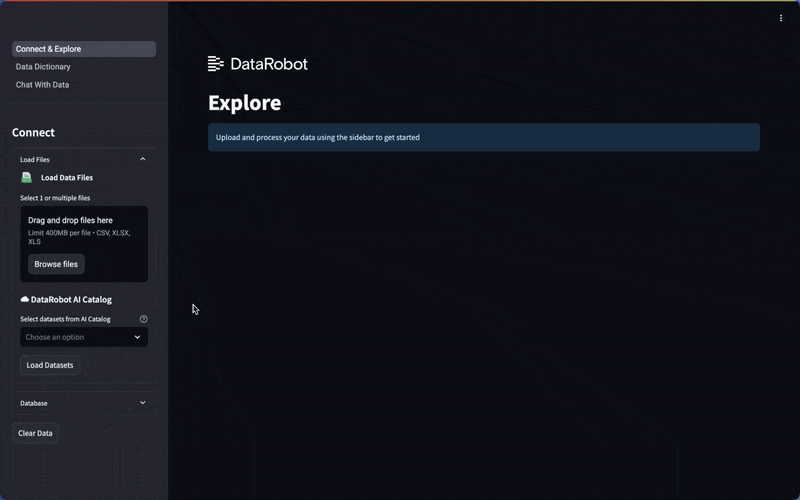
Talk to My Data delivers a seamless talk-to-your-data experience, transforming files, spreadsheets, and cloud data into actionable insights. Simply upload data, connect to Snowflake or BigQuery, or access datasets from DataRobot's Data Registry. Then, ask a question, and the agent recommends business analyses, generating charts, tables, and even code to help you interpret the results.
This intuitive experience is designed for scalability and flexibility, ensuring that whether you're working with a few thousand rows or billions, your data analysis remains fast, efficient, and insightful.
Warning
Application templates are intended to be starting points that provide guidance on how to develop, serve, and maintain AI applications. They require a developer or data scientist to adapt and modify them for their business requirements before being put into production.
- Quick Start
- User's Guide
- Setup
- Architecture overview
- Why build AI Apps with DataRobot app templates?
- Data privacy
- Make changes
- Tools
- Share results
- Delete all provisioned resources
- Setup for advanced users
Please check out this Talk To My Data walkthrough.
The basic usage of the app is straightforward. The user uploads one or more structured files to the application, starts a chat and asks questions about those files. Behind the scenes, the LLM configured for the application translates the user's question into code, the application runs the code and again sends the results to an LLM to generate analysis and visualizations. Because the dataset is loaded into the application itself, this limits the size of the data that can be analyzed. The application can support larger datasets and connect to remote data stores through the DataRobot platform, described below.
Large datasets can be uploaded to the DataRobot platform (see this documentation). Items from the user's data registry can be connected to the application (see screenshot below). These items are not downloaded into the application, but instead analysis is performed through DataRobot's data wrangling platform. This performs efficient queries that can support larger datasets (we have validated at least 5GB). Note there is a several minute cold start with the platform as it creates the analysis environment and loads data. These datasets can also be added locally, which will avoid this cold start, and is suitable for smaller files.

When a user of the application is a DataRobot user (see this documentation for sharing applications) and has data stores configured in the DataRobot platform (see this page for configuring data stores and this page for details on supported data stores) of a supported connection (currently Postgres and Redshift), these will appear in the application as a "Remote Data Connection" (see screenshot below). These DataStores will be queried via DataRobot's data wrangling platform (see documentation). Unlike the app's bespoke database integration (see Change the database), a data store will not be visible to all users of the app, only to those who have access to the data store and its default credentials in the DataRobot platform.

Before proceeding, ensure you have access to the required credentials and services. This template is pre-configured to use an Azure OpenAI endpoint and Snowflake Database credentials. To run the template as-is, you will need access to Azure OpenAI (leverages gpt-4o by default).
Prerequisites: If you are using DataRobot Codespaces, this is already complete for you. If not, install:
- Python 3.10+
- uv (Python package manager)
- Taskfile.dev (task runner)
- Node.js 18+ (for React frontend)
- Pulumi (infrastructure as code)
DataRobot Codespaces users: If you opened this template from the Application Templates gallery, you can skip steps 1 and 2. If you created a fresh codespace, you can skip step 1 but still need to clone the repository (step 2).
For local development, follow all of the following steps:
-
If
pulumiis not already installed, install the CLI following instructions here. After installing for the first time, restart your terminal and run:pulumi login --local # omit --local to use Pulumi Cloud (requires separate account) -
Clone the template repository
git clone https://github.com/datarobot-community/talk-to-my-data-agent.git cd talk-to-my-data-agent -
Rename the file
.env.templateto.envin the root directory of the repo and populate your credentials.DATAROBOT_API_TOKEN=... DATAROBOT_ENDPOINT=... # e.g. https://app.datarobot.com/api/v2 OPENAI_API_KEY=... OPENAI_API_VERSION=... # e.g. 2024-02-01 OPENAI_API_BASE=... # e.g. https://your_org.openai.azure.com/ OPENAI_API_DEPLOYMENT_ID=... # e.g. gpt-4o PULUMI_CONFIG_PASSPHRASE=... # Required. Choose your own alphanumeric passphrase to be used for encrypting pulumi config FRONTEND_TYPE=... # Optional. Default is "react", set to "streamlit" to use Streamlit frontend USE_DATAROBOT_LLM_GATEWAY=... # Optional. Set to "true" to use DataRobot LLM Gateway with consumption based pricing instead of using your own LLM credentials
Use the following resources to locate the required credentials:
- DataRobot API Token: Refer to the Create a DataRobot API Key section of the DataRobot API Quickstart docs.
- DataRobot Endpoint: Refer to the Retrieve the API Endpoint section of the same DataRobot API Quickstart docs.
- LLM Endpoint and API Key: Refer to the Azure OpenAI documentation.
-
In a terminal, run:
python quickstart.py YOUR_PROJECT_NAME # Windows users may have to use `py` instead of `python`What does
quickstart.pydo?The quickstart script automates the entire setup process for you:
- Creates and activates a Python virtual environment
- Installs all required dependencies (using
uvfor faster installation, falling back topip) - Loads your
.envconfiguration - Sets up the Pulumi stack with your project name
- Runs
pulumi upto deploy your application - Displays your application URL when complete
This single command replaces all the manual steps described in the advanced setup section.
Python 3.10 - 3.12 are supported
Advanced users desiring control over virtual environment creation, dependency installation, environment variable setup
and pulumi invocation see here.
The Talk to My Data agent supports two frontend options:
- React (default): a modern JavaScript-based frontend with enhanced UI features which uses FastAPI Backend. See the React Frontend Development Guide
- Streamlit: A Python-based frontend with a simple interface. See the Streamlit Frontend Development Guide
To change the frontend:
- In
.env: SetFRONTEND_TYPE="streamlit"to use the Streamlit frontend instead of the default React. - Run the following to update your stack (Or run
python quickstart.pyfor easier setup)source set_env.sh # On Windows use `set_env.bat` pulumi up
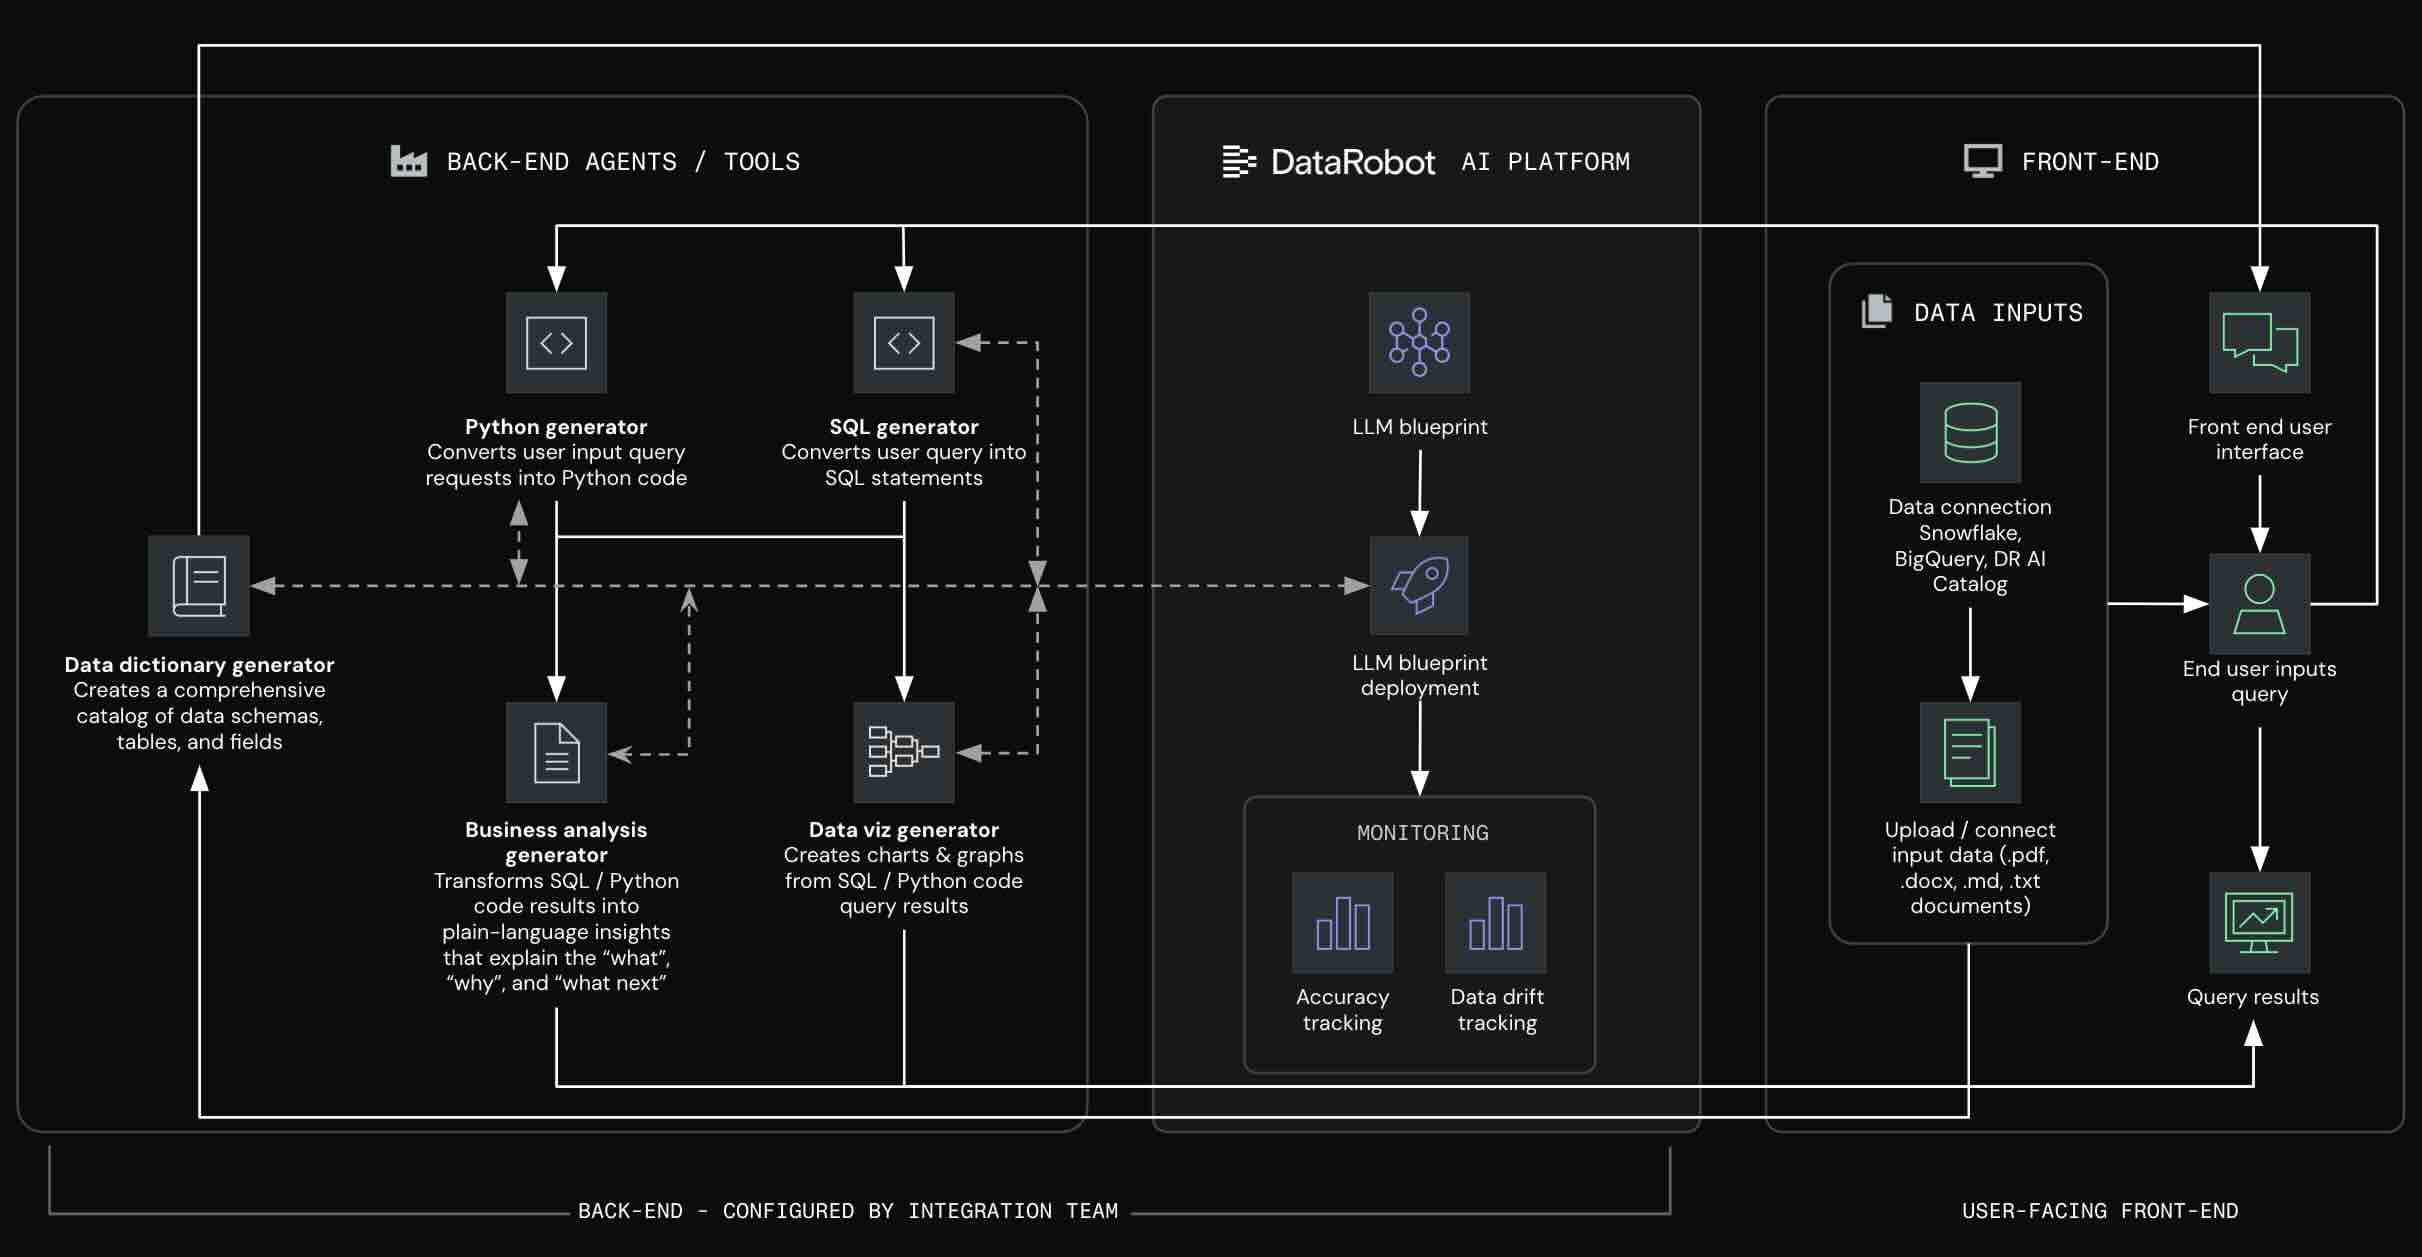
App templates contain three families of complementary logic:
- AI logic: Necessary to service AI requests and produce predictions and completions.
deployment_*/ # Chat agent model - App Logic: Necessary for user consumption; whether via a hosted front-end or integrating into an external consumption layer.
frontend/ # Streamlit frontend app_frontend/ # React frontend alternative with the api located in app_backend utils/ # App business logic & runtime helpers - Operational Logic: Necessary to activate DataRobot assets.
infra/__main__.py  # Pulumi program for configuring DataRobot to serve and monitor AI and app logic
infra/  # Settings for resources and assets created in DataRobot
App Templates transform your AI projects from notebooks to production-ready applications. Too often, getting models into production means rewriting code, juggling credentials, and coordinating with multiple tools and teams just to make simple changes. DataRobot's composable AI apps framework eliminates these bottlenecks, letting you spend more time experimenting with your ML and app logic and less time wrestling with plumbing and deployment.
- Start building in minutes: Deploy complete AI applications instantly, then customize the AI logic or the front-end independently (no architectural rewrites needed).
- Keep working your way: Data scientists keep working in notebooks, developers in IDEs, and configs stay isolated. Update any piece without breaking others.
- Iterate with confidence: Make changes locally and deploy with confidence. Spend less time writing and troubleshooting plumbing and more time improving your app.
Each template provides an end-to-end AI architecture, from raw inputs to deployed application, while remaining highly customizable for specific business requirements.
Your data privacy is important to us. Data handling is governed by the DataRobot Privacy Policy, please review before using your own data with DataRobot.
- Modify the
LLMsetting ininfra/settings_generative.pyby changingLLM=LLMs.AZURE_OPENAI_GPT_4_Oto any other LLM from theLLMsobject.- Trial users: Please set
LLM=LLMs.AZURE_OPENAI_GPT_4_O_MINIsince GPT-4o is not supported in the trial. Use theOPENAI_API_DEPLOYMENT_IDin.envto override which model is used in your Azure organization. You'll still see GPT 4o-mini in the playground, but the deployed app will use the provided Azure deployment.
- Trial users: Please set
- To use an existing TextGen model or deployment:
- In
infra/settings_generative.py: SetLLM=LLMs.DEPLOYED_LLM. - In
.env: Set either theTEXTGEN_REGISTERED_MODEL_IDor theTEXTGEN_DEPLOYMENT_ID - In
.env: SetCHAT_MODEL_NAMEto the model name expected by the deployment (e.g. "claude-3-7-sonnet-20250219" for an anthropic deployment,"datarobot-deployed-llm" for NIM models ) - (Optional) In
utils/api.py:ALTERNATIVE_LLM_BIGandALTERNATIVE_LLM_SMALLcan be used for fine-grained control over which LLM is used for different tasks.
- In
The application supports using the DataRobot LLM Gateway instead of bringing your own LLM credentials.
The application follows this priority order for LLM selection:
- OpenAI Credentials (Highest Priority) - If
OPENAI_API_KEY,OPENAI_API_BASE, etc. are provided in.env, they will always be used regardless of theUSE_DATAROBOT_LLM_GATEWAYsetting - LLM Gateway - If
USE_DATAROBOT_LLM_GATEWAY=trueand no OpenAI credentials are provided
Important: Remove or comment out OPENAI_* environment variables to use DataRobot's LLM Gateway
- In
.env: SetUSE_DATAROBOT_LLM_GATEWAY=true - Run
pulumi upto update your stack (Or runpython quickstart.pyfor easier setup)source set_env.sh # On Windows use `set_env.bat` pulumi up
- No hardcoded LLM credentials (OpenAI keys) are required in your
.envfile - The LLM Gateway provides a unified interface to multiple LLM providers through DataRobot in production
- You can pick from the catalog and change the model
LLMininfra/settings_generative.py - It will use a DataRobot Guarded RAG Deployment and LLM Blueprint for that selected model
Note: LLM Gateway mode requires consumption based pricing is enabled for your DataRobot account as is evidenced by the ENABLE_LLM_GATEWAY feature flag.
Contact your administrator if this feature is not available.
- In
.env: If not using an existing TextGen model or deployment, provide the required credentials dependent on your choice. - Run
pulumi upto update your stack (Or runpython quickstart.pyfor easier setup)source set_env.sh # On Windows use `set_env.bat` pulumi up
⚠️ Availability information: Using a NIM model requires custom model GPU inference, a premium feature. You will experience errors by using this type of model without the feature enabled. Contact your DataRobot representative or administrator for information on enabling this feature.
To add Snowflake support:
- Modify the
DATABASE_CONNECTION_TYPEsetting ininfra/settings_database.pyby changingDATABASE_CONNECTION_TYPE = "no_database"toDATABASE_CONNECTION_TYPE = "snowflake". - Provide snowflake credentials in
.envby either settingSNOWFLAKE_USERandSNOWFLAKE_PASSWORDor by settingSNOWFLAKE_KEY_PATHto a file containing the key. The key file should be a*.p8private key file. (see Snowflake Documentation) - Fill out the remaining snowflake connection settings in
.env(refer to.env.templatefor more details) - Run
pulumi upto update your stack (Or runpython quickstart.pyfor easier setup)source set_env.sh # On Windows use `set_env.bat` pulumi up
The Talk to my Data Agent supports connecting to BigQuery.
- Modify the
DATABASE_CONNECTION_TYPEsetting ininfra/settings_database.pyby changingDATABASE_CONNECTION_TYPE = "no_database"toDATABASE_CONNECTION_TYPE = "bigquery". - Provide the required google credentials in
.envdependent on your choice. Ensure that GOOGLE_DB_SCHEMA is also populated in.env. - Run
pulumi upto update your stack (Or runpython quickstart.pyfor easier setup)source set_env.sh # On Windows use `set_env.bat` pulumi up
The Talk to my Data Agent supports connecting to SAP Datasphere.
- Modify the
DATABASE_CONNECTION_TYPEsetting ininfra/settings_database.pyby changingDATABASE_CONNECTION_TYPE = "no_database"toDATABASE_CONNECTION_TYPE = "sap". - Provide the required SAP credentials in
.env. - Run
pulumi upto update your stack (Or runpython quickstart.pyfor easier setup)source set_env.sh # On Windows use `set_env.bat` pulumi up
You can help the data analyst python agent by providing tools that can assist with data analysis tasks. For that, define functions in utils/tools.py. The function will be made available inside the code execution environment of the agent. The name, docstring and signature will be provided to the agent inside the prompt.
- Log into the DataRobot application.
- Navigate to Registry > Applications.
- Navigate to the application you want to share, open the actions menu, and select Share from the dropdown.
pulumi downFor manual control over the setup process adapt the following steps for MacOS/Linux to your environment:
python -m venv .venv
source .venv/bin/activate
pip install -r requirements.txt
source set_env.sh
pulumi stack init YOUR_PROJECT_NAME
pulumi up
e.g. for Windows/conda/cmd.exe this would be:
conda create --prefix .venv pip
conda activate .\.venv
pip install -r requirements.txt
set_env.bat
pulumi stack init YOUR_PROJECT_NAME
pulumi up
For projects that will be maintained, DataRobot recommends forking the repo so upstream fixes and improvements can be merged in the future.