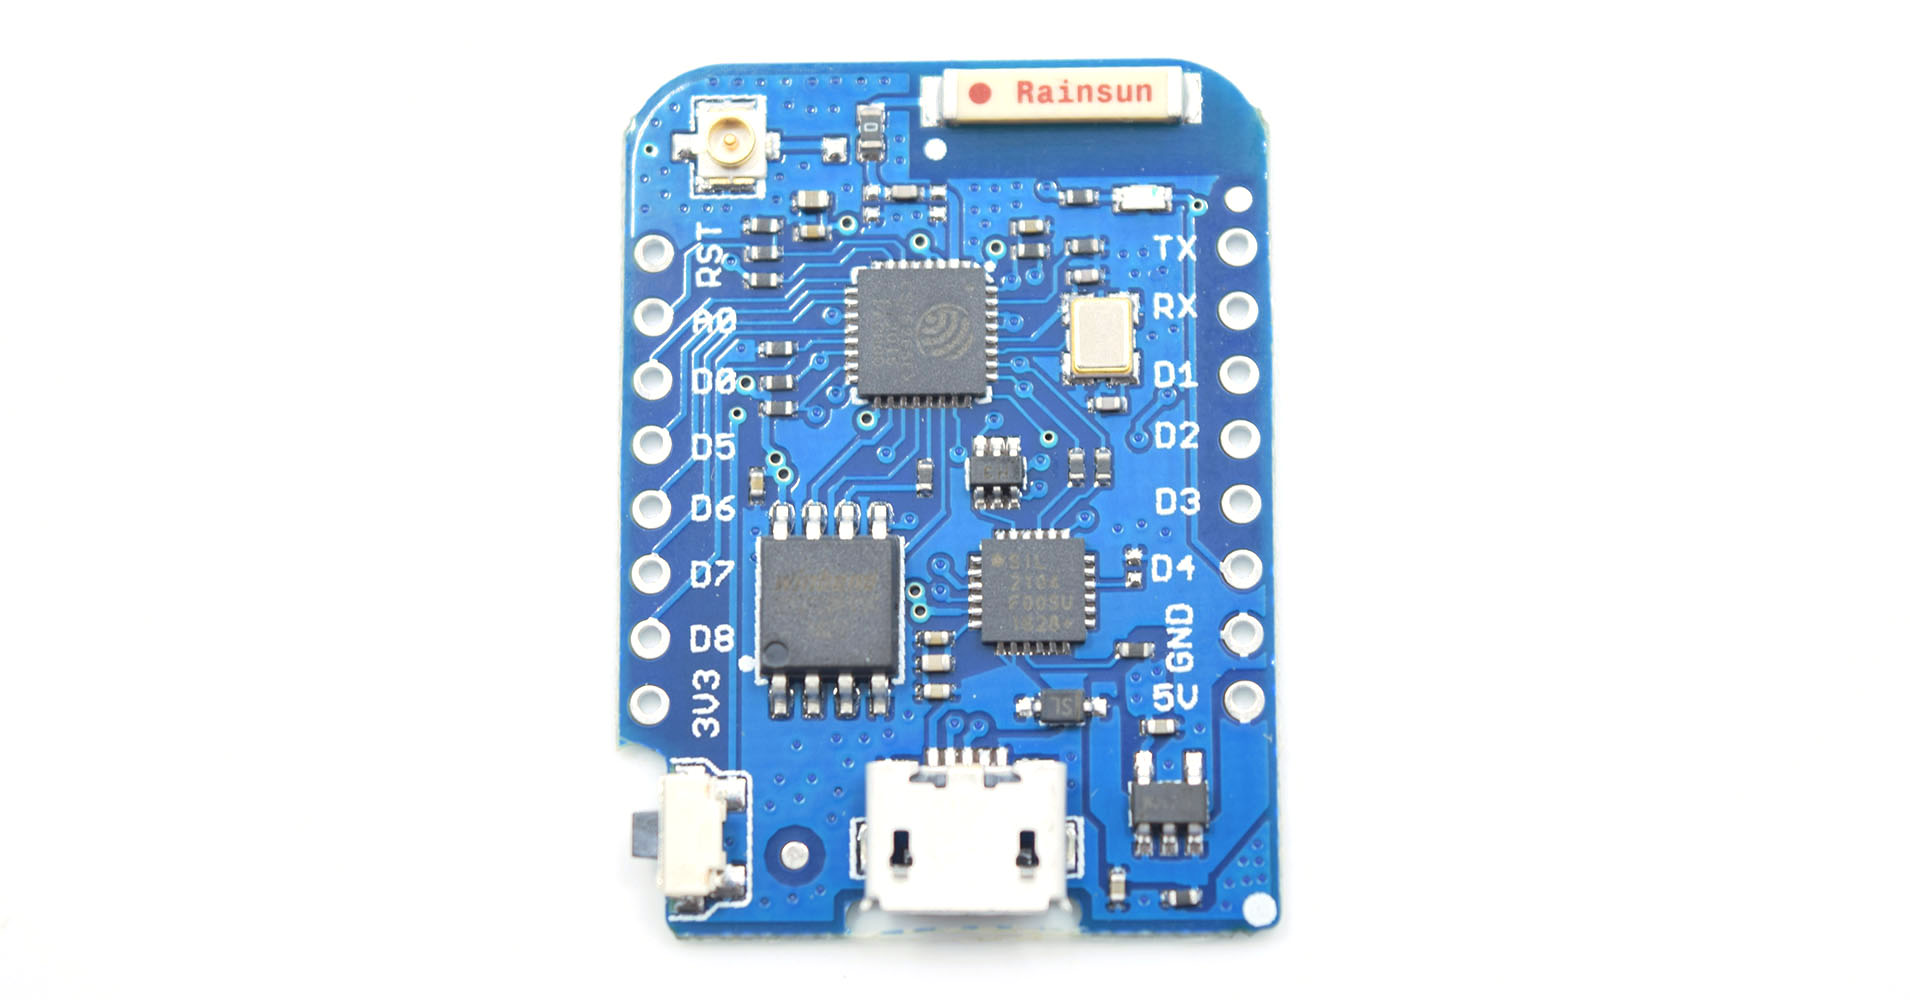
The D1 mini Pro is a mini wifi board based on ESP-8266EX.
ESP8266EX integrates the ultra-low power Tensilica L106 cache-less, no hardware divider, 32-bit micro controller (MCU), which is the smallest of the Xtensa RISC controllers.
See WeMos official web site for full documentation.
Features:
- 11 digital input/output pins
- Interrupt/pwm/I2C/one-wire
- 1 analog input(3.2V max input)
- 16M bytes(128M bit) Flash
- External antenna connector
- Built-in ceramic antenna
- New CP2104 USB-TO-UART IC
- Same size as D1 mini, but more light
| Technical specs | |
|---|---|
| Microcontroller | ESP-8266EX |
| Operating Voltage | 3.3V |
| Digital I/O Pins | 11 |
| Analog Input Pins | 1(Max input: 3.2V) |
| Clock Speed | 80MHz/160MHz |
| Flash | 16M bytes |
| Length | 34.2mm |
| Width | 25.6mm |
| Weight | 2.5g |
Thanks to HERON'S BLOG, the following table maps the Wemos D1 mini's pins to ESP8266 and Arduino pin numbers.
| Pin | Function | ESP-8266 | Arduino | Arduino IDE |
|---|---|---|---|---|
| TX | IO, Serial TX | GPIO1,TXD | D1 | 1 |
| RX | IO, Serial RX | GPIO2,RXD | D3 | 3 |
| A0 | Analog input, max 3.3V input | ADC | A0 | A0 |
| D0 | IO | GPIO16 | D16 | 16 |
| D1 | IO, SCL | GPIO5 | D5 | 5 |
| D2 | IO, SDA | GPIO4 | D4 | 4 |
| D3 | IO, 10k Pull-up | GPIO0 | D0 | 0 |
| D4 | IO, 10k Pull-up, BUILTIN_LED | GPIO2 | D2 | 2 |
| D5 | IO, SCK | GPIO14 | D14 | 14 |
| D6 | IO, MISO | GPIO12 | D12 | 12 |
| D7 | IO, MOSI | GPIO13 | D13 | 13 |
| D8 | IO, 10k Pull-down, SS | GPIO15 | D15 | 15 |
| G | Ground | GND | GND | |
| 5V | 5V | - | 5V | |
| 3V3 | 3.3V | VCC | 3.3V | |
| RST | Reset | RST | RESET |
All of the IO pins have interrupt/pwm/I2C/one-wire support except D0.
All of the IO pins run at 3.3V.
I choose PlatformIO IDE as integrated development environment.
It is a cross-platform build system running on top of GitHub's Atom text editor.
The repository directory structure complies with the need to maintain both the libraries and the projects source code.
+--WeMosD1
|  +--libraries
|  |  +--_Lib_stub_
|  |     +--src
|  |        +- _Lib_stub_.c
|  |        +- _Lib_stub_.h
|  +--projects
|  |  +--_App_stub_
|  |  |  +--lib
|  |  |  |  +- readme.txt
|  |  |  +--src
|  |  |  |  +- main.cpp
|  |  |  +- _App_stub_.pro
|  |  |  +- platformio.ini
|  |  +- platformio.ini.template
./libraries
Extra libraries directories root where PlatformIO Library Dependency Finder (LDF) will look for dependencies.
Edit the platformio.ini project configuration file and set
lib_extra_dirs
LDF option to libraries relative path (see below).
./libraries/_Lib_stub_
_Lib_stub_ library directory root.
./libraries/_Lib_stub_/src
Source code of _Lib_stub_ library.
./projects
PlatformIO projects directories root.
./projects/platformio.ini.template
PlatformIO project configuration file template.
Update the project specific platformio.ini file with its content.
./projects/_App_stub_
_App_stub_ project directory root.
./projects/_App_stub_/src
Source code of the project.
./projects/_App_stub_/lib
This directory can be used to store the project specific (private) libraries.
More details are located in lib/readme.txt file.
./projects/_App_stub_/_App_stub_.pro [optional]
Qt Creator project configuration file.
./projects/_App_stub_/platformio.ini
_App_stub_ project configuration file.
This file is created any time that PlatformIO initializes a project.
Add the following lines to the [env:d1_mini] section:
; extra directory where Library Dependency Finder (LDF) will look for dependencies.
lib_extra_dirs = ../../libraries

; uploader connection speed (baud rate) used to send firmware to board.
upload_speed = 921600
See platformio.ini.template.
Launch Atom editor and add a project folder (i.e. WeMosD1):
File > "Add Project Folder..." > /path/to/WeMosD1
Create the directories:
./libraries
./libraries/_Lib_stub_
./projects
Create a PlatformIO project:
PlatformIO > "Initialize or Update PlatformIO Project"
The PlatformIO: Initialize or Update PlatformIO Project dialog should result:
Selected board:
WeMos D1 R2 & mini

Choose the directory:
/absolute/path/to/WeMosD1/projects/_App_stub_
Edit the platformio.ini project configuration file
and set lib_extra_dirs LDF option to libraries relative path (see above).
See PlatformIO Qt Creator official page for more detailed information.
Fist of all, add the folder where is located platformio program
to system PATH.
Choose board ID using platformio boards
or Embedded Boards Explorer
and generate project via platformio init --ide command.
# Generate project for WeMos D1 Mini
platformio init --ide qtcreator --board d1_mini
The project is generated under the current directory.
You can specify another project directory via
platformio init -d %PATH_TO_THE_PROJECT_DIR% command.
Among other stuff, platformio generates the platformio.pro.
You are free to rename it as your preferences, such as yourProject.pro.
Import project via File > Open File or Project and select platformio.pro
from the folder where is located Project Configuration File platformio.ini.
Select default desktop kit and click on Configure Project
(Projects mode, left panel).
Set General > Build directory to the project directory
where is located Project Configuration File platformio.ini.
Remove all items from Build Steps,
click on Build Steps > Add Build Step > Custom Process Step and set:
- Command:
platformio - Arguments:
-f -c qtcreator run - Working directory:
%{buildDir}
Remove all items from Clean Steps,
click on Clean Steps > Add Clean Step > Custom Process Step and set:
- Command:
platformio - Arguments:
-f -c qtcreator run --target clean - Working directory:
%{buildDir}
Warning
The libraries which are added, installed or used in the project
after generating process wont be reflected in IDE.
To fix it you need to reinitialize project using platformio init (repeat it).
Conclusion
Build the project with shortcut Ctrl+Shift+B or using Menu: Build > Build All.
Useful commands
# process/build project from the current directory
platformio run

# upload firmware to embedded board
platformio run --target upload
# or
platformio run -t upload

# clean project (remove compiled files)
platformio run --target clean

# additional information
platformio run --help