
A zero-dependency networking solution for building modern and secure iOS, watchOS, macOS and tvOS applications.
![]()


🚀 TermiNetwork has been tested in a production environment with a heavy load of asynchronous requests and tens of thousands of unique clients per day.

This is a high level diagram of TermiNetwork showing how its componets are connected to each other.

- Multi-environment setup
- Model deserialization with Codables
- Decode response in the appropriate response type: Codable, UIImage, Data or String
- UIKit/SwiftUI helpers for downloading remote images
- Group your Requests in Routers
- Reachability support
- Transformers: convert models from one type to another easily
- Error Handling
- Interceptors
- Mock Responses
- Certificate Pinning
- Flexible Configuration
- Middleware
- File/Data Upload/Download
- Pretty printed debug information
- Installation
- Demo Application
- Usage
- Queue Hooks
- Error Handling
- Reachability
- Transformers
- Mock responses
- Interceptors
- Image Helpers
- Middleware
- Debug Logging
You can install TermiNetwork with one of the following ways...
Add the following line to your Podfile and run pod install in your terminal:
pod 'TermiNetwork', '~> 3.0.0'Add the following line to your Carthage and run carthage update in your terminal:
github "billp/TermiNetwork" ~> 3.0.0Go to File > Swift Packages > Add Package Dependency and add the following URL :
https://github.com/billp/TermiNetwork
To see all the features of TermiNetwork in action, download the source code and run the TermiNetworkExamples scheme.
Let's say you have the following Codable model:
struct Todo: Codable {
   let id: Int
   let title: String
}
The following example creates a request that adds a new Todo:
let params = ["title": "Go shopping."]
let headers = ["x-auth": "abcdef1234"]

Request(method: .post,
	url: "https://myweb.com/api/todos",
	headers: headers,
	params: params)
    .success(responseType: Todo.self) { todo in
	print(todo)
    }
    .failure { error in
	print(error.localizedDescription)
}One of the following supported HTTP methods:
.get, .head, .post, .put, .delete, .connect, .options, .trace or .patch
One of the following supported response types
Codable.self (implementations), UIImage.self, Data.self or String.self
A callback that returns an object of the given type. (specified in responseType parameter)
A callback that returns a Error and the response Data (if any).
The following example uses a custom Queue with maxConcurrentOperationCount and a configuration object. To see the full list of available configuration properties, take a look at Configuration properties in documentation.
let myQueue = Queue(failureMode: .continue)
myQueue.maxConcurrentOperationCount = 2

let configuration = Configuration(
    cachePolicy: .useProtocolCachePolicy,
    timeoutInterval: 30,
    requestBodyType: .JSON
)

let params = ["title": "Go shopping."]
let headers = ["x-auth": "abcdef1234"]

Request(method: .post,
        url: "https://myweb.com/todos",
        headers: headers,
        params: params,
        configuration: configuration)
    .queue(queue)
    .success(responseType: String.self) { response in
        print(response)
    }
    .failure { error in
        print(error.localizedDescription)
    }
The request above uses a custom queue myQueue with a failure mode of .continue (default), which means that the queue continues its execution if a request fails.
The complete and recommended setup of TermiNetwork consists of defining Environments and Routers.
Create a swift enum that implements the EnvironmentProtocol and define your environments.
enum MyAppEnvironments: EnvironmentProtocol {
    case development
    case qa

    func configure() -> Environment {
        switch self {
        case .development:
            return Environment(scheme: .https,
                               host: "localhost",
                               suffix: .path(["v1"]),
                               port: 3000)
        case .qa:
            return Environment(scheme: .http,
                               host: "myqaserver.com",
                               suffix: .path(["v1"]))
        }
    }
}
Optionally you can pass a configuration object to make all Routers and Requests to inherit the given configuration settings.
To set your global environment use Environment.set method
Environment.set(MyAppEnvironments.development)Create a swift enum that implements the RouteProtocol and define your environments.
The following example creates a TodosRoute with all the required API routes (cases).
enum TodosRoute: RouteProtocol {
    // Define your routes
    case list
    case show(id: Int)
    case add(title: String)
    case remove(id: Int)
    case setCompleted(id: Int, completed: Bool)

    // Set method, path, params, headers for each route
    func configure() -> RouteConfiguration {
        let configuration = Configuration(requestBodyType: .JSON,
                                          headers: ["x-auth": "abcdef1234"])

        switch self {
        case .list:
            return RouteConfiguration(method: .get,
                                      path: .path(["todos"]), // GET /todos
                                      configuration: configuration)
        case .show(let id):
            return RouteConfiguration(method: .get,
                                      path: .path(["todo", String(id)]), // GET /todos/[id]
                                      configuration: configuration)
        case .add(let title):
            return RouteConfiguration(method: .post,
                                      path: .path(["todos"]), // POST /todos
                                      params: ["title": title],
                                      configuration: configuration)
        case .remove(let id):
            return RouteConfiguration(method: .delete,
                                      path: .path(["todo", String(id)]), // DELETE /todo/[id]
                                      configuration: configuration)
        case .setCompleted(let id, let completed):
            return RouteConfiguration(method: .patch,
                                      path: .path(["todo", String(id)]), // PATCH /todo/[id]
                                      params: ["completed": completed],
                                      configuration: configuration)
        }
    }
}
You can optionally pass a configuration object to each case if you want provide different configuration for each route.
To create the request you have to initialize a Router instance and specialize it with your defined Router, in our case TodosRoute:
Router<TodosRoute>().request(for: .add(title: "Go shopping!"))
    .success(responseType: Todo.self) { todo in
        // do something with todo
    }
    .failure { error in
        // do something with error
}Hooks are closures that run before and/or after a request execution in a queue. The following hooks are available:
Queue.shared.beforeAllRequestsCallback = {
    // e.g. show progress loader
}

Queue.shared.afterAllRequestsCallback = { completedWithError in
    // e.g. hide progress loader
}

Queue.shared.beforeEachRequestCallback = { request in
    // do something with request
}

Queue.shared.afterEachRequestCallback = { request, data, urlResponse, error
    // do something with request, data, urlResponse, error
}
For more information take a look at Queue in documentation.
TermiNetwork provides its own error types (TNError) for all the possible error cases. These errors are typically returned in onFailure callbacks of start methods.
To see all the available errors, please visit the TNError in documentation.
Router<TodosRoute>().request(for: .add(title: "Go shopping!"))
      .success(responseType: Todo.self) { todo in
         // do something with todo
      },
      .failure: { error in
          switch error {
          case .notSuccess(let statusCode):
               debugPrint("Status code " + String(statusCode))
               break
          case .networkError(let error):
               debugPrint("Network error: " + error.localizedDescription)
               break
          case .cancelled(let error):
               debugPrint("Request cancelled with error: " + error.localizedDescription)
               break
          default:
               debugPrint("Error: " + error.localizedDescription)
}With Reachability you can monitor the network state of the device, like whether it is connected through wifi or cellular network.
let reachability = Reachability()
try? reachability.monitorState { state in
    switch state {
    case .wifi:
        // Connected through wifi
    case .cellular:
        // Connected through cellular network
    case .unavailable:
        // No connection
    }
}
Transformers enables you to convert your Rest models to Domain models by defining your custom transform functions. To do so, you have to create a class that inherits the Transformer class and specializing it by providing the FromType and ToType generics.
The following example transforms an array of RSCity (rest) to an array of City (domain) by overriding the transform function.
final class CitiesTransformer: Transformer<[RSCity], [City]> {
    override func transform(_ object: [RSCity]) throws -> [City] {
        object.map { rsCity in
            City(id: UUID(),
                 cityID: rsCity.id,
                 name: rsCity.name,
                 description: rsCity.description,
                 countryName: rsCity.countryName,
                 thumb: rsCity.thumb,
                 image: rsCity.image)
        }
    }
}
Finally, pass the CitiesTransformer in the Request's start method:
Router<CityRoute>()
    .request(for: .cities)
    .success(transformer: CitiesTransformer.self) { cities in
        self.cities = cities
    }
    .failure { error in
        switch error {
        case .cancelled:
            break
        default:
            self.errorMessage = error.localizedDescription
        }
    }
Mock responses is a powerful feature of TermiNetwork that enables you to provide a local resource file as Request's response. This is useful, for example, when the API service is not yet available and you need to implement the app's functionality without losing any time. (Prerequisite for this is to have an API contract)
- Create a Bundle resource and put your files there. (File > New -> File... > Settings Bundle)
- Specify the Bundle path in Configuration
let configuration = Configuration()
if let path = Bundle.main.path(forResource: "MockData", ofType: "bundle") {
    configuration.mockDataBundle = Bundle(path: path)
}
- Enable Mock responses in Configuration
configuration.mockDataEnabled = true
- Define the mockFilePath path in your Routes
The example above loads the Cities/cities.json from MockData.bundle and returns its data as Request's response.
enum CityRoute: RouteProtocol {
case cities

func configure() -> RouteConfiguration {
    switch self {
    case .cities:
        return RouteConfiguration(method: .get,
                                    path: .path(["cities"]),
                                    mockFilePath: .path(["Cities", "cities.json"]))
        }
    }
}
For a complete example, open the demo application and take a look at City Explorer - Offline Mode.
Interceptors offers you a way to change or augment the usual processing cycle of a Request. For instance, you can refresh an expired access token (unauthorized status code 401) and then retry the original request. To do so, you just have to implement the InterceptorProtocol.
The following Interceptor implementation tries to refresh the access token with a retry limit (5).
final class UnauthorizedInterceptor: InterceptorProtocol {
    let retryDelay: TimeInterval = 0.1
    let retryLimit = 5

    func requestFinished(responseData data: Data?,
                         error: TNError?,
                         request: Request,
                         proceed: @escaping (InterceptionAction) -> Void) {
        switch error {
        case .notSuccess(let statusCode):
            if statusCode == 401, request.retryCount < retryLimit {
                // Login and get a new token.
                Request(method: .post,
                        url: "https://www.myserviceapi.com/login",
                        params: ["username": "johndoe",
                                 "password": "p@44w0rd"])
                    .success(responseType: LoginResponse.self) { response in
                        let authorizationValue = String(format: "Bearer %@", response.token)

                        // Update the global header in configuration which is inherited by all requests.
                        Environment.current.configuration?.headers["Authorization"] = authorizationValue

                        // Update current request's header.
                        request.headers["Authorization"] = authorizationValue

                        // Finally retry the original request.
                        proceed(.retry(delay: retryDelay))
                    }
            } else {
	 	// Continue if the retry limit is reached
	    	proceed(.continue)
            }
        default:
            proceed(.continue)
        }
    }
}
Finally, you have to pass the UnauthorizedInterceptor to the interceptors property in Configuration:
let configuration = Configuration()
configuration.interceptors = [UnauthorizedInterceptor.self]TermiNetwork provides two different helpers for setting remote images.
-
Example with URL
var body: some View {
    TermiNetwork.Image(withURL: "https://example.com/path/to/image.png",
	               defaultImage: UIImage(named: "DefaultThumbImage"))
}
-
Example with Request
var body: some View {
    TermiNetwork.Image(withRequest: Router<CityRoute>().request(for: .image(city: city)),
                       defaultImage: UIImage(named: "DefaultThumbImage"))
}
-
Example with URL
let imageView = UIImageView() // or NSImageView (macOS), or WKInterfaceImage (watchOS)
imageView.tn_setRemoteImage(url: sampleImageURL,
                            defaultImage: UIImage(named: "DefaultThumbImage"),
                            preprocessImage: { image in
    // Optionally pre-process image and return the new image.
    return image
}, onFinish: { image, error in
    // Optionally handle response
})
-
Example with Request
let imageView = UIImageView() // or NSImageView (macOS), or WKInterfaceImage (watchOS)
imageView.tn_setRemoteImage(request: Router<CityRoute>().request(for: .thumb(withID: "3125")),
                            defaultImage: UIImage(named: "DefaultThumbImage"),
                            preprocessImage: { image in
    // Optionally pre-process image and return the new image.
    return image
}, onFinish: { image, error in
    // Optionally handle response
})
Middleware enables you to modify headers, params and response before they reach the success/failure callbacks. You can create your own middleware by implementing the RequestMiddlewareProtocol and passing it to a Configuration object.
Take a look at ./Examples/Communication/Middleware/CryptoMiddleware.swift for an example that adds an additional encryption layer to the application.
You can enable the debug logging by setting the verbose property to true in your Configuration.
let configuration = Configuration()
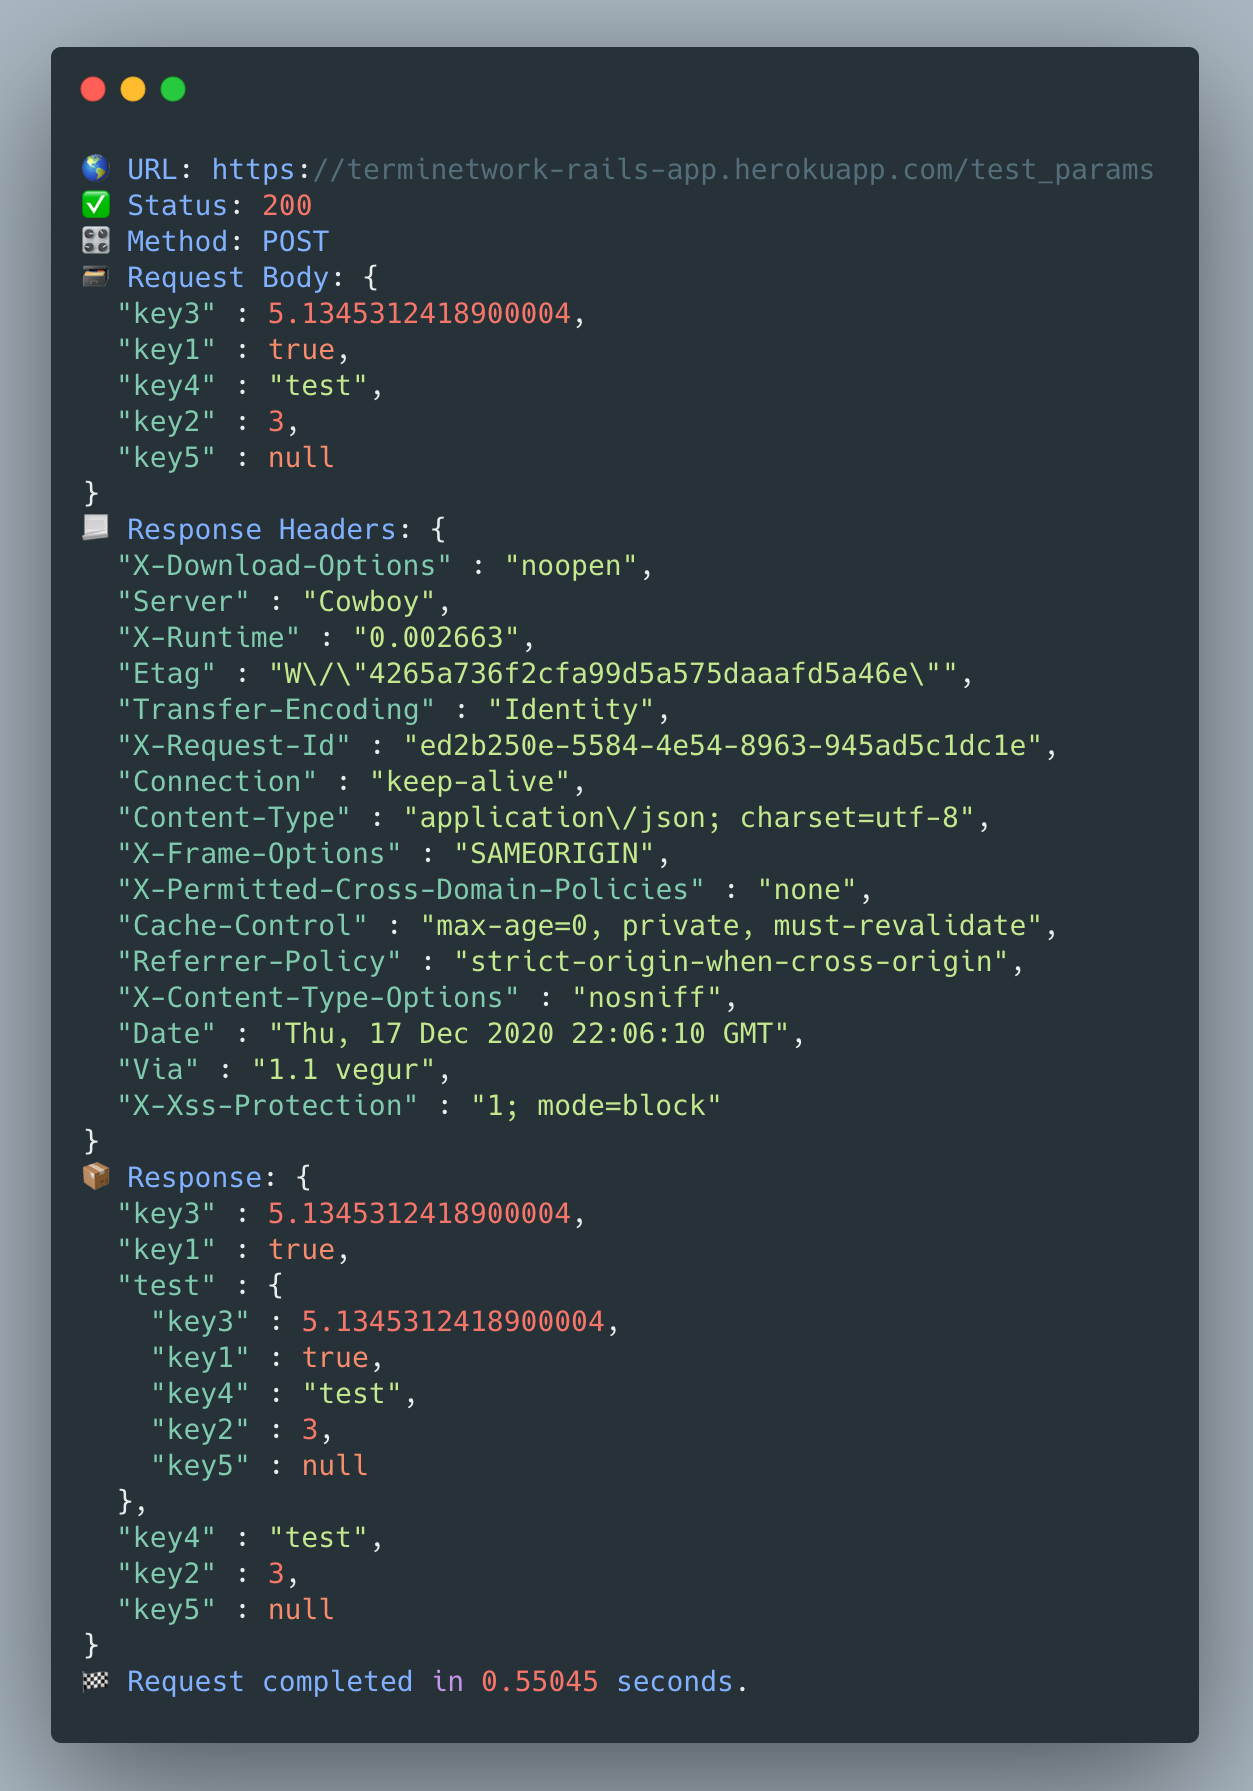
configuration.verbose = true... and you will see a beautiful pretty-printed debug output in debug window
To run the tests open the Xcode Project > TermiNetwork scheme, select Product -> Test or simply press ⌘U on keyboard.
Alex Athanasiadis, alexanderathan@gmail.com
TermiNetwork is available under the MIT license. See the LICENSE file for more info.