TigerGraph ML team
Machine learning on graph data has become a common task across industries. However, different from traditional datasets, graph data is still new to many practitioners and there isn’t a standard toolkit/platform to perform machine learning on such data. The ML workbench is to fill that gap. It provides a robust and efficient data pipeline to stream graph data from TigerGraph database to users’ existing ML systems as well as common data processing functions such as train/test data split and subgraph sampling. It also provides a TigerGraph optimized IDE (Integrated Development Environment) as a one-stop shop for developing graph ML models with TigerGraph. In short, it is a toolkit for data scientists and machine learning practitioners to integrate TigerGraph into their machine learning workflow, and to enable them to quickly build their first Graph ML application.
For a quick start, feel free to skip the Overview section and jump to Getting Started directly.
Note: The current version only supports model training. Model tuning and hosting will come soon but they are beyond the scope of the current version.
The ML Workbench V1 contains 3 major components.
- Graph data processing service (GDPS). GDPS is a microservice that performs common data processing functions such as train/test split, and graph sampling/batching (e.g., neighbor sampling). It should be run on the TG database server to be able to communicate with it. Although the service provides a standard REST API, we DO NOT intend to expose the API to users for security and usability considerations. Rather, we recommend using the python client
tgmlto access the service (more languages will be supported later). - TigerGraph ML (tgml). TGML is a python package designed for machine learning practitioners to integrate TigerGraph into their existing workflow. It serves as a python client for GDPS, but more importantly, it provides various graph data loaders, which behave like the data loaders in typical machine learning libraries but load data from the TigerGraph database. Put differently, users can just plug in the graph data loaders into their existing model training code, and they will get batches of graph data as if the data is read from their local disk.
- TigerLab. TigerLab is an integrated development environment (IDE) for ML scientists and developers. It is a TigerGraph-customized JupyterLab and comes with
tgml, gsql terminal, and detailed tutorial notebooks for using the workbench. It has 2 editions:- Desktop edition. It is a desktop application that runs locally on your computer. The current version has basic functionality but it is behind the server edition. For better experience, we recommend starting with the server edition, even on a personal computer.
- Server edition. It runs on a (presumably remote) computing server, and you open the IDE in your browser. All computations are done on the server. You can run the server edition on your local computer and access it through the browser as well.
Dependencies
- Docker
- Python 3.7+ (only needed if you want to run any of the source code. Otherwise everything is containerized.)
Outline
- Set up TigerGraph database server.
- Deploy Graph Data Processing Service.
- Install Tigerlab or the
tgmlpackage.
Detailed Steps
- You need a TigerGraph database server with TigerGraph 3.2+. See the docs on how to start a TigerGraph Server. tgcloud.io will be supported in the near future but right now the workbench only works with on-prem servers.
- If you will run the TigerGraph docker container, create a folder on the server and make sure it is mapped to the file system inside the container using the
-v {some folder on server}:{some folder in container}option, e.g.,-v /home/user/data:/home/tigergraph/mydata. This allows access to data inside the container from outside. Take note of this argument as GDPS will also use those folders to read and save data. - If you will run the TigerGraph software directly, then there is nothing much to do and go ahead.
- For security purposes, we recommend turning on OAuth authentication for the TigerGraph database even for development, as long as the server is accessible remotely. However, this step is optional.
- If you will run the TigerGraph docker container, create a folder on the server and make sure it is mapped to the file system inside the container using the
- Deploy the Graph Data Processing Service docker image to your TigerGraph server, following the instructions below. You can also run the source code if that is more of your thing following the instructions in the repo. If there is a firewall, you might need to allow the port of the service (default is 8000).
- Open a terminal on the machine hosting the TigerGraph database. Note: Do not open the terminal inside the database container if you are running TigerGraph's docker container.
- Download this script with your favoriate tool such as wget
wget https://tigergraph-public-data.s3.us-west-1.amazonaws.com/ml-workbench/gdps/run_container.sh - Run the downloaded script and it will guide you through the process of running the GDPS container:
bash run_container.sh - You can pass the following arguments to the script to configure the service if needed. E.g.:
bash run_container.sh --tg_rest_port 1000.--tg_rest_port: The port for RESTPP. Default: 9000.--tg_gs_port: The port for GSQL server. Default: 14240.--keep_tmp_files: Whether to keep temporary files. A good number of temporary files will be generated in the temporary output folder while the service is running. It is not recommended to keep those files unless you are debugging. Default: False.--tg_default_credentials: Whether to use the default username and password of TigerGraph (tigergraph) to authenticate with the database. If True, any authentication header sent to GDPS will be ignored and GDPS will talk to the database using the default credentials. This will open a big security hole and try to avoid doing it unless debugging locally. Default: False.
- To check whether GDPS is running and accessible, visit the url
http://server_ip:8000/in your browser whereserver_ipis the IP address of the TigerGraph server. If you see something like{"message":"Testing page. Remove before deployment"}, then you are good to go.
- From now on, there are 3 paths forward to using the ML workbench depending on your needs.
- If you just want to use the
tgmlpackage in your python code,pip install torch && pip install tgmlwill install the python librarytgml. Then start writing your code or see the tutorial notebooks for examples. - If you want to experience more with the workbench and don’t need a computing server, install TigerLab desktop, which comes with a python environment with tigergraph related packages and some ML packages pre-installed. Note: The development of the desktop edition is behind the server edition. For full experience, we recommend using the server edition as of now, even on a personal computer.
- Download: Mac, Windows (coming soon)
- When installing TigerLab desktop please ensure to set install destination to “Install for me only” to avoid interference with the system’s build in Python
- Once you have finished installing, you can access our example notebooks here. (Note: If you use the git extension in TigerLab to clone from GitHub, you need to setup a personal token for repo clone permission.)
- If you want to have the workbench running remotely and continuously, deploy TigerLab server edition to a server.
- SSH into the computing server or open a terminal locally (if you want to run the server edition locally)
- Run
docker run --network="host" -p 8888:8888 -v {directory on the server}:/workspace tgbill/tigerlab, where{directory on the server}will be mapped to the root directory in TigerLab, so that any files you created in TigerLab will be saved to your server.- If there is a firewall, you might need to allow the port of the service (default 8888).
- Once the container is deployed successfully, you can access TigerLab in your browser at address
http://server_ip:8888/lab?token=__token__, whereserver_ipis the ip address of the server running TigerLab and__token__is printed out on the terminal when you finished deploying the container.
- If everything goes well, you should have JupyterLab open in your browser as shown below. Click on the
ML Templatewidget to download the example notebooks and have fun! (Note: The notebooks are named to follow the natural order of progression but each one is self-contained.)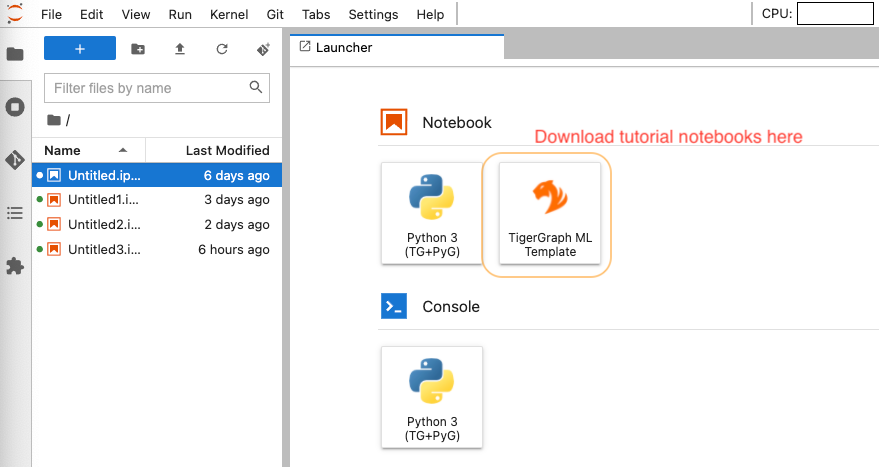
- If you just want to use the