This project shows how to use the NuGets XMAMan.GraphicEngine and XMAMan.GraphicEngine2D. There is support for WinForm and WPF. Outputmethods are 2D, 3D and Raytracing.
If you want to use 2D and 3D-output, then you should use XMAMan.GraphicEngine If you only want to use 2D-output, then XMAMan.GraphicEngine2D is better because its smaler.
Note: DirectX mode only runs under WinForms, and DirectX must be installed first. To do so, copy the files from here: https://github.com/XMAMan/GraphicEngineExamples/blob/master/DirectXSetup.zip to a local directory and use DXSETUP.exe
Use the Wavefront-Exporter and use the triangulate-checkbox for export.

You need this in your csproj-File:
<UseWindowsForms>true</UseWindowsForms>Add this to your xaml-File to place the GraphicPanel
<Border BorderThickness="5" BorderBrush="DarkBlue" x:Name="graphicControlBorder"/>For you code-behind you need this
 var panel = new GraphicPanel3D() { Width = 100, Height = 100, Mode = Mode3D.OpenGL_Version_3_0 };
 this.graphicControlBorder.Child = new GraphicControl(panel);

 this.DataContext = new ViewModel(panel);
Now you can use the GraphicPanel3D-Object in your ViewModel to send the drawing-commands to the view. In our case we want to use the raytracer to show a blender-file. To do this we need to add at first the obj-file:
panel.RemoveAllObjekts();
panel.AddWaveFrontFileAndSplit(DataDirectory + "3DScene.obj", false, new ObjectPropertys()
{
    SpecularHighlightPowExponent = 20,
    NormalInterpolation = InterpolationMode.Flat,
    Albedo = 0.5f
});
After this we can start the raytracer asynchron with
this.panel.StartRaytracing(this.panel.Width, this.panel.Height, (result) => {}, (error) => {});You can show/update the raytracingresult on the graphicpanel with this line of code:
graphicPanel.UpdateProgressImage();This will produce this image.

See the Raytracer-Demo-project for details.
You start again like in the raytracer-project by creating a WPF-Project and add the GraphicPanel to the view and viewModel.
If you want to display a 3D-scene you load the data into the GraphicPanel one times with this method:
private void Add3DObjects()
{
    panel.RemoveAllObjekts();

    //Ground
    int groundId = panel.AddSquareXY(1, 1, 1, new ObjectPropertys()
    {
        Position = new Vector3D(0, 0, 0),
        Orientation = new Vector3D(-90, 0, 180),
        Size = 80,
        Color = new ColorFromTexture()
        {
            TextureFile = DataDirectory + "Decal.bmp",
            TextureMatrix = Matrix3x3.Scale(6, 6)
        },
        ShowFromTwoSides = true,
        BrdfModel = BrdfModel.Diffus,

    });

    //Use Parallax Mapping for the ground
    var tex = this.panel.GetObjectById(groundId).Color.As<ColorFromTexture>();
    this.panel.GetObjectById(groundId).NormalSource = new NormalFromParallax()
    {
        ParallaxMap = tex.TextureFile,
        TextureMatrix = tex.TextureMatrix,
        ConvertNormalMapFromColor = true,
        TexturHeightFactor = 0.04f,
        IsParallaxEdgeCutoffEnabled = true
    };


    //Player
    this.playerId = panel.AddCylinder(2, 1, 1, true, 10, new ObjectPropertys()
    {
        Position = new Vector3D(0, 2, 0),
        Orientation = new Vector3D(0, 0, 0),
        Color = new ColorFromRgb() { Rgb = new Vector3D(1, 0, 0) },
        BrdfModel = BrdfModel.DiffuseAndMirror,
        HasStencilShadow = true,
    });

    panel.AddRing(0.3f, 2, 5, 20, new ObjectPropertys()
    {
        Position = new Vector3D(0, 2, 0),
        Orientation = new Vector3D(0, 0, 45),
        Size = 1,
        HasStencilShadow = true,
        NormalInterpolation = InterpolationMode.Smooth,
        TextureFile = "#004400",
        SpecularHighlightPowExponent = 50,
        ShowFromTwoSides = false
    });

    //LightSource
    panel.AddSphere(0.1f, 10, 10, new ObjectPropertys()
    {
        Position = new Vector3D(0, 10, 3),
        Orientation = new Vector3D(0, 0, 45),
        Size = 1.0f,
        TextureFile = "#FFFFFF",
        ShowFromTwoSides = true,
        RasterizerLightSource = new RasterizerLightSourceDescription() { SpotDirection = Vector3D.Normalize(new Vector3D(0, 30, 0) - new Vector3D(0, 75, 30)), SpotCutoff = 180.0f, SpotExponent = 1, ConstantAttenuation = 1.1f },
        RaytracingLightSource = new DiffuseSphereLightDescription() { Emission = 2200}
    });

    panel.GlobalSettings.BackgroundImage = "#FFFFFF";
    panel.GlobalSettings.ShadowsForRasterizer = RasterizerShadowMode.Shadowmap;
    panel.GlobalSettings.Camera = new Camera(new Vector3D(0, 7, 10), new Vector3D(0, -0.5f, -1), 45.0f);
}
In the timer-tick-method you can now draw the 3D-Object and add also 2D-content at top:
private void Draw()
{
    this.panel.DrawWithoutFlip();
    this.panel.DrawString(10, 10, Color.Red, 15, "Press W,A,S,D for moving the cylinder");
    this.panel.DrawString(10, 30, Color.Red, 15, "Press 1,2,3 or 4 for switching mode. Current mode: " + this.panel.Mode);
    this.panel.FlipBuffer();
}
This will produce a 3D-scene where you can move the red cylinder:

See the Wpf3D-Project for details.
Create a new WinForm-application in VisualStudio and add the GraphicEngine-NuGet. After this go the the toolbox and add the GraphicPanel3D-Panel to your MainWindow-Panel.

You can now again add all 3D-objects one time at start (or durring runtime if you would add/remove an object).
 panel.RemoveAllObjekts();
 //LegoMan from Wavefront file
 this.legoIds = panel.AddWaveFrontFileAndSplit(DataDirectory + "LegoMan.obj", false, new ObjectPropertys()
 {
     NormalInterpolation = InterpolationMode.Smooth,
     SpecularHighlightPowExponent = 50,
     Size = 0.1f,
 });
In the timer-tick-method you call again the DrawWithoutFlip- and FlipBuffer-Method.
private void Draw()
{
    this.panel.DrawWithoutFlip();
    this.panel.DrawString(10, 10, Color.Red, 15, "Press 1,2,3 or 4 for switching mode. Current mode: " + this.panel.Mode);
    this.panel.FlipBuffer();
}
This will produce a legoman which is spinning.

See the WinForm3D-Project for details.
You create a new WinForm- or WPF-Project and add the GraphicPanel like in the 3D-Examples. But instead of using the Add-Methods for adding some 3D-Objects you are using the draw-commands direct in the TimerTick-Method.
private void Draw()
{
    this.panel.ClearScreen(Color.AliceBlue);

    this.panel.DrawRectangle(new Pen(Color.Black, 2), 0, 0, this.panel.Width, this.panel.Height);

    this.panel.DrawFillCircle(Color.Green, this.ballPosition, ballRadius);
    this.panel.DrawCircle(Pens.Red, this.mousePosition, 10);

    this.panel.DrawFillRectangle(DataDirectory + "Face_04.png", 10, 10, 300, 200, true, Color.White);

    this.panel.DrawString(10, 10, Color.Black, 15, "Left mouse click for placing red circle");
    this.panel.DrawString(10, 30, Color.Black, 15, "Press 1,2,3 or 4 for switching mode. Current mode: " + this.panel.Mode);


    this.panel.FlipBuffer();
}
This will produce this image with a moving circle:

See the WinForm2D/Wpf2D-Project for details.
Create a WPF-Project (by example with usage of .NET 8.0) und add the XMAMan.GraphicEngine2D-NuGet.
You need this in your csproj-File because GraphicPanel2D is a winForm-control.
<UseWindowsForms>true</UseWindowsForms>Add this to your xaml-File to place the GraphicPanel
<Border BorderThickness="5" BorderBrush="DarkBlue" x:Name="graphicControlBorder"/>For you code-behind you need this
 var panel = new GraphicPanel2D() { Width = 100, Height = 100, Mode = Mode3D.OpenGL_Version_3_0 };
 this.graphicControlBorder.Child = new GraphicControl(panel);

 this.DataContext = new ViewModel(panel);
Now you can use the GraphicPanel2D-Object in your ViewModel to send the drawing-commands to the view.
class ViewModel
{
private GraphicPanel2D panel;
private System.Windows.Threading.DispatcherTimer timer;
private string DataDirectory = @"..\..\..\..\..\Data\";
private List<Vertex2D[]> voronioPolygons = null;
private List<Point> voronoiCellPoints = null;
private TextureData marioTexture = null;
private int spriteNr = 0;
public ViewModel(GraphicPanel2D panel)
{
this.panel = panel;
this.panel.Mode = Mode2D.OpenGL_Version_3_0;
this.panel.MouseClick += GraphicPanel2D_MouseClick;
this.panel.SizeChanged += GraphicPanel2D_SizeChanged;
this.timer = new System.Windows.Threading.DispatcherTimer();
this.timer.Interval = new TimeSpan(0, 0, 0, 0, 30);//30 ms
this.timer.Tick += Timer_Tick;
this.timer.Start();
CreateVoronoiPolygons();
}
private void GraphicPanel2D_MouseClick(object sender, MouseEventArgs e)
{
this.voronoiCellPoints = GraphicPanel2D.GetRandomPointList(10, this.panel.Width, this.panel.Height, new Random(0));
this.voronioPolygons = GraphicPanel2D.GetVoronoiPolygons(this.panel.Size, this.voronoiCellPoints);
}
private void GraphicPanel2D_SizeChanged(object sender, EventArgs e)
{
Draw(this.panel, DataDirectory, this.spriteNr, this.voronioPolygons, this.voronoiCellPoints, this.marioTexture, false, Matrix4x4.Ident());
}
private void Timer_Tick(object? sender, EventArgs e)
{
spriteNr++;
Draw(this.panel, DataDirectory, this.spriteNr, this.voronioPolygons, this.voronoiCellPoints, this.marioTexture, false, Matrix4x4.Ident());
}
//First, it creates a new texture bitmap by drawing into a framebuffer and then taking the data from it.This bitmap is then
//decomposed into polygons using Voronoi, and these polygons are then drawn using the polygon drawing function.
private void CreateVoronoiPolygons()
{
float yAngle = 10;
this.marioTexture = CreateMarioTexture(this.panel, DataDirectory + "nes_super_mario_bros.png", yAngle);
this.voronoiCellPoints = GraphicPanel2D.GetRandomPointList(10, marioTexture.Image.Width, marioTexture.Image.Height, new Random(0));
this.voronioPolygons = GraphicPanel2D.GetVoronoiPolygons(marioTexture.Image.Size, this.voronoiCellPoints);
this.voronioPolygons = this.voronioPolygons.Select(x => TransformPolygon(x, new Vector2D(340, 30))).ToList(); //Move to position (340, 30)
}
public class TextureData
{
public Bitmap Image;
public string TextureName;
}
//Creates a Mario texture in the currently selected 2D mode's texture memory in the GraphicsPanel2D.
//Return value: Name of the created texture.If the texture already exists, it will be updated.
public static TextureData CreateMarioTexture(GraphicPanel2D graphic, string texturFile, float yAngle)
{
int width = 80;
int height = 80;
int frameBufferId = graphic.CreateFramebuffer(width, height, true, false);
graphic.EnableRenderToFramebuffer(frameBufferId);
graphic.ClearScreen(Color.Transparent);
//Take only the section where Mario is visible from the large image and paint it into the framebuffer
graphic.DrawImage(texturFile, width / 2, height / 2, width, height, 243, 202, 283 - 243, 240 - 202, true, Color.FromArgb(255, 255, 255), 0, yAngle);
graphic.FlipBuffer();
int colorTextureId = graphic.GetColorTextureIdFromFramebuffer(frameBufferId);
Bitmap marioTexture = graphic.GetTextureData(colorTextureId);
graphic.DisableRenderToFramebuffer();
graphic.CreateOrUpdateNamedBitmapTexture("MarioBitmap", marioTexture);
//marioTexture.Save("MarioTexture.bmp");
//Color c = marioTexture.GetPixel(0, 0);
return new TextureData()
{
TextureName = "MarioBitmap",
Image = marioTexture
};
}
public static Vertex2D[] TransformPolygon(Vertex2D[] polygon, Vector2D position)
{
return polygon.Select(x => new Vertex2D(x.Position + position, x.Textcoord)).ToArray();
}
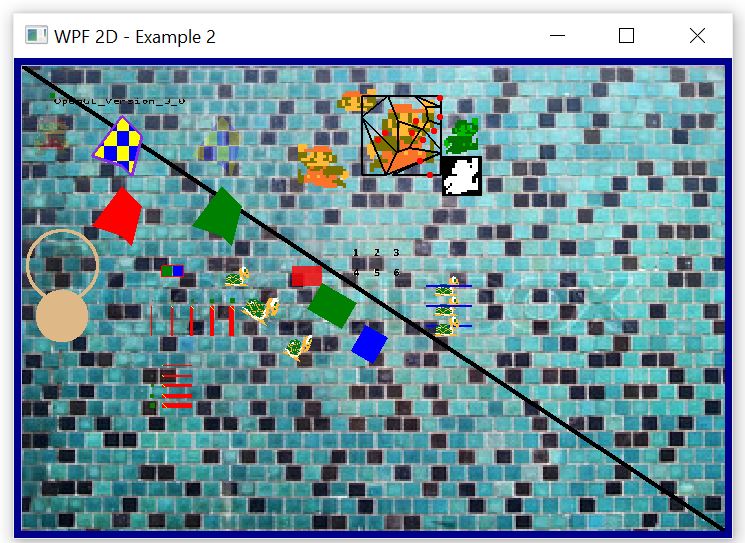
public void Draw(GraphicPanel2D graphic, string dataDirectory, int spriteNr, List<Vertex2D[]> voronioPolygons, List<Point> voronoiCellPoints, TextureData marioTex, bool showScreenAlpha, Matrix4x4 transform)
{
/*graphic.ClearScreen(Color.White);
foreach (var polygon in this.voronioPolygons)
{
graphic.DrawFillPolygon(dataDirectory + "thumb_COLOURBOX5847554.jpg", false, Color.FromArgb(255, 255, 255), polygon.ToList());
graphic.DrawPolygon(new Pen(Color.Black, 2), polygon.Select(x => x.Position).ToList());
}
foreach (var point in this.voronoiCellPoints)
{
graphic.DrawFillCircle(Color.Red, new Vector2D(point.X, point.Y), 2);
}
graphic.FlipBuffer();
return;*/
string text = graphic.Mode.ToString();
graphic.ClearScreen(dataDirectory + "thumb_COLOURBOX5847554.jpg");
graphic.MultTransformationMatrix(transform);
Size size = graphic.GetStringSize(20, text);
graphic.EnableScissorTesting(300, 20, 60, 25);
graphic.DrawImage(dataDirectory + "nes_super_mario_bros.png", 300, 20, 60, 50, 243, 202, 283 - 243, 240 - 202, true, Color.FromArgb(255, 255, 255));
graphic.DisableScissorTesting();
graphic.DrawImage(dataDirectory + "nes_super_mario_bros.png", 300, 100, 60, 50, 243, 202, 283 - 243, 240 - 202, true, Color.FromArgb(255, 255, 255), 0, 180);
graphic.DrawImage("MarioBitmap", 420, 50, 40, 40, 0, 0, 80, 80, true, Color.FromArgb(0, 255, 0));
//Check that the alpha value of the Mario texture is correct
graphic.CreateOrUpdateNamedBitmapTexture("MarioBitmapAlpha", BitmapHelp.GetAlphaChannel(marioTex.Image));
graphic.DrawFillRectangle("MarioBitmapAlpha", 420, 90, 40, 40, false, Color.FromArgb(255, 255, 255));
foreach (var polygon in voronioPolygons)
{
graphic.DrawFillPolygon("MarioBitmap", false, Color.FromArgb(255, 255, 255), polygon.ToList());
graphic.DrawPolygon(new Pen(Color.Black, 2), polygon.Select(x => x.Position).ToList());
}
foreach (var point in voronoiCellPoints)
{
graphic.DrawFillCircle(Color.Red, new Vector2D(point.X + 340, point.Y + 30), 2);
}
//graphic.DrawRectangle(new Pen(Color.Black, 3), 30, 30, size.Width, size.Height);
graphic.DrawFillRectangle(dataDirectory + "Mario.png", 10, 50, 40, 40, true, Color.FromArgb(spriteNr % 255, 255, 255, 255));
graphic.DrawString(30, 30, Color.Black, 10, text);
graphic.DrawLine(new Pen(Color.Black, 5), new Vector2D(0, 0), new Vector2D(graphic.Width, graphic.Height));
graphic.DrawPixel(new Vector2D(30, 30), Color.Green, 5);
graphic.DrawFillPolygon(dataDirectory + "Decal.bmp", new List<Vector2D>() { new Vector2D(100, 100), new Vector2D(110, 110), new Vector2D(120, 70), new Vector2D(100, 50), new Vector2D(70, 90) }, false, Color.FromArgb(255, 255, 255));
graphic.DrawFillPolygon(dataDirectory + "Decal.bmp", new List<Vector2D>() { new Vector2D(100 + 100, 100), new Vector2D(110 + 100, 110), new Vector2D(120 + 100, 70), new Vector2D(100 + 100, 50), new Vector2D(70 + 100, 90) }, false, Color.FromArgb(spriteNr % 255, 255, 255, 255));
graphic.DrawFillPolygon(Color.Red, new List<Vector2D>() { new Vector2D(100, 100 + 70), new Vector2D(110, 110 + 70), new Vector2D(120, 70 + 70), new Vector2D(100, 50 + 70), new Vector2D(70, 90 + 70) });
graphic.DrawFillPolygon(Color.Green, new List<Vector2D>() { new Vector2D(100 + 100, 100 + 70), new Vector2D(110 + 100, 110 + 70), new Vector2D(120 + 100, 70 + 70), new Vector2D(100 + 100, 50 + 70), new Vector2D(70 + 100, 90 + 70) });
graphic.DrawPolygon(new Pen(Color.BlueViolet, 3), new List<Vector2D>() { new Vector2D(100, 100), new Vector2D(110, 110), new Vector2D(120, 70), new Vector2D(100, 50), new Vector2D(70, 90) });
graphic.DrawCircle(new Pen(Color.BurlyWood, 3), new Vector2D(40, 200), 35);
graphic.DrawFillCircle(Color.BurlyWood, new Vector2D(40, 250), 25);
graphic.DrawFillRectangle(dataDirectory + "Tortoise.png", 200, 200, 30, 20, true, Color.FromArgb(255, 255, 255));
graphic.DrawFillRectangle(dataDirectory + "Tortoise.png", 240, 240, 40, 30, true, Color.FromArgb(255, 255, 255), 30);
graphic.DrawFillRectangle(dataDirectory + "Tortoise.png", 280, 280, 40, 30, true, Color.FromArgb(255, 255, 255), 30, 50);
graphic.DrawFillRectangle(Color.FromArgb(200, 255, 0, 0), 200 + 70, 200, 30, 20);
graphic.DrawFillRectangle(Color.Green, 240 + 70, 240, 40, 30, 30);
graphic.DrawFillRectangle(Color.Blue, 280 + 70, 280, 40, 30, 30, 50);
//Here I'm testing the case of drawing a triangle with P0.X==P1.X
//Observation: OpenGL always seems to shift a line one pixel to the left. If I specify (3,3), it draws at (2,3)
//For a triangle, the top left corner is correct and the bottom right corner is shifted one pixel to the top left
graphic.DrawPolygon(new Pen(Color.Red, 1), new List<Vector2D>() { new Vector2D(140, 200), new Vector2D(162, 200), new Vector2D(162, 211), new Vector2D(140, 211) });
graphic.DrawFillPolygon(Color.Green, new List<Vector2D>() { new Vector2D(140, 200), new Vector2D(150, 200), new Vector2D(150, 210), new Vector2D(140, 210) });
graphic.DrawFillPolygon(Color.Blue, new List<Vector2D>() { new Vector2D(151, 200), new Vector2D(161, 200), new Vector2D(161, 210), new Vector2D(151, 210) });
//Vertical lines with different widths
for (int i = 0; i < 5; i++)
{
graphic.DrawLine(new Pen(Color.Red, 1 + i), new Vector2D(130 + i * 20, 240), new Vector2D(130 + i * 20, 270));
graphic.DrawPixel(new Vector2D(130 + i * 20, 235), Color.Green, i + 1);
graphic.DrawPixel(new Vector2D(130 + i * 20, 235), Color.Red, 1);
for (int j = 0; j <= i; j++)
{
//One pixel is moved up by one
graphic.DrawPixel(new Vector2D(130 + i * 20 + j - (i + 1) / 2, 240 + j + 0.5f), Color.Yellow, 1);
}
}
//Horizontal lines of different widths
for (int i = 0; i < 5; i++)
{
graphic.DrawLine(new Pen(Color.Red, 1 + i), new Vector2D(140, 300 + i * 10), new Vector2D(170, 300 + i * 10));
graphic.DrawPixel(new Vector2D(130, 300 + i * 10), Color.Green, i + 1);
graphic.DrawPixel(new Vector2D(130, 300 + i * 10), Color.Red, 1);
for (int j = 0; j <= i; j++)
{
//One pixel is moved up by one
graphic.DrawPixel(new Vector2D(140 + j, 300 + i * 10 + j - (i + 0.5f) / 2), Color.Yellow, 1);
}
}
//int spriteNr = 0;
graphic.DrawSprite(dataDirectory + "fire1.png", 11, 11, spriteNr % 11, spriteNr / 11, 20, 180, 40, 40, 0.01f, true, Color.FromArgb(spriteNr % 255, 255, 255, 255));
//graphic.DrawLine(new Pen(Color.Blue, 5), new Vector2D(40, 200), new Vector2D(40, 250));
graphic.FlipBuffer();
if (showScreenAlpha)
{
//Prüfe ab, dass der Alpha-Wert der ScreenShoot-Funktion stimmt
Bitmap screenAlpha = BitmapHelp.GetAlphaChannel(graphic.GetScreenShoot());
graphic.CreateOrUpdateNamedBitmapTexture("ScreenAlpha", screenAlpha);
graphic.DrawFillRectangle("ScreenAlpha", 420, 130, 40, 40, false, Color.FromArgb(255, 255, 255));
}
//Check that the sprite display shows the correct sub-image (expected numbers from 1 to 6)
int spriteCounter = 0;
for (int x = 0; x < 3; x++)
for (int y = 0; y < 2; y++)
{
graphic.DrawSprite(dataDirectory + "Numbers.png", 3, 2, x, y, 325 + x * 20, 177 + y * 20, 20, 20, 0.01f, true, Color.White);
spriteCounter++;
}
//Since no DepthTesting is activated, the line is drawn over the turtle
graphic.DrawFillRectangle(dataDirectory + "Tortoise.png", 410, 210, 30, 20, true, Color.FromArgb(255, 255, 255));
graphic.DrawLine(new Pen(Color.Blue, 2), new Vector2D(404, 220), new Vector2D(450, 220));
//DepthTesting is activated
graphic.EnableDepthTesting();
//The Z-value of the turtle is smaller than the Z-value of the line. So the line is in front
graphic.ZValue2D = 1 - 5; //Rear
graphic.DrawFillRectangle(dataDirectory + "Tortoise.png", 410, 230, 30, 20, true, Color.FromArgb(255, 255, 255));
graphic.ZValue2D = 2 - 5; //Front
graphic.DrawLine(new Pen(Color.Blue, 2), new Vector2D(404, 240), new Vector2D(450, 240));
//The Z-value of the turtle is greater than the Z-value of the line. Therefore, the turtle is in front
graphic.ZValue2D = 2 - 5; //Front
graphic.DrawFillRectangle(dataDirectory + "Tortoise.png", 410, 250, 30, 20, true, Color.FromArgb(255, 255, 255));
graphic.ZValue2D = 1 - 5; //Rear
graphic.DrawLine(new Pen(Color.Blue, 2), new Vector2D(404, 260), new Vector2D(450, 260));
graphic.DisableDepthTesting();
}
}This will produce this image with a moving fire-sprite: