Level Designing

All levels are placed in res://Scenes/Levels with the naming convention Level <letter><number>.tscn where letter could be A and number could be 1.
The root node must have the res://Scripts/Level/LevelScene.cs script attached to it. If this is not done then many things will not function as expected.
AddLevel("Your Level Name Here") must be added in the constructor of the res://Scripts/Managers/LevelManager.cs class. Use the naming convention described above and use the same name as you used when creating the .tscn scene.
All level specific assets such as coins, enemies, and the player are found in res://Scenes/Prefabs.
Note that your level will have to be setup in the map scene as well. Instructions on this will be added eventually.
Where ever the player is placed is where the level will start. This can be useful to test specific parts of a level by temporarily placing the player in those areas.
This is an example of what a level hierarchy could look like, this does not have to be followed but it would be nice if everyone agreed upon a universal format.


The camera is unique for each level because the "limits" need to be set for each level individually. The yellow border you see below is the camera limits. Note that there is code in the LevelScene.cs script that dynamically places colliders at the start of the game so the player can not go outside the level. This is done for the left, right and ceiling of the level. While still on the topic it should be noted that the LevelScene.cs script must be attached to the first node in the levels scene. Feel free to change the zoom level of the camera from 0.8 to something else.


There are 2 types of tilesets. One is for the solid ground and another is for the platforms. In the example level the tileset called "Bottom Layer" is the solid ground and "Layer 2" is used for all platforms. If you want more layers then duplicate "Layer 2" tileset.
Moves Between 2 Points
Where ever the platform is placed is where the platforms start position will be and the position on the right is where the platform will move to. Right click the node and click Editable Children and modify the position on the right to where you want the platform to move to.


Platform Disappear
This platform is straight forward to use, the property values are in ms.

Platform Circle
A platform that moves in a ciruclar motion. Right click the node and click Editable Children and modify the radius of the Radius node to change how far out the platform moves. (you will see a orange dot on the right side of the circle you can drag when clicking the Radius node)


WallJumpArea
If the player is in a area with this group, they can wall jump on any tileset edge.
Tileset
If a tileset does not have this group then enemies will not know if their colliding with a wall.
Platform
If a tileset platform does not have this group then the player will not be able to drop down from a platfrom with the down key.
Level Finish
If a player touches a area with this group then they will clear the level.
Bottom
If a player or a enemy touches a area with this group they will die. This is to prevent entities from falling endlessely off the bottom of the level. The bottom area should be put down enough so for example large enemies are not instantly deleted when they touch this area as the player will see this.
An example of what the bottom area could look like can be see below marked by the large blue rect underneath the level. See how the area covers the entire width of the level.

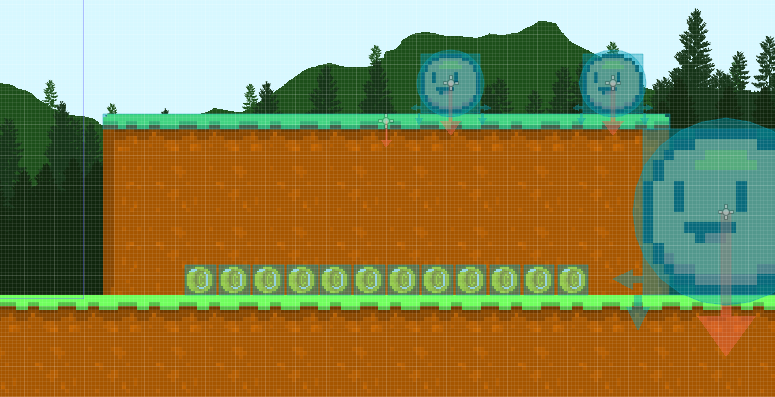
Basic Enemy
These orange balls are super intelligent, if told, they can check if their colliding with a wall or if their about go off a cliff. If you beat the example level, you'll know the 3 enemies below have varing speeds.


To modify the size of an enemy simply modify the scale property of that enemy.

Triggers can be setup to perform a specific [action] on one or more [entities] when a specific [entity type] enters a area.
Below you can see a trigger marked by the big blue rect on the left. The 3 enemies of varying sizes at the bottom right are activated when the player enters this trigger area.

Here you can see the settings of this trigger.

The parallax background is the art you see in the distance when playing the game. Each layer can have its own horizontal speed. If changing the position of the background, the position of each individual Sprite node must be changed otherwise if other values are changed for example in the ParallaxBackground node then the position of the background in the editor will not match up with the position in the game. To change the scroll speed of each layer, modify the x value of the scale property in each ParallaxLayer node. Values should range from 0 to 1.0, anything faster than 1.0 would be too fast. Note that parallax backgrounds can also be put in front of the games art (tilesets / player), to achieve this just edit the Z-Index of the background to be 2 or higher.

