This program is outdated, use my other one, TheEnderek0/SourceModTools, mainly the MapCompiler tool.
A batch script meant for porting over puzzlemaker puzzles to P2CE.
This script means to automate compiling maps exported from puzzlemaker to P2CE and run them. It's not meant for publishing the puzzles! It's meant for mods to more easily design puzzles, using P2CE specific entities, code etc. For example let's say you would like to use Adhesion Gel in the puzzlemaker, now you can do that!
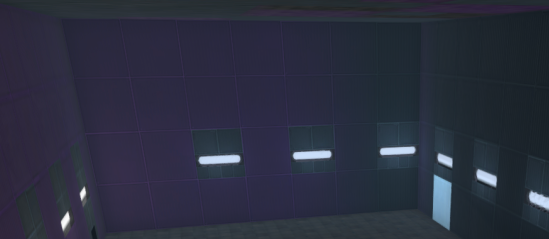
As I mentioned before this script is not meant for puzzles that are going to be published on workshop. Why is that? Well, this script doesn't exactly replicate how BEE2 packs stuff into the maps. While the logic-side should work perfectly fine, you can end up with visual bugs like this, due to missing textures, sounds etc:
While I made sure most of the stuff gets packed, postcompiler won't detect sounds playing purely via vscript for example. One way to get rid of these bugs is to mount BEE2 for the sake of playing the maps. (I suggest doing so by mounts.kv by adding this):
440
    {
        "bee2"
        {
            "dir" "materials"
            "dir" "sound"
            "dir" "models"
            "dir" "scripts"
            "dir" "particles"
        }
    }
But this won't solve the issue that some of stuff can be not-packed properly, you'll have to use external tools to pack this.
The .zip file you downloaded contains four files:
- PuzzlemakerCompile.bat
- gameinfo.txt
- srctools.vdf
- srctools_paths.vdf
You will need to configure three of those, but this isn't difficult to do. Firstly let's discuss the file structure.
There are no real rules on the filestructure except for one:
gameinfo.txt, srctools.vdf, srctools_paths.vdf must be all in the same directory as the maps (Specified in map_path in the .bat file, check below).
You can place the .bat file wherever you'd like, is it Desktop or somewhere in your mod file system it doesn't matter much* (explained later on).
The default config is to have all of these files placed in <mod>/maps/puzzlemaker/, so for example p2ce/maps/puzzlemaker/.
Now, after you placed all of these files appropriately, you will need to change some config in the files so they run properly, I will guide you through everything so don't worry about this!
First of all, and by far the easiest, is to open srctools_paths.vdf. You will see an entry like this:
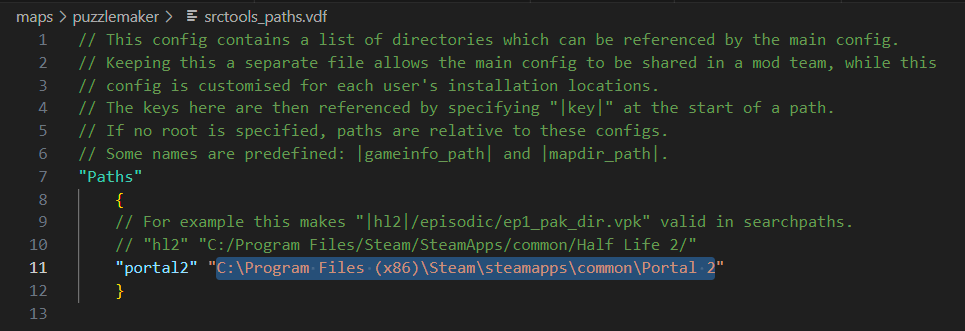
You will need to change this path, so it points to the main game folder of Portal 2. You can do this easily by going into Steam > Selecting Portal 2 > Right click > Properties > Local files > Browse. Then copy that path from the explorer. After you've done this, close the file.
Now it's a bit more tricky. Open up the .bat file you've downloaded (right click > edit). The lines that you may need to change are lines 3, 4, 5 and 6.

You never modify anything before the = sign!
Here's what is what:
p2pathis the path of the main Portal 2, so the same thing you've put in the file before.- modpath is the path of the mod folder. If you are not a mod developer, you should just use p2ce (example below). The default one is set to be relative to the
maps/puzzlemaker/directory (the recommended installation place). - map_path is the relative path (to the
<mod>/maps/) of where the maps are located. - game_executable is the name of the game to run. I've added this too since I've heard that p2ce may soon change the executable name from chaos.exe to p2ce.exe. So if the script stops working and it says that it cannot locate this file, change this to the new executable name.
Here's an example config for:
Mod is just base p2ce (the .bat file can be placed anywhere now because it's an absolute path!).
Maps are placed in the p2ce\maps\ directory.
set p2path=C:\Program Files (x86)\Steam\steamapps\common\Portal 2
set modpath=C:\Program Files (x86)\Steam\steamapps\common\Portal 2 Community Edition\p2ce
set map_path=\
set game_executable=chaos.exeTo ensure that your mods content is available for the compiling tools (for example to properly calculate lighting on normal maps) you need to add a new entry to searchpaths, referencing your mod.
SearchPaths
		{
                        game                               MyModsName                              # <============

			game 				"p2ce/custom/*"
			game+mod+default_write_path				|gameinfo_path|.
			Game				p2ce
			Game				hammer
			gamebin				|gameinfo_path|bin
			Game				update

			// Platform + game required for hammer
			Platform+game		platform

			// Files downloaded from community servers are
			// mounted last as to not override default files.
			game+download		|gameinfo_path|download
		}
That's all about the installation.
Usage of this script is very, very simple. When opened, it will prompt you with two things:
Do a full compile:- If you write
Yand then press enter, you will make the script do a final compliation. What it means, is that the script cannot encounter any errors on the way. If it does (for example a leak) it will stop the process and not proceed further. It also means VRAD will run in -final which may be slow! This was intended for puzzles meant to be put on the workshop, before I encountered the issues in the Caveats chapter, so it's mostly a leftover. - If you leave the field empty or write anything else, the script will run in the "default" mode, meaning that if it encounters any errors during VVIS / VRAD step it will just run past it and compile further. This is especially useful when you don't care for visuals/performance much and you just want to test the puzzle.
- If you write
Map name- Then, the script will ask you to use the
puzzlemaker_exportcommand. When you are in the puzzlemaker, save the puzzle, open up the console and typepuzzlemaker_exportand then type the name of the mapfile (it can be anything, but without extensions). After that go over to the script and type the same name. The compiling process will begin. Keep in mind you will need to do this everytime you make changes! If you don't want to do this or leave the field empty the script will default to thepreview.vmf, which is the latest played puzzle. To use this method instead, just launch the puzzle in Portal 2, then stop the launching process (so the puzzlemaker generates thepreview.vmfwith the newest changes).
- Then, the script will ask you to use the
That's basically all you'll have to do to use this script. The further part of this readme is meant for advanced users that want to dive deeper and see how this script works.
It all starts with the puzzlemaker_export <name> command which exports the map into sdk_content/maps/<name>.vmf
This step invokes the vbsp.exe found in Portal 2/bin/vbsp.exe with default arguments and -force_peti -skip_vbsp. This is why BEE2 is crucial for this to work, since it performs all of the style work, logic swapping and everything important related to the compilation process. This yields the styled/<name>.vmf file in sdk_content/maps as opposed to just using maps/<name>.vmf which is the pure puzzlemaker exported file. This is also why Postcompiler must be run, since the map relies heavily on comp_ entities.
This step copies the styled/<name>.vmf to the map_path directory in the mod structure, for further processing with P2CE's tools.
Standard VBSP invoked with default arguments and also -instancepath "%p2path%/sdk_content/maps/" where p2path is the path of Portal 2; so the instances get compiled successfully.
It is to mention here, that gameinfo.txt is used for VBSP, VVIS and VRAD, so they compile properly.
Postcompiler is run after VBSP, and is setup by the .vdf files so it packs the BEE2 files. This means that mounting BEE2 doesn't need to be mounted. It works most of the time (check above). It definitelly packs the crucial files such as vscripts, textures etc. Thing to note here: the -game parameter actually references the game directory of the mod, not the custom gameinfo bundled with the script. It is because we don't actually need to mount BEE2 stuff via gameinfo here, we can mount it in srctools.vdf
Standard VIS process, operating on the .bsp file compiled by VBSP, nothing else to add here.
This process depends on the mode user selects. For standard the arguments passed are:
bin\win64\vrad.exe -hdr -StaticPropLighting -StaticPropPolys -lights "%p2path%/portal2/lights.rad" -game "%copypath%" "%copypath%/%filename%"
(%copypath% is the directory where the map files/gameinfo are located in)
Where for the "Full compile" the arguments are as follows:
bin\win64\vrad.exe -final -hdr -TextureShadows -StaticPropLighting -StaticPropPolys -PortalTraversalLighting -PortalTraversalAO -lights "%p2path%/portal2/lights.rad" -game "%copypath%" "%copypath%/%filename%"
At the end, game is launched with: -game "%modpath%" -novid -multirun +map %map_path%\%filename%
As you see the compiling process is rather easy. There are multiple error-checking lines to ensure it's the most user-friendly it can be.