The goal of this project is to build a virtualized framework to compare the performance of HTTP/3 + QUIC with respect to HTTP/2 and TCP.
To do this we used Vagrant and Virtualbox in order to manage the virtual machines and Docker to run the web-server.
Reference software: https://blog.cloudflare.com/experiment-with-http-3-using-nginx-and-quiche/
The aim of HTTP/3 is to provide fast, reliable, and secure web connections across all forms of devices by resolving transport-related issues of HTTP/2. To do this, it uses a different transport layer network protocol called QUIC which brings the following benefits:
- Speed: only a single handshake is required to establish a connection client-server reducing the RTT drastically.
- Security: packets are always authenticated and encrypted.
- Optimization: to prevent head-of-line blocking multiple streams of data are supported within a connection, in this way a lost packet only impacts those streams with data carried in that packet.
- Resiliency: each connection has its unique ID that permits to survive changes in the client's IP address and port (e.g. switching from Wi-Fi to a mobile network).
- Reliability: unlike TCP, the QUIC protocol does not rely on a specific congestion control algorithm but it can automaticaly adapt at needs. It also improves loss recovery by using unique packet numbers to avoid retransmission ambiguity and by using explicit signaling in acknowledgements (ACKs) for accurate RTT measurements.
The network setup is very simple: 2 host connected to a router, one used as a client the other as a web-server.

Our client will run the software necessary for the performance evaluation, on the other hand the server will run 3 Docker containers deploying the html pages.
It is important to highlight that HTTP/3 protocol requires the use of port 80 and 443.
- connection between client and router
| NETWORK INTERFACE | DEVICE | IP ADDRESS |
|---|---|---|
| enp0s8 | client | 192.168.1.2/30 |
| enp0s8 | router | 192.168.1.1/30 |
- connection between router and server
| NETWORK INTERFACE | DEVICE | IP ADDRESS |
|---|---|---|
| enp0s9 | router | 192.168.2.1/30 |
| enp0s8 | server | 192.168.2.2/30 |
As said earlier, Vagrant is used to manage the VMs and the networking side of the environment.
The Vagrantfile is configured in order to:
- set ubuntu/bionic64 as the hosts's OS
- reserve 1024 MB of RAM to the client and server in order to run Google Chrome and the Docker containers
- enable the X11 forwarding necessary to use the browser and the related performance evaluation tools
config.ssh.forward_agent = true
config.ssh.forward_x11 = true
All the provisioning scripts are in the vagrant folder and are used mainly for routing and the installation of basic softwares.
To deploy the Docker containers we first need a Docker image which is built from a Dockerfile by running the following commands (in our docker/ directory):
sudo docker build -t reinhardmartin/dncs_http3 .
sudo docker login
sudo docker push reinhardmartin/dncs_http3:latest
The Docker image is now created and ready to be downloaded, we will discuss in the Deployment part how to do this and how to deploy the containers. The image used is based on NGINX 1.16.1 over Ubuntu 18.04 in order to use the Quiche patch.
Since QUIC need encryption we need to generate SSL/TLS certificates through Let's Encrypt. However, in order to generate valid certificates, it is required a real domain. We have registered a Duck DNS domain with the 192.168.2.2 IP address associated then we can run certbot:
sudo certbot -d HOSTNAME --manual --preferred-challenges dns certonly
This will generate two files: fullchain.pem and privkey.pem.
For security reason these certificates are not included in this repository.
To make different tests our Docker containers will run each 3 HTML pages of different size:
- Dimension -
html/index3
- Multiverse -
html/index2
- Covido -
html/index

We can now create the environment with vagrant up. Focusing on the server.sh script we notice the following commands:
sudo docker run --name nginx3 -d -p 80:80 -p 443:443/tcp -p 443:443/udp -v /vagrant/docker/conf/http3.web.conf:/etc/nginx/nginx.conf -v /vagrant/certs/:/etc/nginx/certs/ -v /vagrant/docker/html/:/etc/nginx/html/ reinhardmartin/dncs_http3

sudo docker run --name nginx2 -d -p 90:80 -p 643:443/tcp -p 643:443/udp -v /vagrant/docker/conf/http2.web.conf:/etc/nginx/nginx.conf -v /vagrant/certs/:/etc/nginx/certs/ -v /vagrant/docker/html/:/etc/nginx/html/ reinhardmartin/dncs_http3

sudo docker run --name nginx1 -d -p 100:80 -p 743:443/tcp -p 743:443/udp -v /vagrant/docker/conf/tcp.web.conf:/etc/nginx/nginx.conf -v /vagrant/certs/:/etc/nginx/certs/ -v /vagrant/docker/html/:/etc/nginx/html/ reinhardmartin/dncs_http3
Each command deploys a different container based on the Docker image created previously reinhardmartin/dncs_http3 with different configurations:
- --name nginx3: use ports 80 - 443 with the protocol HTTP/3
- --name nginx2: use ports 90 - 643 with the protocol HTTP/2
- --name nginx1: use ports 100 - 743 with the protocol TCP
This is possible because of the configuration files located in docker/conf/ passed by the -v option in Docker.
We have already enabled the X11 forwarding and installed Google Chrome on our client, in order to run it we can follow these simple
instructions then launch it with the command:
google-chrome --enable-quic --quic-version=h3-29
This will be necessary for the next part.
All the measurements have to be taken from the client, which is accessible with the command vagrant ssh.
First, to have a brief overview of what has to be expected, we have a look at httpstat's output (of index2.html web page)
- HTTP/3
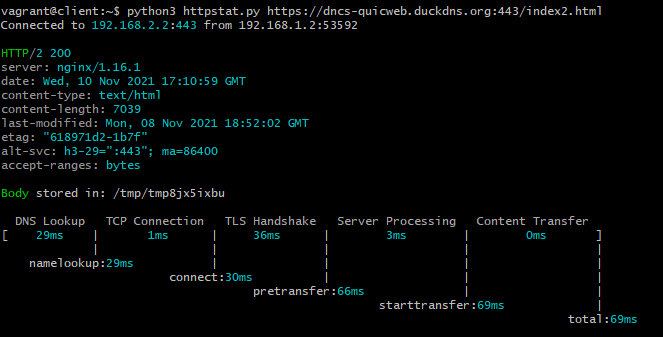
(To be noticed that in this case the response is HTTP/2 not /3)
- HTTP/2

- TCP
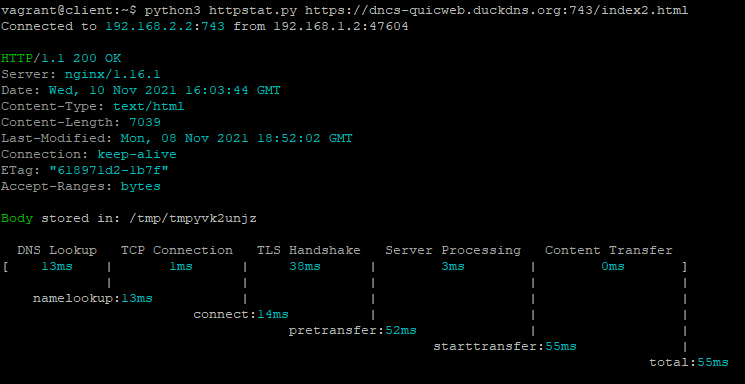
It seems HTTP/2 is still a more reliable protocol in terms of speed.
Now, for a more in depth analysis, we launch Google Chrome where we can access our domain and test it with Chrome Devtools.
Important parameters to notice are the following:
- Covido
| PROTOCOL | PAGE WEIGHT | TTFB | LOAD TIME | # TCP CONN. |
|---|---|---|---|---|
| HTTP/3 | 5.1 MB | 2.41 ms | 3.14 s | 0 |
| HTTP/2 | 5.1 MB | 7.16 ms | 2.49 s | 1 |
| TCP | 5.1 MB | 5.40 ms | 2.34 s | 6 |
- Dimension
| PROTOCOL | PAGE WEIGHT | TTFB | LOAD TIME | # TCP CONN. |
|---|---|---|---|---|
| HTTP/3 | 344 kB | 4.09 ms | 769 ms | 0 |
| HTTP/2 | 344 kB | 7.50 ms | 650 ms | 1 |
| TCP | 344 kB | 5.63 ms | 732 ms | 3 |
(Screenshots of Chrome Devtools are in media/ directory).
As expect by the httpstat output, HTTP/3 + QUIC is not yet the fastest protocol compared to the previous versions but what we can observe from the data acquired is the
short TTFB (time to first byte) due to the faster handshake and the absence of TCP connections, that would drop in a switch of connection (e.g. mobile to Wi-Fi), in favor of new
unique ID. What we couldn't observe is HTTP/3 behavior in a high congestion level network to test its reliability. Hence some of the purpouse this protocol set itself are
fulfilled still there is margin of improvement.
Http/3 is still in the development phase, in the future, we could expect increased performance in a real-world scenario where UDP connections, parallel loading of resources and better congestion control will play a significant role.