![]()


⚠️ AI-Assisted Development Warning: This project has been largely developed with the assistance of AI tools (Claude and Cursor). I only have a basic understanding of what this code does and have been using this project as a way to experiment with AI-assisted development while creating a component I wanted for my dashboard. The code may contain inconsistencies, and best practices might only be partially followed due to the contextual limitations of AI. Use at your own risk and feel free to contribute improvements!
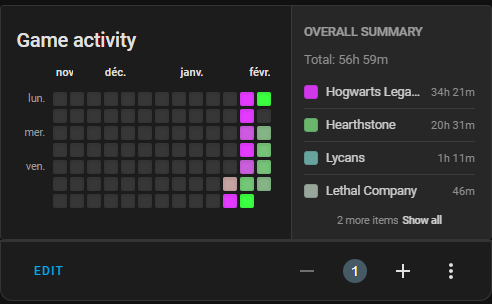
A custom Lovelace card for Home Assistant that visualizes entity activity data as a calendar heatmap, similar to GitHub's contribution graph. Perfect for tracking game activity, device usage, or any time-based data.
- 📅 Displays historical activity data on a calendar grid
- 🎮 Perfect for tracking game activity, device usage, or any time-based data
- 🎨 Advanced theme-aware colors that automatically adapt to light/dark modes
- 🌈 Intelligent color intensity scaling for better visual differentiation
- 🔄 Auto-refreshes data at configurable intervals
- 📊 Detailed breakdown of activity on hover and click
- 🌐 Localized day and month names
- 📱 Responsive design for both desktop and mobile
- 🗓️ Configurable week start day (Monday or Sunday)
- 📏 Automatic sizing of heatmap based on available space
- 🎲 Configurable limit on number of games displayed
- 🛡️ Robust error handling for improved reliability
- Make sure HACS is installed in your Home Assistant instance
- Add this repository as a custom repository in HACS:
- Go to HACS → Integrations → ⋮ → Custom repositories
- Add
https://github.com/MagicMicky/lovelace-calendar-heatmap-cardas a "Lovelace" repository
- Search for "Calendar Heatmap Card" in the Frontend section and install it
- Restart Home Assistant
- Download the
calendar-heatmap-card.jsfile from the latest release - Upload it to your Home Assistant instance using the following path:
/config/www/community/lovelace-calendar-heatmap-card/calendar-heatmap-card.js - Add the resource reference to your Lovelace configuration:
resources:
  - url: /local/community/lovelace-calendar-heatmap-card/calendar-heatmap-card.js
    type: module
- Restart Home Assistant
Add the card to your Lovelace dashboard:
type: custom:calendar-heatmap-card
entity: sensor.game_activity
title: My Gaming Activity| Option | Type | Default | Description |
|---|---|---|---|
entity |
string | (Required) | Entity ID to display history for |
title |
string | "Game Activity" | Card title |
ignored_states |
array | ["unknown", "idle", "offline", ""] | States to ignore in calculations |
refresh_interval |
number | 300 | Refresh interval in seconds |
start_day_of_week |
string | "monday" | Day to start the week on ("monday" or "sunday") |
include_unknown |
boolean | false | Whether to include "unknown" state in calculations |
type: custom:calendar-heatmap-card
entity: sensor.steam_activity
title: Steam Gaming Activitytype: custom:calendar-heatmap-card
entity: sensor.steam_activity
title: Steam Gaming Activity
days_to_show: 180
ignored_states:
- idle
- offline
- ""
refresh_interval: 600
start_day_of_week: sunday
include_unknown: trueThe card now automatically adjusts the number of weeks displayed based on the available space in your dashboard. This ensures optimal visibility regardless of your screen size or dashboard layout. The heatmap will show between 4 and 52 weeks, depending on the available width.
The card now has a fixed height to ensure consistent appearance across dashboards. This prevents the card from becoming too tall when there's a lot of data.
The detail view now shows a limited number of games by default (4), with a "Show all" button to reveal the complete list. This improves readability and performance, especially for users with many different games or states.
The Calendar Heatmap Card features advanced theme-aware color handling that automatically adapts to your Home Assistant theme. The card will detect whether you're using a light or dark theme and adjust colors accordingly for optimal visibility.
You can customize the appearance of the heatmap by adding these variables to your Home Assistant theme:
calendar-heatmap-no-data-color: "#ebedf0"  # Color for days with no data
calendar-heatmap-level-1: "#c6e48b"        # Color for lowest activity level
calendar-heatmap-level-2: "#7bc96f"        # Color for low-medium activity level
calendar-heatmap-level-3: "#239a3b"        # Color for medium-high activity level
calendar-heatmap-level-4: "#196127"        # Color for highest activity level
If these variables are not defined, the card will fall back to using Home Assistant's standard theme colors:
--disabled-text-colorfor no data--success-colorfor level 1--primary-colorfor level 2--accent-colorfor level 3--state-active-colorfor level 4
In version 3.3.0, the theme detection has been improved to:
- Automatically detect theme changes in real-time
- Properly detect themes from parent elements (useful for cards inside dashboards with different themes)
- Adapt colors for better contrast in both light and dark themes
The card uses an improved intensity scaling algorithm that provides better visual differentiation between different activity durations:
- Very short sessions (< 15 min)
- Short sessions (15-45 min)
- Medium sessions (45 min - 2 hours)
- Longer sessions (2-4 hours)
- High usage sessions (4-8 hours)
- Very high usage sessions (8+ hours)
This makes it easier to distinguish between days with different levels of activity at a glance.
This card works best with entities that:
- Have different states representing different activities (like game names)
- Change state frequently enough to generate meaningful data
- Maintain history in Home Assistant
Examples include:
- Game activity sensors (Steam, PlayStation, etc.)
- Device usage sensors
- Presence/occupancy sensors
- Any sensor that changes state throughout the day
The Calendar Heatmap Card works perfectly with the Discord Game integration for Home Assistant, which provides a sensor that tracks the games you play.
When you set up the Discord Game integration, it creates a sensor for each user that shows the current game being played. The sensor follows the format sensor.discord_user_*_game where * is your Discord user ID. This sensor's state changes to the name of the game when you're playing something, and to "idle", "offline", or other status indicators when you're not.
type: custom:calendar-heatmap-card
entity: sensor.discord_user_game
title: My Discord Gaming Activity
days_to_show: 365
ignored_states:
  - unknown
  - idle
  - offline
  - ""
  - dnd
  - online
refresh_interval: 300
start_day_of_week: monday
Replace sensor.discord_user_game with your actual Discord game sensor as it appears in Home Assistant.
The Calendar Heatmap Card will:
- Track the time spent in each game state
- Display different colors for different games
- Show a breakdown of your gaming activity when you hover over or click on a day
- Filter out states like "idle" and "offline" by default (configurable)
This gives you a beautiful visualization of your gaming habits over time, showing which days you played the most and which games dominated your play time.
Example of Discord gaming activity visualization
- Ensure your entity has historical data in Home Assistant
- Check that the entity states aren't all in the
ignored_stateslist - Verify that
days_to_showisn't set too low
- Make sure you're using a recent version of Home Assistant
- Try adding the custom theme variables mentioned in the Theming section
- Check if your theme properly defines the fallback variables
- Try reducing
days_to_showto display fewer days - Increase
refresh_intervalto reduce update frequency
- In version 3.3.0+, the card automatically adjusts to available space
- If the card appears too small, try placing it in a wider column in your dashboard
- The card height is now fixed for better UI integration
The project follows a modular architecture:
src/
├── index.js                  # Main entry point
├── calendar-heatmap-card.js  # Main component class
├── constants.js              # Constants like version
├── utils/                    # Utility functions
│   ├── date-utils.js         # Date manipulation functions
│   ├── format-utils.js       # Formatting functions
│   ├── color-utils.js        # Color manipulation helpers
│   └── dom-utils.js          # DOM manipulation helpers
├── services/                 # External services
│   ├── history-service.js    # History data fetching
│   └── entity-subscription.js # Entity state subscription
├── data/                     # Data processing
│   └── data-processor.js     # Data transformation logic
└── ui/                       # UI components
    ├── components/           # Reusable UI components
    │   ├── month-header.js   # Month header component
    │   ├── day-labels.js     # Day labels component
    │   ├── detail-view.js    # Detail view component
    │   └── heatmap-grid.js   # Heatmap grid component
    └── styles.js             # Styles and theme handling
- Clone the repository
- Install dependencies:
This will also generate a
npm install
package-lock.jsonfile which is important for CI/CD. - Build the project:
npm run build
Contributions are welcome! Please feel free to submit a Pull Request.
- Fork the repository
- Create your feature branch (
git checkout -b feature/amazing-feature) - Commit your changes (
git commit -m 'Add some amazing feature') - Push to the branch (
git push origin feature/amazing-feature) - Open a Pull Request
This project is licensed under the MIT License - see the LICENSE file for details.
- Inspired by GitHub's contribution calendar
- Built for the Home Assistant community
This project uses semantic-release for automated versioning and releases. For this to work properly:
- Create a GitHub Personal Access Token with
reposcope - Add this token as a repository secret named
GH_TOKENin your GitHub repository settings - Ensure the
scriptsdirectory exists and the update script is executable:mkdir -p scripts chmod +x scripts/update-version.js
- Set up Git hooks properly (especially if you're using nvm):
npm run setup-hooks
- Write commit messages following the Conventional Commits format:
feat: ...for new features (minor version bump)fix: ...for bug fixes (patch version bump)- Include
BREAKING CHANGE:in the commit message for major version bumps
See the CONTRIBUTING.md file for more details on the release process.