This repo is the algorithm submission template for the TopBrain 2025 challenge on grand-challnge (GC). With a few lines of code, you can modify this repo to generate the Docker container and take part in the TopBrain challenge!
-
If you want more flexibility (i.e. customize this repo beyond
your_algorithm.pyfile or not using this template repo at all), then simply ensure that your docker container can:-
read from the input interface that supplies one
.mhaimage:Head MR Angiography (Image) at
/input/images/head-mr-angio/<uuid>.mhaHead CT Angiography (Image) at
/input/images/head-ct-angio/<uuid>.mha -
write to the output interface one
.mhasegmentation mask:Head MR Angiography Segmentation to
/output/images/head-mr-angio-segmentation/<uuid>.mhaHead CT Angiography Segmentation to
/output/images/head-ct-angio-segmentation/<uuid>.mha
-
-
If you are new to the GC submission system, we recommend that you clone this repo locally and use it as a template, which only requires a few simple steps to build a submission container! The steps are easily done, and you just follow the
TODOin one file!- Clone this repo locally
- Add your algorithm by editing the
./your_algorithm.pyfile - Submit your algorithm by
bash ./save.shto create atar.gzof your docker container and upload to GC- see GC documentation "Option 2 (Uploading the container image)": how to deploy your container
For more information on using this repo as a template, please refer to Use This Repo as a Template below.
-
Submission portal links. We have four submission portals: Two submission portals for the validation phase, and two for the final-test phase, one for each track:
- Submit to Validation CTA
- Submit to Validation MRA
- Submit to Final Test CTA
- Submit to Final Test MRA
Please use the validation submission portals to make sure your docker containers work as intended. You can submit to validation phases with a daily limit until they close. But final test phases only allow for one submission.
You can adapt the your_algorithm.py file. We have marked the most relevant parts you need to change with TODO.
For each test case, the output of your algorithm must be a prediction array either for the CT or the MR image (depending on the track).
Simply do the following 3 TODOs in the your_algorithm.py file:
#######################################################################################
# TODO-1:
# Choose your TRACK. Track is either 'MR' or 'CT'.
TRACK = "MR"  # or 'CT'
# END OF TODO-1
#######################################################################################


#######################################################################################
# TODO-2:
# if you use pytorch, we have a util to show torch and cuda status
do_you_use_pytorch_cuda = False  # True or False
# END OF TODO-2
#######################################################################################
Finally, in the your_segmentation_algorithm() function, implement your inference algorithm there, and whatever you do,
just return us an numpy array of the same shape as the input image. We will handle the rest of the file conversion and output saving etc from there onwards.
def your_segmentation_algorithm(*, input_array: np.array) -> np.array:
    """
    This is an example of a prediction algorithm.
    It is a dummy algorithm that returns an array of the correct shape filled with ones.
    args:
        input_array: np.array (x,y,z) from the input image
    returns:
        np.array - prediction in the same shape as the input_array
    """

    #######################################################################################
    # TODO-3: place your own prediction algorithm here.
    # You are free to remove everything! Just return to us an npy in (x,y,z).
    # Depending on the value of TRACK, the input_array will either be the MR or the CT image for you to segment.

    # NOTE: the prediction array must have the same shape as the input image!

    # NOTE: If you extract the array from SimpleITK, note that
    #              SimpleITK npy array axis order is (z,y,x).
    #              We have already transposed SimpleITK.GetArrayFromImage to (x,y,z) for you!

    # NOTE: You can also put files in the `resources` folder (e.g. model weights),
    # Remember to copy them in the Dockerfile!
    # COPY --chown=user:user resources /opt/app/resources

    # load and initialize your model here
    # model = ...
    # device = ...

    # You can also place and load additional files in the resources folder
    # with open(resources / "some_resource.txt", "r") as f:
    #     print(f.read())

    # for example, we can return all 1s as prediction
    pred_array = np.ones(input_array.shape)
    # replace the above line with your actual algorithm

    # END OF TODO-3
    #######################################################################################

return pred_arrayYou can run inference locally by executing the script inference.py. The inference.py also serves as the entrypoint for the Docker container.
NOTE: You don't need to change anything in the inference.py script.
Update your requirements.txt for your required python libraries.
Make the necessary changes to the Dockerfile:
- Choose a suitable base image if necessary to build your container (e.g., Tensorflow or Pytorch or even Ubuntu, or a different version of Python base image)
- Make sure that all required source files (such as model weights and python scripts) are copied to the Docker container with
COPYin yourDockerfile
COPY --chown=user:user <somefile> /opt/app/
Highly recommended to test your container by bash test_run.sh locally. This will mimic the GC docker running environment and input to your docker container any mha files you provide in the ./test/input folder. It will check the output predictions against what you provide in ./test/expected_output/:
################
# in test_run.sh
# TODO: Provide the expected output segmentation mask of your algorithm in ./test/expected_output/
# TODO: In the python code snippet below change the following if necessary:

TRACK="MR"  # or "CT"
EXPECTED_SEG_MASK="expected_output_dummy_mra.mha"
################

bash test_run.sh
Change the input test images in test/input/images/head-ct-angio/ or test/input/images/head-mr-angio/, and the expected output in test/expected_output to validate your algorithm works in the form of a Docker container.
Note: the GC environment will process the test images sequentially one image at a time. So, there should only be a CT image or a MR image in the corresponding input folders.
Currently, you find test/input/images/head-ct-angio/example_input_dummy_cta.mha and test/input/images/head-mr-angio/example_input_dummy_mra.mha in the input folder.
Please note that GC environment has a limit on
- Container size must be under 10GB
⚠️ - Usable main memory of at most 31 GiB DRAM
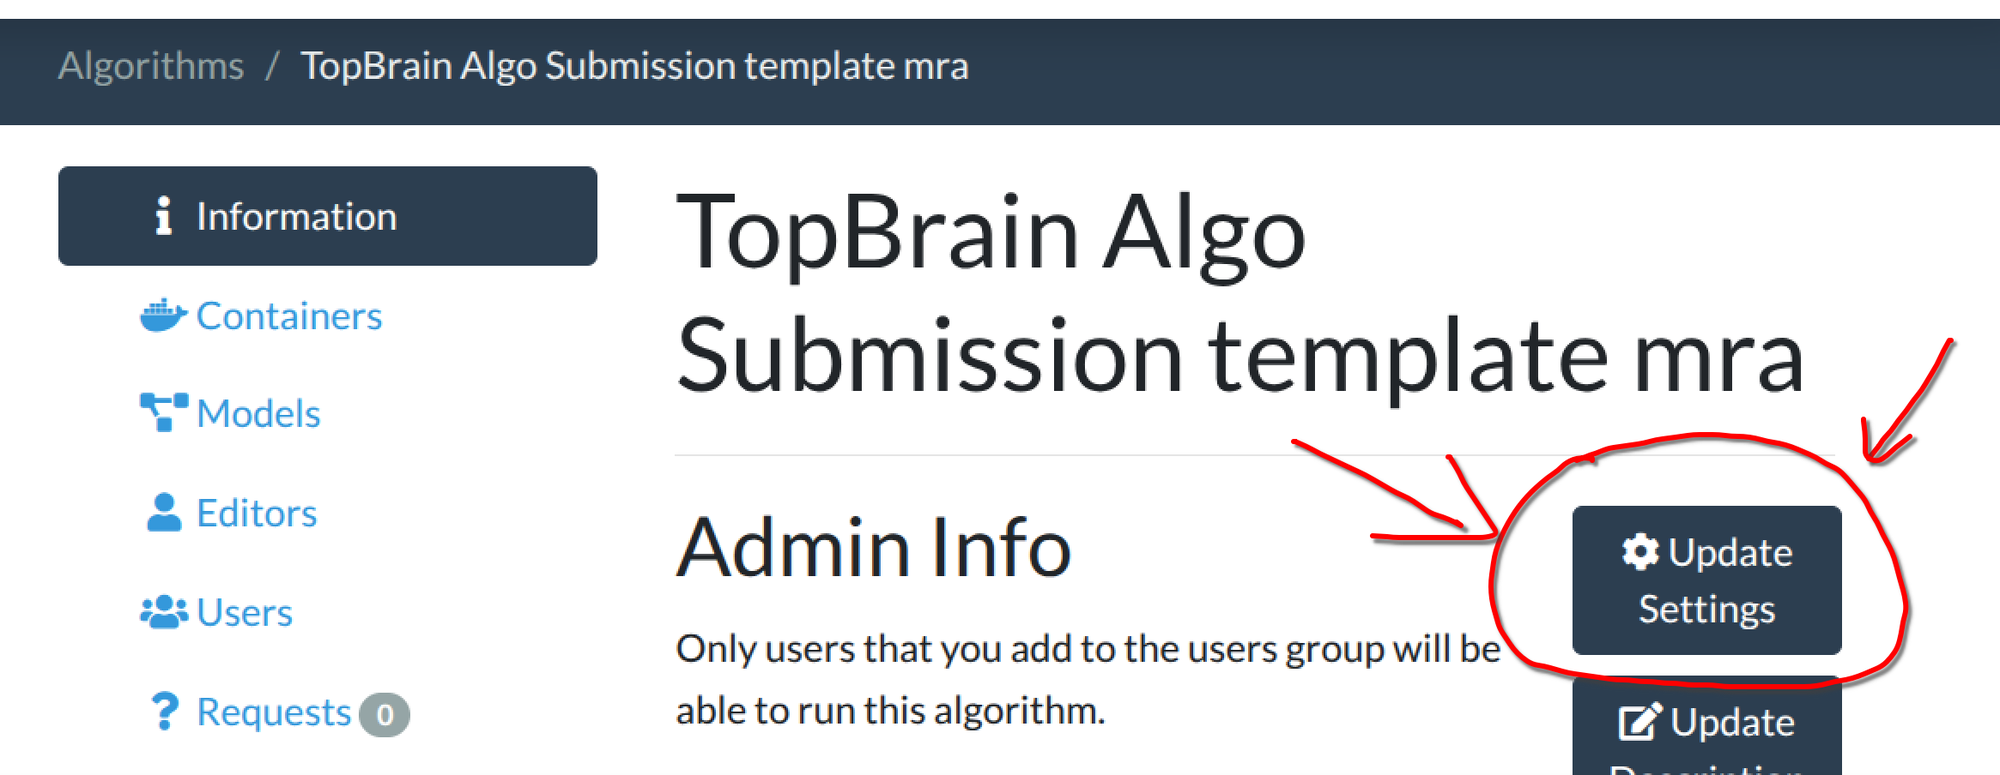
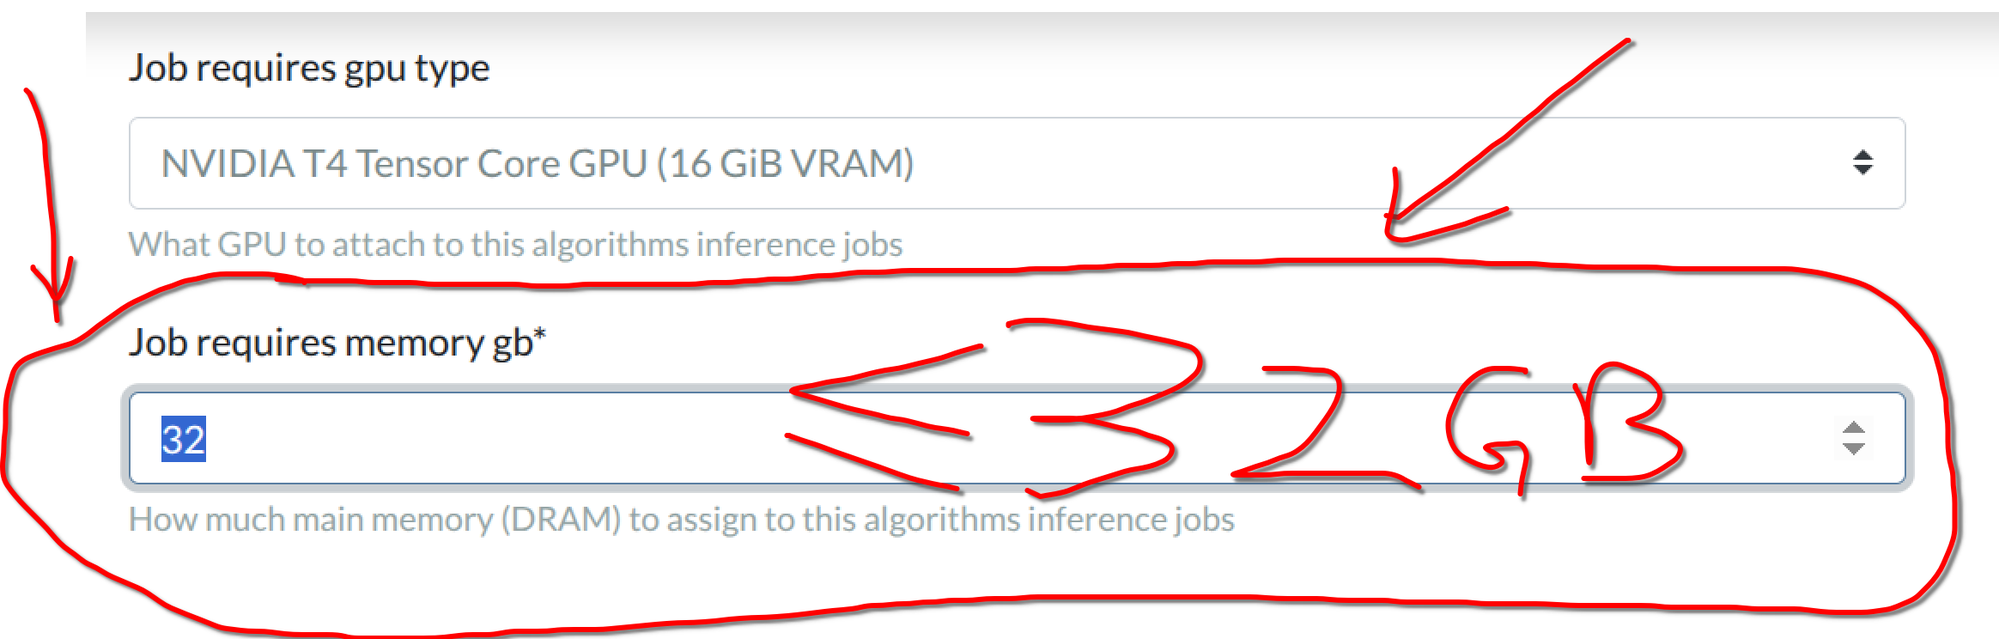
⚠️ (1 GB is reserved by GC, so 32 - 1 = 31)- The
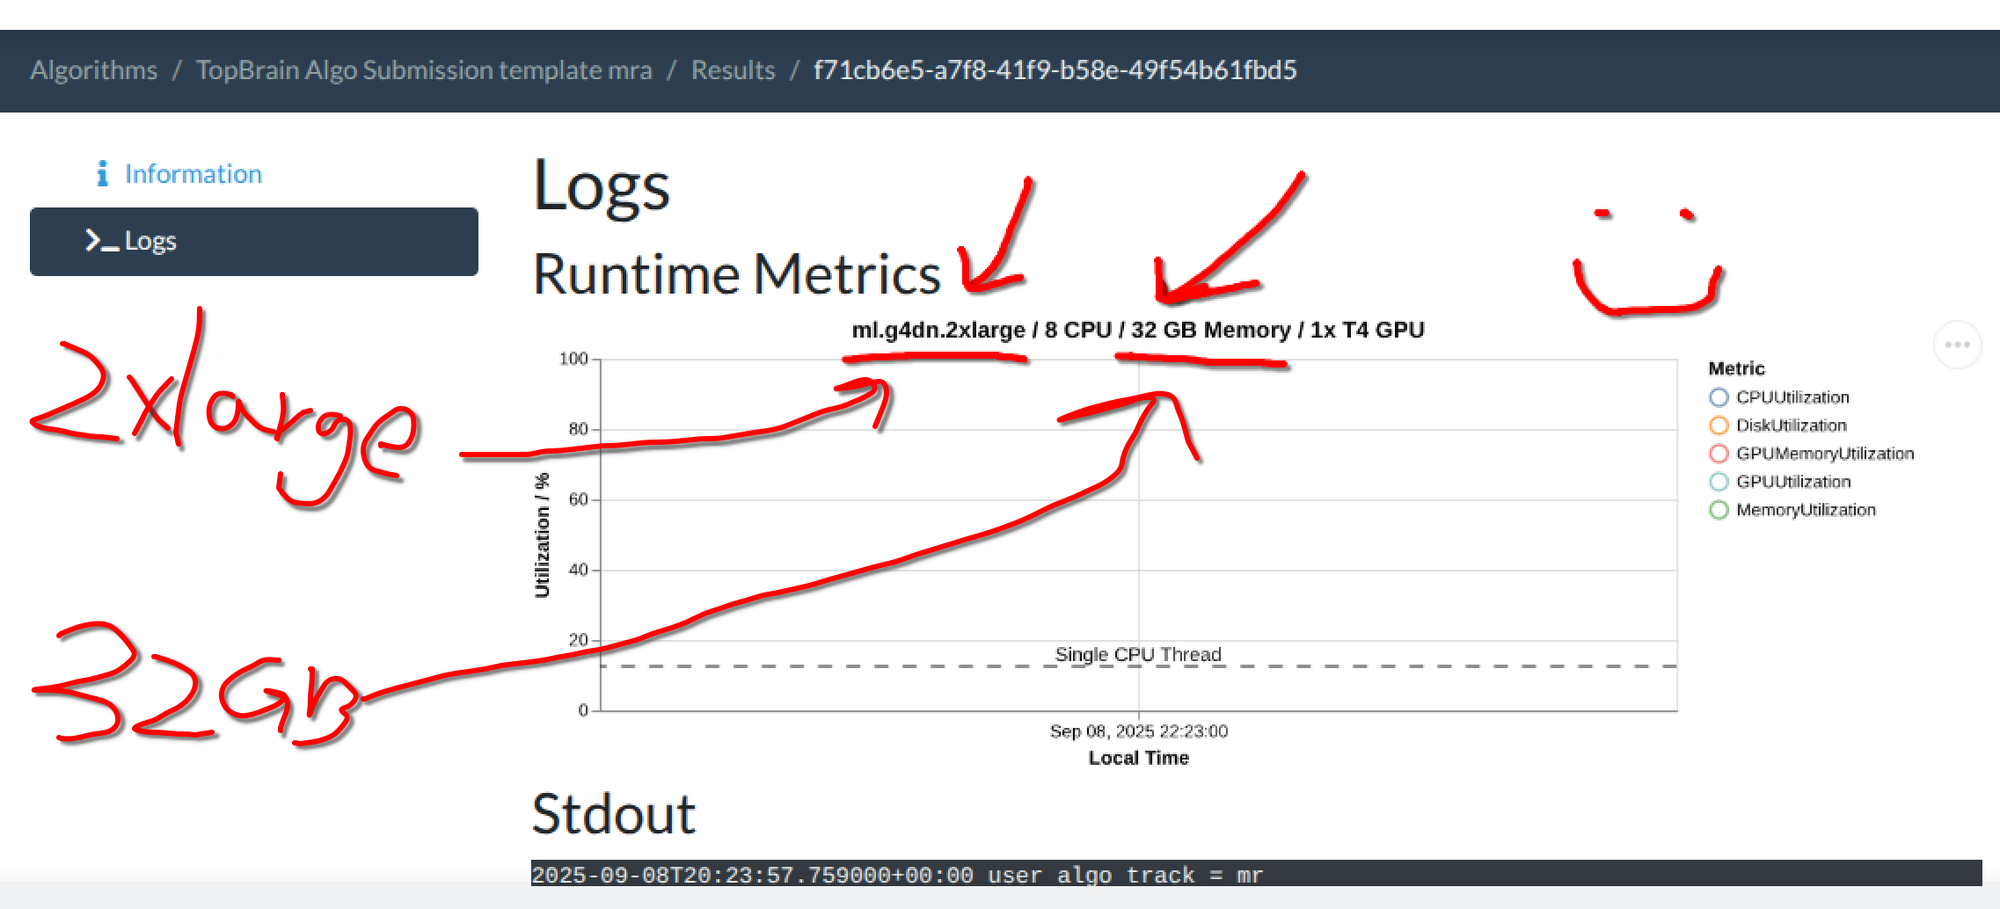
test_run.shsimulates this limitation locally. So make sure you test your container with ourtest_run.shfirst! - The default for newly created algorithms is 16GB. New in GC: You need to update the memory setting AFTER algorithm upload! Here are the steps to change the memory used for your algorithm. 1) After you have uploaded the algorithm Docker, go to your algorithm's page and click "Update Settings"; 2) Fill in a number of at most 32 in "Job requires memory gb; 3) 32 GB correspond to the
2xlargeinstance type. (You do not have to adjust the memory if you are okay with the 16GB default.)
- The
If you choose to upload your container to GC directly (instead of linking a private Github repo, see above TLDR), then run save.sh to package your docker container image. This will create a .tar.gz file ready for upload to one of our GC submission portals.
NOTE: it is a good idea to rename the default generated file with a more informative name, since we have 2 tracks:
################
# in save.sh
# TODO: change the track for a better name of your Docker image tag
TRACK="MR"  # or "CT"
################

bash save.sh

# update the zip name (optional)Please refer to the GC documentation on
- "Submitting your Algorithm container"
- espeically the "Submission tips".
NOTE: It is recommended to use the GC to "Try Out Algorithm" first:
Once your container is active, please test it out before submitting it to the challenge, you can upload data using the "Try Out Algorithm" button. Please use a representative image and check that the outputs are what you expect. You can inspect the error messages on the Results page of your algorithm.
And that is it! 🤠 All the best for the submission process. Please reach out to us by leaving an issue on this repo or on our challenge forum.