This project demonstrates how to build a DIY audio player using the ESP32 microcontroller and LM386 amplifier IC. The ESP32's built-in Digital-to-Analog Converter (DAC) is utilised to play audio files in WAV format through a speaker, creating a simple yet functional audio playback system.
Project Link: ESP32 Based Audio Player on CircuitDigest
- 🎵 Play audio files using ESP32's DAC capability
- 🔊 Audio amplification using LM386 IC
- 📁 Support for WAV audio format
- 🎚️ Adjustable volume control through potentiometer
- ⚡ Simple circuit with minimal components
- 🔄 Continuous audio playback loop
| Component | Quantity | Description |
|---|---|---|
| ESP32 Development Board | 1 | Main microcontroller |
| LM386 Amplifier Module | 1 | Audio amplification |
| 8Ω Speaker | 1 | Audio output |
| Jumper Wires | As needed | Circuit connections |
| Breadboard (Optional) | 1 | For prototyping |
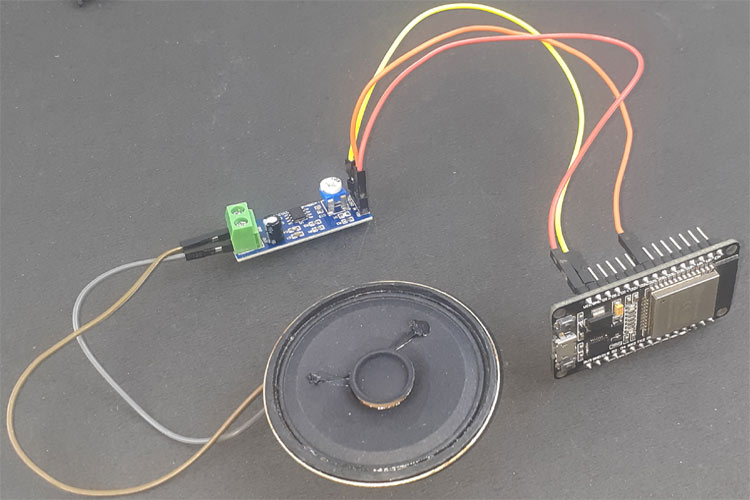
| LM386 Amplifier Module | ESP32 Pin |
|---|---|
| VCC | VIN (5V) |
| GND | GND |
| IN | GPIO 25 (DAC1) |
Speaker Connection: Connect the 8Ω speaker to the output pins of the LM386 amplifier module.
- GPIO 25 is one of the two DAC (Digital to Analog Converter) pins on the ESP32
- The LM386 amplifier module amplifies the weak audio signal from the ESP32
- Volume can be adjusted using the potentiometer on the LM386 module
- Arduino IDE (version 1.8 or higher)
- ESP32 Board Support - Install via Board Manager
- XT_DAC_Audio Library - Download from XTronical
- Audacity - For audio file conversion and processing (Download here)
- HxD Hex Editor - For generating hex codes from WAV files (Download here)
- Open your audio file in Audacity
- Change the Project Rate to 16000 Hz (8000-16000 Hz recommended for ESP32)
- Navigate to File > Export > Export as WAV
- Select the following settings:
- File Type: WAV (Microsoft)
- Encoding: Unsigned 8-bit PCM
- Save the file
- Open the WAV file in HxD Hex Editor
- Press Ctrl+A to select all hex code
- Go to Edit > Copy as > C to copy in C language format
- Paste the code into a header file named
SoundData.h
const unsigned int sample[] = {
    // Paste your hex code here
};#include "SoundData.h" // Contains audio data in hex format
#include "XT_DAC_Audio.h" // DAC audio libraryXT_Wav_Class Sound(sample); // WAV file object
XT_DAC_Audio_Class DacAudio(25,0); // DAC audio player on GPIO 25void setup() {
Serial.begin(115200); // Initialize serial for debugging
}void loop() {
DacAudio.FillBuffer(); // Fill audio buffer
if(Sound.Playing==false) // Check if sound finished
DacAudio.Play(&Sound); // Play sound again
}- Download and install the XT_DAC_Audio library
- Place it in your Arduino libraries folder
- Convert your audio file to WAV format (16000 Hz, 8-bit PCM)
- Generate hex code using HxD Hex Editor
- Create
SoundData.hfile with the hex data
- Connect ESP32 to your computer via USB
- Select the correct board and port in Arduino IDE
- Upload the sketch to ESP32
- Connect the LM386 amplifier module to ESP32 as per the circuit diagram
- Attach the speaker to the amplifier output
- Power up the ESP32
- Once powered, the ESP32 will automatically start playing the audio
- Adjust volume using the potentiometer on the LM386 module
- Monitor serial output for debugging
#include "SoundData.h"
#include "XT_DAC_Audio.h"

XT_Wav_Class Sound(sample);
XT_DAC_Audio_Class DacAudio(25,0);

uint32_t DemoCounter=0;

void setup() {
    Serial.begin(115200);
}

void loop() {
    DacAudio.FillBuffer();
    if(Sound.Playing==false)
        DacAudio.Play(&Sound);
    Serial.println(DemoCounter++);
}Solutions:
- Verify the audio file is in correct format (16000 Hz, 8-bit PCM)
- Check all connections, especially GPIO 25 to amplifier IN pin
- Ensure hex code is properly formatted in SoundData.h
- Verify amplifier module is powered correctly
Solutions:
- Check speaker connections
- Verify LM386 module is receiving power (VIN and GND)
- Test speaker with another audio source
- Ensure GPIO 25 is properly connected
Solutions:
- Adjust potentiometer on LM386 module clockwise
- Use a higher wattage speaker
- Check amplifier module power supply
Solutions:
- Reduce sample rate in Audacity (try 8000 Hz)
- Lower the volume on amplifier module
- Ensure power supply is stable
- Microcontroller: ESP32
- DAC Pin Used: GPIO 25 (DAC1)
- Audio Format: WAV (Unsigned 8-bit PCM)
- Sample Rate: 8000-16000 Hz (recommended)
- Amplifier IC: LM386
- Speaker Impedance: 8Ω
- Power Supply: 5V via USB or external source
- Audio Storage: The audio file is converted to a hex code and stored in program memory as an array
- DAC Conversion: ESP32's DAC converts digital audio data to analog voltage signals on GPIO 25
- Amplification: LM386 amplifies the weak analog signal from ESP32
- Audio Output: The amplified signal drives the speaker to produce audible sound
- Continuous Playback: The code continuously checks if audio has finished and replays it in a loop
- Memory Constraints: ESP32's limited RAM restricts the length of audio files
- Audio Quality: 8-bit, low sample rate audio provides basic quality
- Format Support: Only WAV format is supported
- Mono Output: Single channel audio only
- Add SD card support for larger audio files
- Implement multiple track playback
- Add touch/button controls for play/pause/skip
- Integrate Bluetooth audio streaming
- Display track information on OLED screen
- Add equaliser functionality
- Battery power option with charging circuit
- Project Tutorial: CircuitDigest ESP32 Audio Player
- XT_DAC_Audio Library: XTronical Website
- Audacity: Official Website
- HxD Hex Editor: Official Download
- ESP32 Datasheet: Espressif Documentation
- LM386 Datasheet: Texas Instruments.
- ESP32: ESP32 Projects
This project is open-source and available for educational and personal use. Please take a look at the original CircuitDigest article for specific licensing information.
You can fix this project and submit pull requests for improvements. Suggestions and bug reports are welcome!
- Circuit Digest for the original project tutorial
- XTronical for the XT_DAC_Audio library
- ESP32 community for continued support and development
For questions or support regarding this project, please visit the original project page or refer to the CircuitDigest community forums.
Happy Making! 🎵🔧