This project is a Full Stack online Role-Playing Game. Users can sign up and play for free, or upgrade to a premium account to access premium content.
View the deployed site on Render.
CIRPG: siː aɪ ɑː piː ʤiː | Noun
Acronym: Code Institute Role Playing Game.
A Full Stack Role-Playing Game, filled with loot fuelled endorphins, stunning hand drawn graphics, and a Leaderboard to lose friends over.
“You should have seen the Mythic item I pulled on CIRPG last night!”
CIRPG is browser-based Full Stack Role-Playing Game, which allows users to create a character, embark on an endless adventure, and aim for a place on the Leaderboard. As users progress through the game, they earn experience, level up, and find new weapons to equip. Whilst the mechanics behind the gameplay are complex, the gameplay itself is simple, fun, and intuitive.
The project was developed using Python (Django), HTML, CSS, JavaScript, and utilises an SQL database via PostreSQL.
View Terminology
Throughout this documentation, certain terms will be used which either may not be familiar to some, or may appear very similar and indistinguishable from one another without any prior explanation. In order to avoid any confusion and for the sake of clarity, I have defined these in relative terms to the project below:- Loot: A term used to describe weapons that are generated after a successful battle.
- Run: A term used to describe a user’s playthrough of the game, from starting a new character to losing that character.
- User: An individual playing the game.
- Profile: A user’s central hub, containing run statistics, their current character/loot (if applicable), and their corresponding stats.
- Character: The playable entity chosen by a user at the beginning of a run, displayed in a user’s profile.
- Stats: A character/enemy/weapon’s attributes (HP, Attack, Defence, Speed).
- XP: Experience Points. Represents progression between Character Levels.
- Tier: Weapons and Enemies are Tiered, which means they will only become available within the possible pool of content when a user's level reaches or exceeds that Tier.
- Codex: This term is used to refer to a library-like list of all content within the game.
- Rarity: This term is used to describe how ‘rare’ a weapon is. The higher the Rarity, the higher the item’s base stats will be.
What would your ideal browser-based RPG look like?
“I want a game that I can play in shorts bursts.”
“I want a game that I can stop playing and come back to later.”
“I want a game where I can compete with my friends.”
“I want a game where each play through feels unique.”
“I want a game where I can try it before I pay for it.”
| User Story ID | As A/An | I want to be able to | So that I can |
|---|---|---|---|
| Viewing and Navigation | |||
| 1a | Site User | Understand the purpose of the site immediately | Decide whether I want to engage with it. |
| 1b | Site User | Navigate and interact with the site with ease on all viewports | Play the game on any device. |
| 1c | Site User | Find out information about the game | Understand how to play. |
| Registration and User Accounts | |||
| 2a | Site User | Register for an account | Have a profile. |
| 2b | Site User | Log In and logout | Access my profile and play the game. |
| 2c | Site User | Recover my password | Recover access to my account. |
| 2d | Free/Paid User | Access my profile | See my statistics and status. |
| Premium | |||
| 3a | Free User | Access the upgrade offer from any page | Choose to upgrade easily from any location on the site. |
| 3b | Free User | Pay to upgrade to the full version | Have full access to premium features. |
| 3c | Paid User | Navigate the site without upgrade offers | Avoid paying for the product twice. |
| Game | |||
| 4a | Free User | Have basic access to the game | Decide whether I want to pay for the full game. |
| 4b | Free/Paid User | Create a new character | Start playing the game. |
| 4c | Free/Paid User | Enter and engage in a battle | Enjoy the basic gameplay loop of the game. |
| 4d | Free/Paid User | Level up my character | Make progress in the game. |
| 4e | Free/Paid User | Be presented with a choice of a new weapon after each win | Customise my character. |
| 4f | Free/Paid User | Leave a battle halfway through and return at a later time | Stop playing the game at any point without being penalised. |
| 4g | Paid User | Have access to higher levels, additional characters, and additional weapons/enemies | Enjoy the benefits of premium content. |
| Leaderboard | |||
| 5a | Site User | View the Leaderboard | See the High Scores of paid players. |
| 5b | Site User | View individual Leaderboard entries | View the breakdown of a player's score. |
| 5c | Paid User | Add my score to the Leaderboard | Compete with other paid players. |
| 5d | Paid User | See my score at the end of a game. | Find out where my position is on the Leaderboard, or see how close I was to reaching the Leaderboard. |
| Codex | |||
| 6a | Site User | View the Codex | See all available content in the game. |
| 6b | Site User | Sort and Filter the Codex | Find specific entries in the codex, and find out what content is available as a premium user. |
| 6c | Admin | Add entries to the Codex | Add content to the game. |
| 6d | Admin | Update entries to the Codex | Update content in the game. |
| 6e | Admin | Delete entries in the Codex | Remove content to the game. |
Ideal User: An individual who likes Role-Playing Games, and wants a game that is easy to play, accessible, and can be played in short stints.
Project Goal: Create a game that is intuitive, addictive, competitive, yet rewarding and easy to play.
User Needs:
- To be able to navigate the site with ease.
- To be able to register, log in and log out.
- To be able to try the game without paying for it.
- To be able to pay for premium access for content not available to free users.
- To be able to play the game easily.
- To be able to compete with other players.
Project Objectives:
- To create a game that is easy to play, addictive, and rewarding.
- To paywall content between free/premium users.
- To incentivise users to upgrade to premium.
- To add a degree of competition to encourage users to continue playing.
- To create a game where every run is unique.
- To allow the user to navigate and control the application with ease on all platforms and devices.
- Users must be able to navigate, and interact with, the site with ease.
- Ensure Interactivity and Gameplay is simple and intuitive.
- Ensure users can obtain additional information on how to play, and that the instructions are easy to understand.
- Ensure layout and design is responsive to all media sizes.
- Allow users to create an account, confirm their email address, change their password, log in, and log out.
- Implement content which is available only to premium users.
- Create a paywall between free and premium content, preventing free users from accessing the premium content.
- Allow users to upgrade to a premium account through a one-off Stripe payment to obtain access to the premium content.
- Prevent users from upgrading to a premium account more than once.
- Allow users to see an overview of all possible content in the game via the Codex.
- Allow free users to see what Premium content is available within the Codex.
- Allow users to filter and sort content within the Codex.
- Allow Admins to create, update, and delete content from the Codex.
- Allow users to create a character if one does not already exist in their profile.
- Allow users to have a transparent view of the difference between available characters.
- Allow free users to create a character from the free characters available.
- Allow premium users to create a character from all available characters.
- Ensure that when a user creates a character, a random weapon of appropriate Tier, Premium Access, Level, and Rarity is created.
- Allow users to visit their profile.
- Allow users to see their gameplay statistics from their profile.
- Allow users to create a character from their profile (if applicable).
- Allow users to see their current character and weapon from their profile (if applicable).
- Allow users to delete their current character from their profile (if applicable).
- Allow users to engage in combat with a random enemy of a relative level and Tier.
- Allow real-time control of the battle through an Active Time Battle system.
- Allow users to attack or retreat on their turn.
- Allow users to understand the battle mechanics through an intuitive UI and a text-based battle log.
- Prevent free users from fighting enemies higher than Tier 2.
- Clearly communicate to a user if they have won or lost a battle.
- Generate random Loot for a user when they win a battle.
- Allow a user to choose whether to keep their existing weapon or take the new loot.
- Grant a character a relative amount of XP when they win a battle.
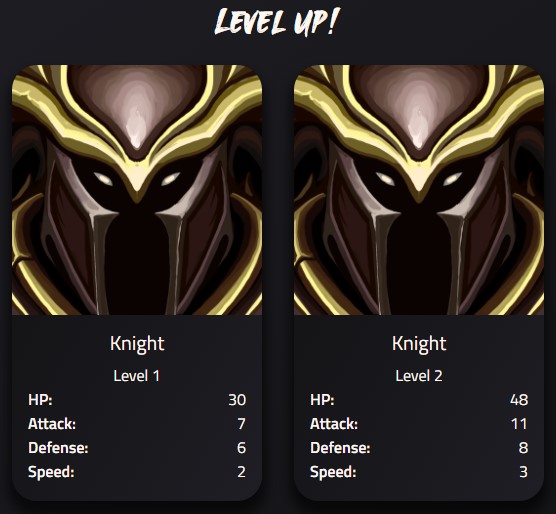
- If a character levels up when they win a battle, their character’s statistics are increased.
- If a character loses a battle, their character is removed from the database (akin to permadeath).
- When a character loses a battle, their score is presented to them.
- Prevent free users from exceeding Level 2.
- Prevent free users from obtaining loot higher than Tier 2, or Rarity higher than Uncommon.
- Allow all users to view the Leaderboard.
- Allow all users to view additional details regarding each individual Leaderboard entry.
- Ensure there are only ever 10 Leaderboard entries.
- Prevent free users from their score being added to the database.
- Allow paid users to have their score and stats published on their Leaderboard if their score his higher than any of the existing 10 entries.
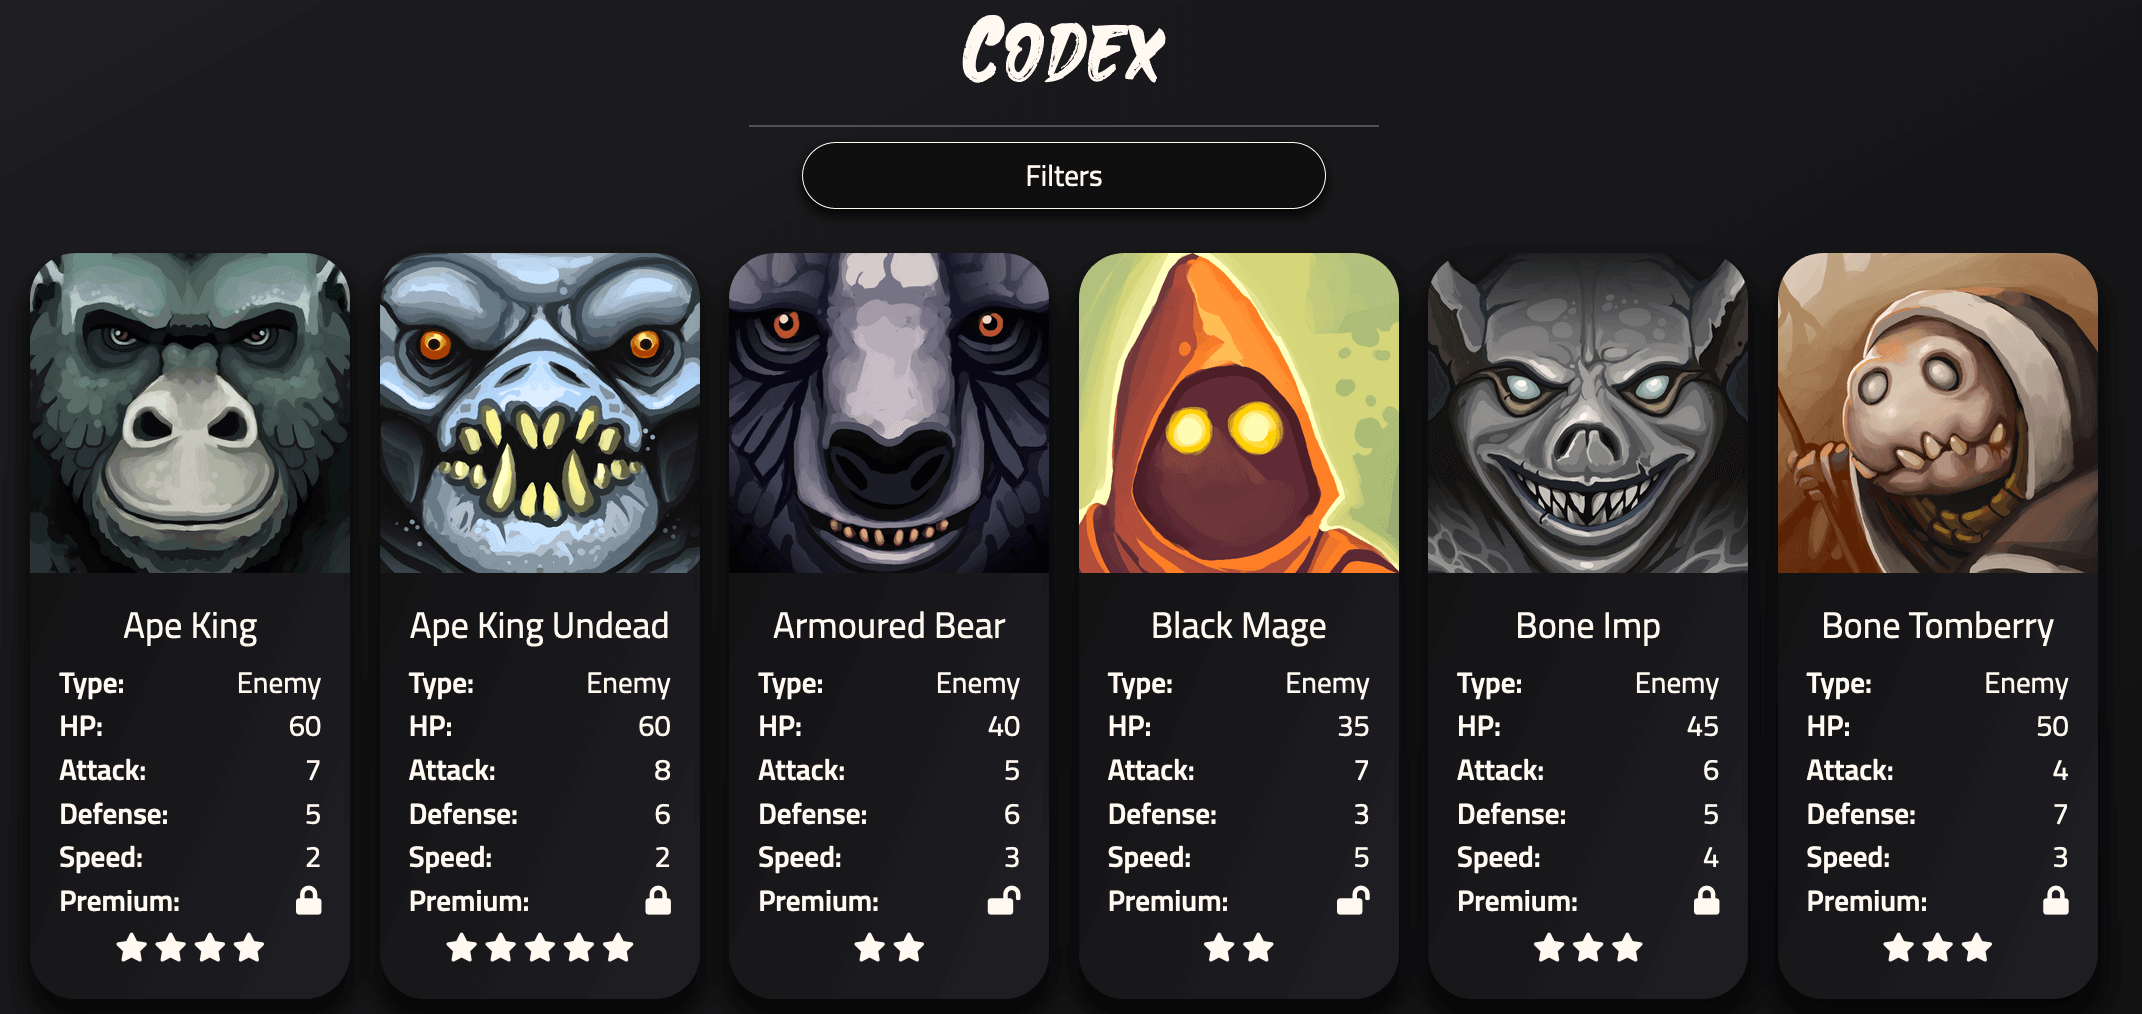
The content within this project relates to the entries within the Codex. Each entry will either be a Character, an Enemy, or a Weapon, and will have a name, and image, a unique set of stats, and an associated Tier. All game mechanics are centred around these Codex entries and their associated stats.
Content artwork will be commissioned, and will be in the style of Fantasy / Dungeons and Dragons.
Characters will be entries within the Codex that only the User can play the game with.
Enemies will be entries within the Codex that Characters will fight against during a Battle.
Weapons will be entries within the Codex that will be randomly generated for both Characters and Enemies. A weapon’s stats will be combined with the associated Character’s/Enemy’s stats.
- Each entry within the Codex will have 4 stats:
- HP: Hit Points, which represent health. When a Character or Enemy’s total HP is reduced to Zero, they will be defeated.
- Attack: This will represent the amount of damage one inflicts on their opponent’s HP in the event of a successful attack.
- Defence: This value will be used to calculate Dodge Chance.
- A Character/Enemy’s chance of dodging an attack will be calculated through the following formula: Defence/HP (capped at 75%).
- Each time an attack is attempted, the opposition will attempt to dodge the attack based on their own Defence and HP.
- Speed: This value will be used to calculated who attacks first, and when they attack.
- Each entry’s stats will be defined as Base Stats, as they are subject to
modification.
- The higher the base stats, the bigger impact stat modification will have.
- Enemies and Weapons will have an associated Tier.
- Tiers represent what Level the Character must be in order for the entry to be available within the pool of content.
- Entries with a higher Tier will have higher Base Stats, which will make them substantially more powerful (on a logarithmic scale) based on how the stat modification intends to apply.
When an enemy or weapon is generated from the Codex, it will be randomly assigned a level. The level will only ever be less than or equal to the current Character’s level.
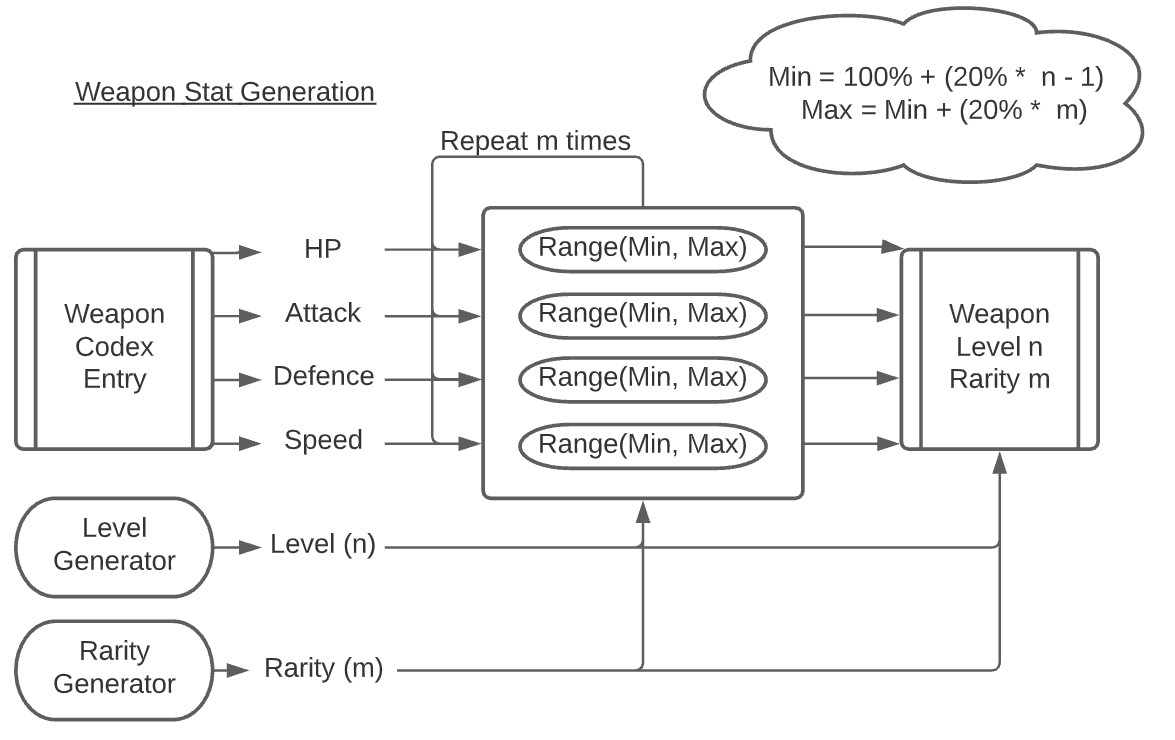
For weapons, the level will affect the range of possible stat modifiers.
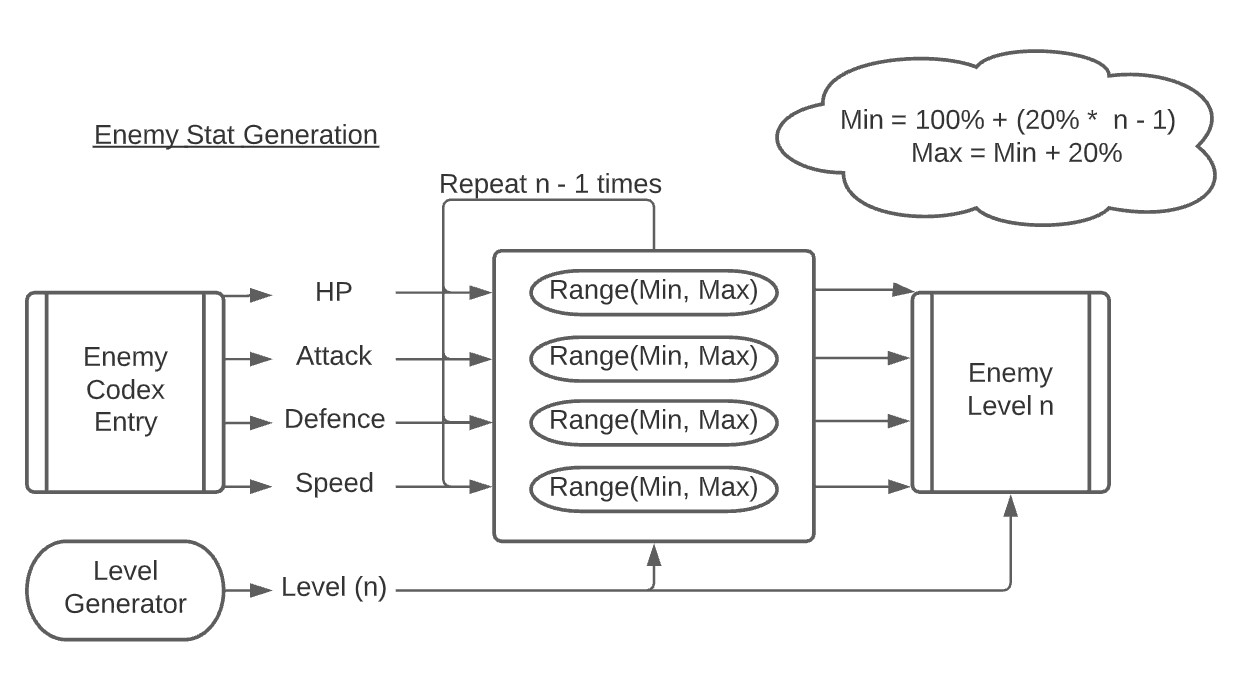
For enemies, the level will affect the number of times the stat modifier is applied to the enemy’s stats.
When a weapon is generated (either as Loot for the user, or for an enemy during battle), it’s rarity will be randomly allocated based on the Character’s current level:
- Uncommon (Character Level 1+)
- Common (Character Level 2+)
- Rare (Character Level 3+)
- Epic (Character Level 4+)
- Mythic (Character Level 5+)
An item’s rarity affects how many times a stat modifier is applied to the weapon’s stats.
In order to create a simple interface for the user, each of the project’s core functions will be isolated into different pages. In an attempt to implement an intuitive navigation system, a persistent Navigation Bar (Navbar) will be utilised, along with carefully selected navigational aids on each page in an attempt to pre-empt the user’s subsequent destination. This will allow a user to navigate the project with ease, spending minimal time finding the next destination, hopefully engaging and retaining their attention for longer periods of time.
The Navbar will be a persistent element that will allows users to navigate to any logical page (i.e any route the user is permitted to access manually).
Show Details
Applicable User Stories:
- 1b, 2a, 2b, 2d, 3a, 4a, 4b, 4c, 5a, 6a
Applicable Functional Requirements:
- Simple, Intuitive, and Engaging Interface
- User Management
- Premium Content
- Codex Overview
- Profile
- Character Creation
- Leaderboard
Navigational Routes:
- All logical pages
The home page is the initial landing page, and provides a brief overview of the project’s concept and the appropriate CTAs.
Show Details
Applicable User Stories:
- 1a, 1b, 1c, 2a, 2b, 2d, 6a, 6b
Applicable Functional Requirements:
- Simple, Intuitive, and Engaging Interface
- User Management
- Codex Overview
Navigational Routes:
- Codex (Pre-filtered)
- Log In (Logged Out)
- Register (Logged Out)
- Profile (Logged in)
Account Management will allow users to register, create an account, log in, log out, and reset their password.
Show Details
Applicable User Stories:
- 1b, 2b, 2c
Applicable Functional Requirements:
- Simple, Intuitive, and Engaging Interface
- User Management
Navigational Routes:
- Non-logical account verification
- Profile
- Login Redirect
The help page will provide an in-depth breakdown of all content, gameplay mechanics, and guidance.
Show Details
Applicable User Stories:
- 1b, 1c
Applicable Functional Requirements:
- Simple, Intuitive, and Engaging Interface
Navigational Routes:
- N/A
The codex will allow free and paid users to view all content in the game, and sort/filter the content appropriately. Admins will be able to Create, Edit, and Delete content from this page.
Show Details
Applicable User Stories:
- 1b, 6a, 6b, 6c, 6d, 6e
Applicable Functional Requirements:
- Simple, Intuitive, and Engaging Interface
- Codex
Navigational Routes:
- Create/Edit/Delete Codex Entries (Admin Only)
The profile will allow users to see an overview of their long-term progress. If the user has a current active character, this page will allow a user to see their current character, proceed to a battle, or delete their current character. If a user does not have an activate character, they can create a new character from this page.
Show Details
Applicable User Stories:
- 1b, 2d, 4a, 4b, 4c,
Applicable Functional Requirements:
- Simple, Intuitive, and Engaging Interface
- User Management
- Character Creation
- Premium Content
- Profile
- Character Progression and Lifecycle
Navigational Routes:
- Create
- Battle
The create page will allow users to create a new Character.
Show Details
Applicable User Stories:
- 1b, 4a, 4b, 4g
Applicable Functional Requirements:
- Simple, Intuitive, and Engaging Interface
- Premium Content
- Character Creation
- Profile
Navigational Routes:
- Profile
Battle will consist of a logical route (Battle) and non-logical route (Post-Battle). Users will manually navigate to the Battle page to engage in the project’s main gameplay loop. Once a battle is finished, they will be routed to the Post-Battle page, the content of which will change depending on multiple factors including whether the user won the battle, whether they are premium users, or whether their character levelled up.
Show Details
Applicable User Stories:
- 1b, 2d, 3c, 4a, 4c, 4d, 4e, 4f, 4g, 5c, 5d
Applicable Functional Requirements:
- Simple, Intuitive, and Engaging Interface
- Premium Content
- Battle Mechanics
- Character Progression and Lifecycle
- Leaderboard
Navigational Routes:
- Profile
- Battle
- Create
- Premium
- Leaderboard
The Leaderboard will show the top 10 scoring premium users. Contained within each entry will be detailed information surrounding that particular character’s run.
Show Details
Applicable User Stories:
- 1b, 5a, 5b, 5c, 5d
Applicable Functional Requirements:
- Simple, Intuitive, and Engaging Interface
- Premium Content
- Leaderboard
Navigational Routes:
- N/A
The Premium page will allow users to upgrade their account from Free to Premium. This page will display the benefits of upgrading, and will direct the user to an external Stripe website upon requesting to upgrade. The redirect back from the external page will change depending on whether the payment was successful or not.
Show Details
Applicable User Stories:
- 1b, 3b, 3c
Applicable Functional Requirements:
- Simple, Intuitive, and Engaging Interface
- Premium Content
- Character Creation
- Profile
- Battle Mechanics
- Character Progression and Lifecycle
- Leaderboard
Navigational Routes:
- Success/Abort (Non-Logical)
- Profile
- Premium
The following considerations were made when planning the project’s Interaction Design. Given this project is a game, and is intended to entice a user to upgrade to a premium account, the interaction design aims to keep a user engaged and excited by the content.
- The main game mechanics focus on stats, whether they are individual stats of a new piece of loot, or whether they are the combined stats of a Character or their Enemy. Therefore, this information intends to be clearly communicated the user via text; all stats must be easily legible, and contained to their relative entry in the codex, allowing a user to clearly identify their relevance and relationship to the associated entry.
- All instructional content within the project will be colloquial, yet simple, easy to understand, and easy to follow.
- All text relating to navigation and authentication will be appropriately selected and positioned to allow a user to easily understand how to access and navigate the project.
- Each entry within the Codex will contain an associated image; the name of each entry will relate to the image (i.e. the entry “Ape King” will have a picture that resembles an Ape).
- Each image will be appropriately sized and positioned, allowing a user to understand their relationship to the Codex entries, yet not overwhelm or misuse the available screen space.
- Interactive elements will have visual effects tied to them in order to communicate their interactivity.
- Visual effects will be applied to weapons, and relevant identifiers associated with weapons, in order to emphasise their rarity or the scale of their stats.
- All features will be available to all screen sizes and devices.
- Visual Effects on interactive elements will be adjusted whether the user is interacting with the site via a mouse or via touch.
- Users will be able to access and engage with this project anywhere with an internet connection.
- One of the project’s objectives is to keep a user engaged for as long as possible, therefore it is important to respect a user’s time.
- Animations will be implemented in the Battle section, albeit short and informative, and intend not to disrupt the flow of gameplay.
- Each run will take anywhere between 5 seconds to over 5 minutes; this grants a user the choice as to whether they want to play once a day, or multiple times in a sitting.
- A user will be able to log out of website at any point, and log back in on any other device and resume where they left off.
- The core gameplay loop will require simple and repetitive user interaction; given the above interaction considerations, this will allow users of any prior gaming experience to enjoy the project.
- Due to the random nature of the gameplay loop, users may be frustrated by the outcome of some battles, however this is an expected emotion. This is strongly counteracted by the excitement of progressing through the game, complimented by the combined interaction design discussed above, designed to invoke engagement and excitement.
Due to the resolution of the wireframe documents, it is recommended that these PDFs are downloaded to be viewed in the browser, rather than using GitHub’s native PDF viewer.
- All Wireframes: Link
- Navbar Wireframe: Link
- Home Wireframe: Link
- How To Wireframe: Link
- Login/Register Wireframe: Link
- Codex Wireframe: Link
- Premium Wireframe: Link
- Create Wireframe: Link
- Profile Wireframe: Link
- Battle Wireframe: Link
- Post-Battle Wireframe: Link
- Leaderboard Wireframe: Link
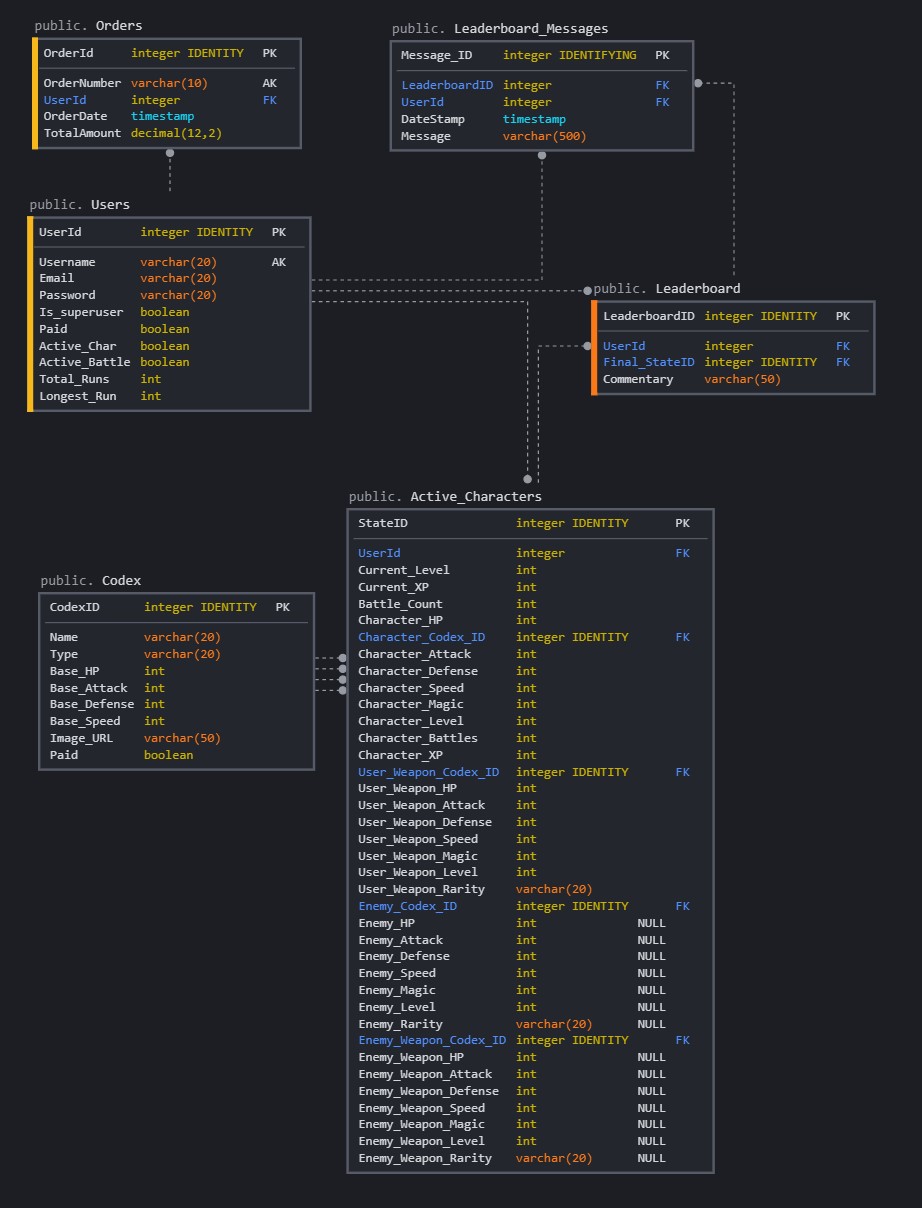
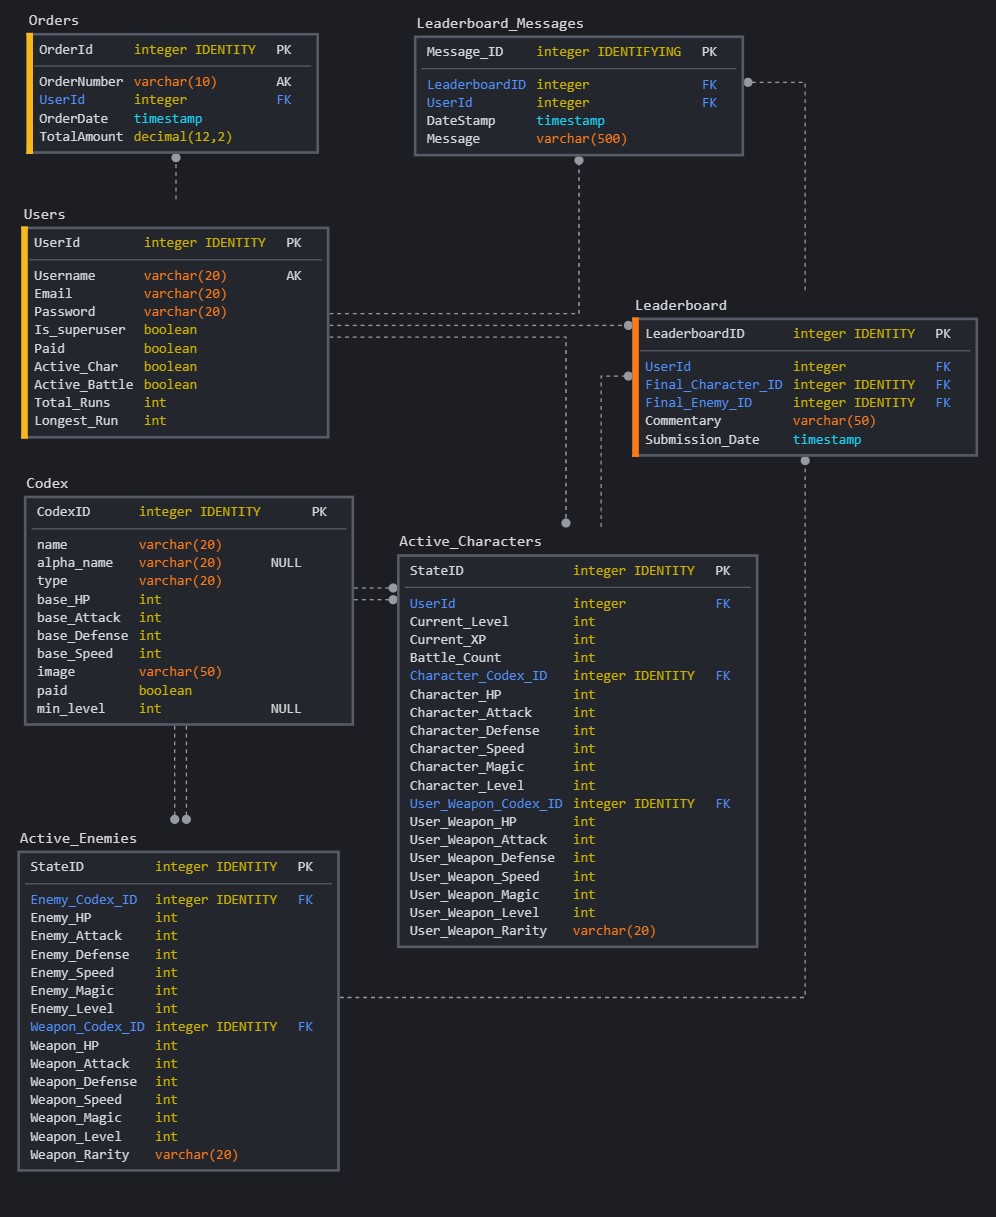
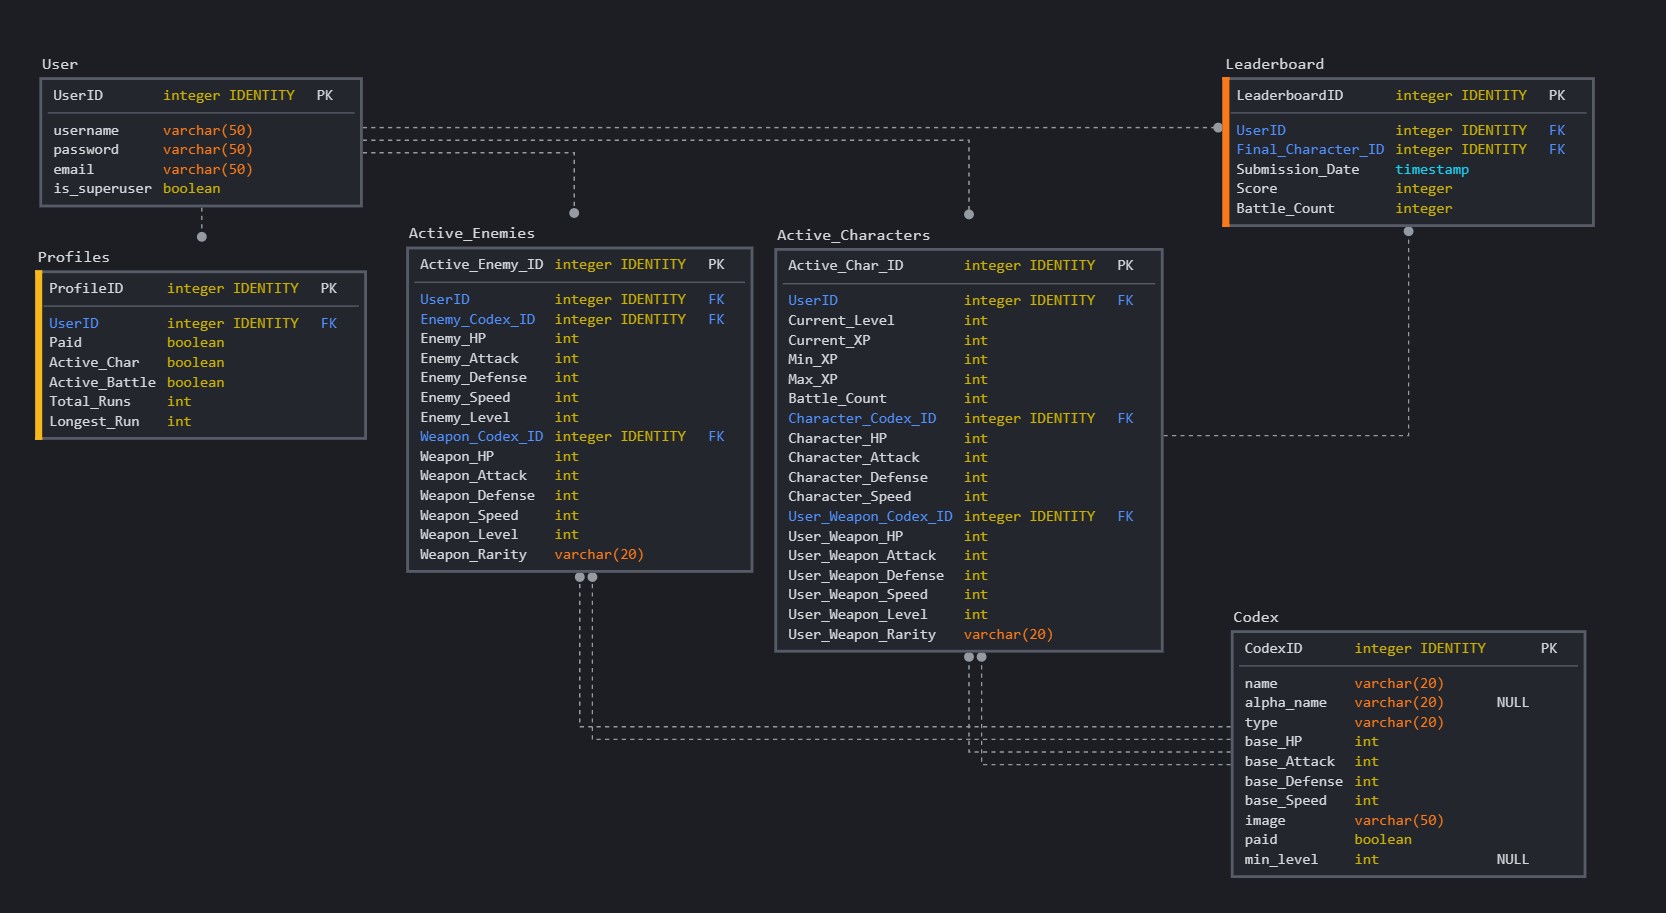
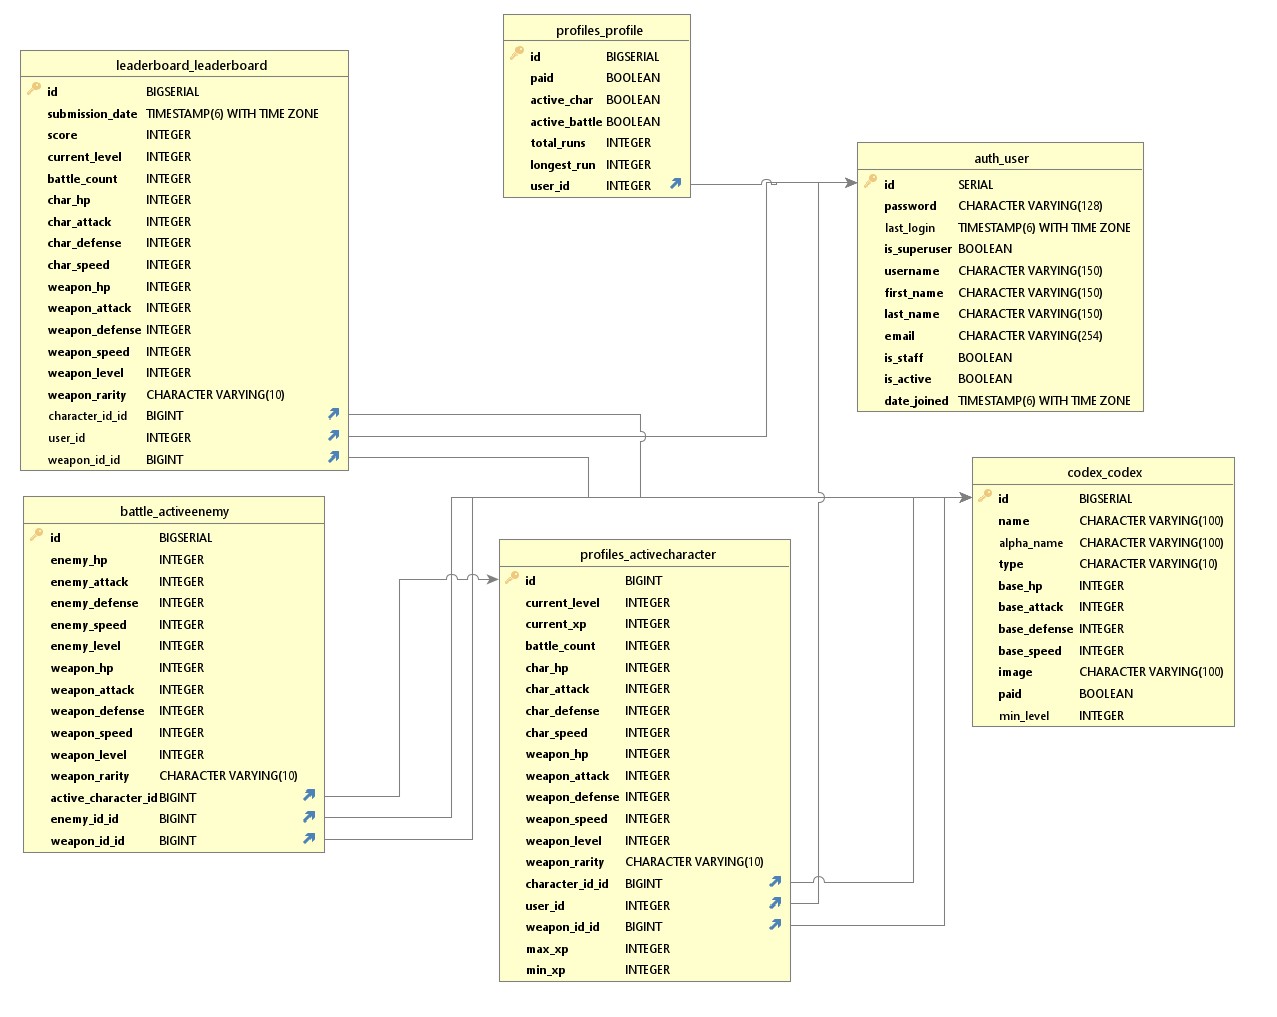
This project utilises a Relational Database via PostgreSQL for storing User Credentials, User Profiles, Codex entries, Active Characters, Active Enemies, and Leaderboard entries. The Database went through 3 major iterations throughout the planning phase of the project. This was as a result of the following:
- A reduction in scope:
- The removal of the “Magic” stat from Codex Entries.
- The removal of Leaderboard Messages.
- Refinement and Refactoring of DB:
- The removal of Orders model.
- Splitting “User” model into “User” and “Profiles”.
- Developing a better understand of relational databases.
- Splitting “Active Characters” into “Active Characters” and “Active Enemies”
- Replacing the Leaderboard Foreign Key with required fields.
The first three DB concepts were completed manually, while the final DB Schema is an actual representation of the deployed database.
Schema
This project utilises a pseudo-monochromatic colour scheme, in order to align with the Fantasy aesthetic and theme. By implementing dark tonal colours, this prevents the colour scheme of the webpages themselves from clashing with the vibrant image content utilised for the Codex entries.
The primary colour scheme, utilised for the layout, framework, and text of the website, focuses on a white to black pseudo-monochromatic colour scheme.
The variations of white were implemented in various aspects of the website depending on the context, whether it is representing the Chalk style text (see Typography), or whether being used for outlines and glowing effects.
The shades of black were used to differentiate between content layers, and priority within the informational hierarchy of each individual page.
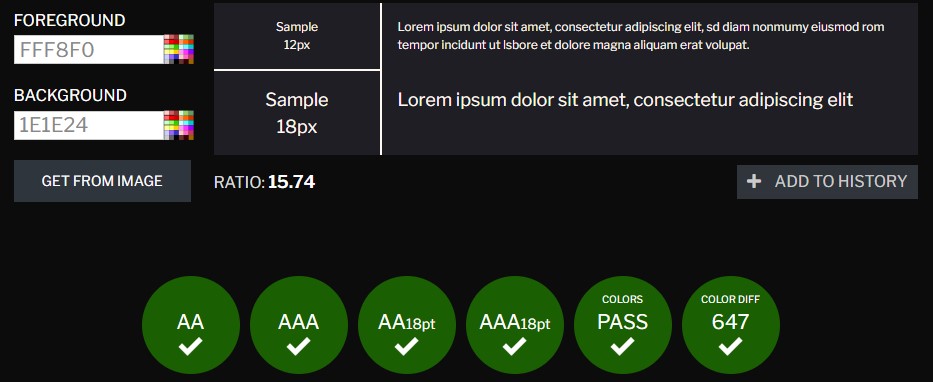
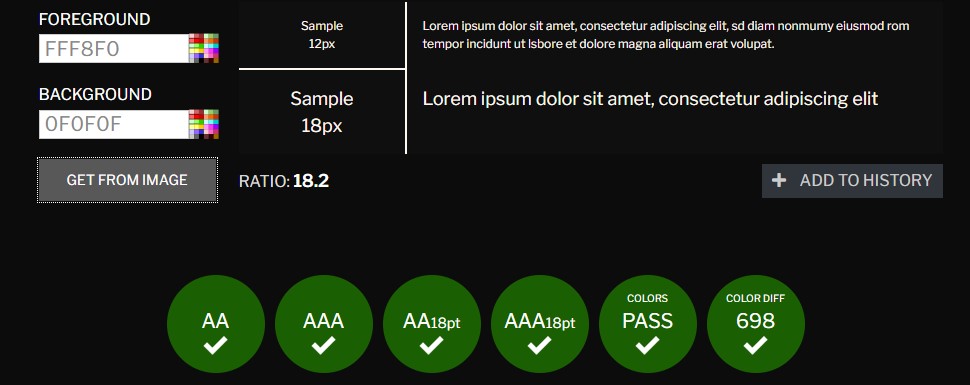
Regardless of which shade of white was used with which shade of black, all combinations produced ideal contrast ratios.
The secondary colour scheme, implemented to represent Loot Rarity, was based on colour schemes synonymous for Color-Coded Loot, and therefore would be familiar to regular gamers.
The images utilised throughout the project for the Codex entries are vibrant and colourful. Given the primary colour scheme is simple, monochromatic, and dark, this allows the images to stand out and ultimately compliment the overall aesthetic.
The font Mandhor was used for all headings within the project, intended to represent handwritten chalkboard text. The use of a handwritten style font was chosen as this would complement the theme of the project, given handwritten text is synonymous with Tabletop RPGs.
The font Titillium Web was chosen as the website’s body text as it is clear, legible, and strong. All text is easy to read, identify, and given it has similarities with the sans-serif font, would be easily recognisable by any user.
Given the primary colour scheme is simple, and utilises a very limited colour range, various visual effects were implemented in order to create an engaging, interesting, and visually appealing aesthetic.
Box shadows are heavily utilised throughout the project to ‘lift’ content off the background. Whilst initially influenced by https://neumorphism.io/, custom border shadows were created for the Navbar, Card Elements, Buttons, and the Leaderboard/Help table.
In order to add a degree of texture to the colour filled elements, and to prevent the overall aesthetic being stale, colour gradients were utilised. The body’s background content utilises a diagonal colour gradient, while the majority of Card elements use the same gradient reversed. The below example demonstrates both the cohesion of using inverted gradients, and the implementation of the aforementioned box shadows.
All links and buttons within the project produce an underlined effect when hovered (desktop) or pressed (mobile). This helps communicate that the elements are interactive, and produces appropriate user feedback when a user engages with these elements.
All buttons are custom designed with a border radius, box shadow, and solid colour fill. When a user hovers (desktop) or pressed (mobile) buttons, an animation is produced which removes the button entirely, and evokes the underlined effect discussed above.
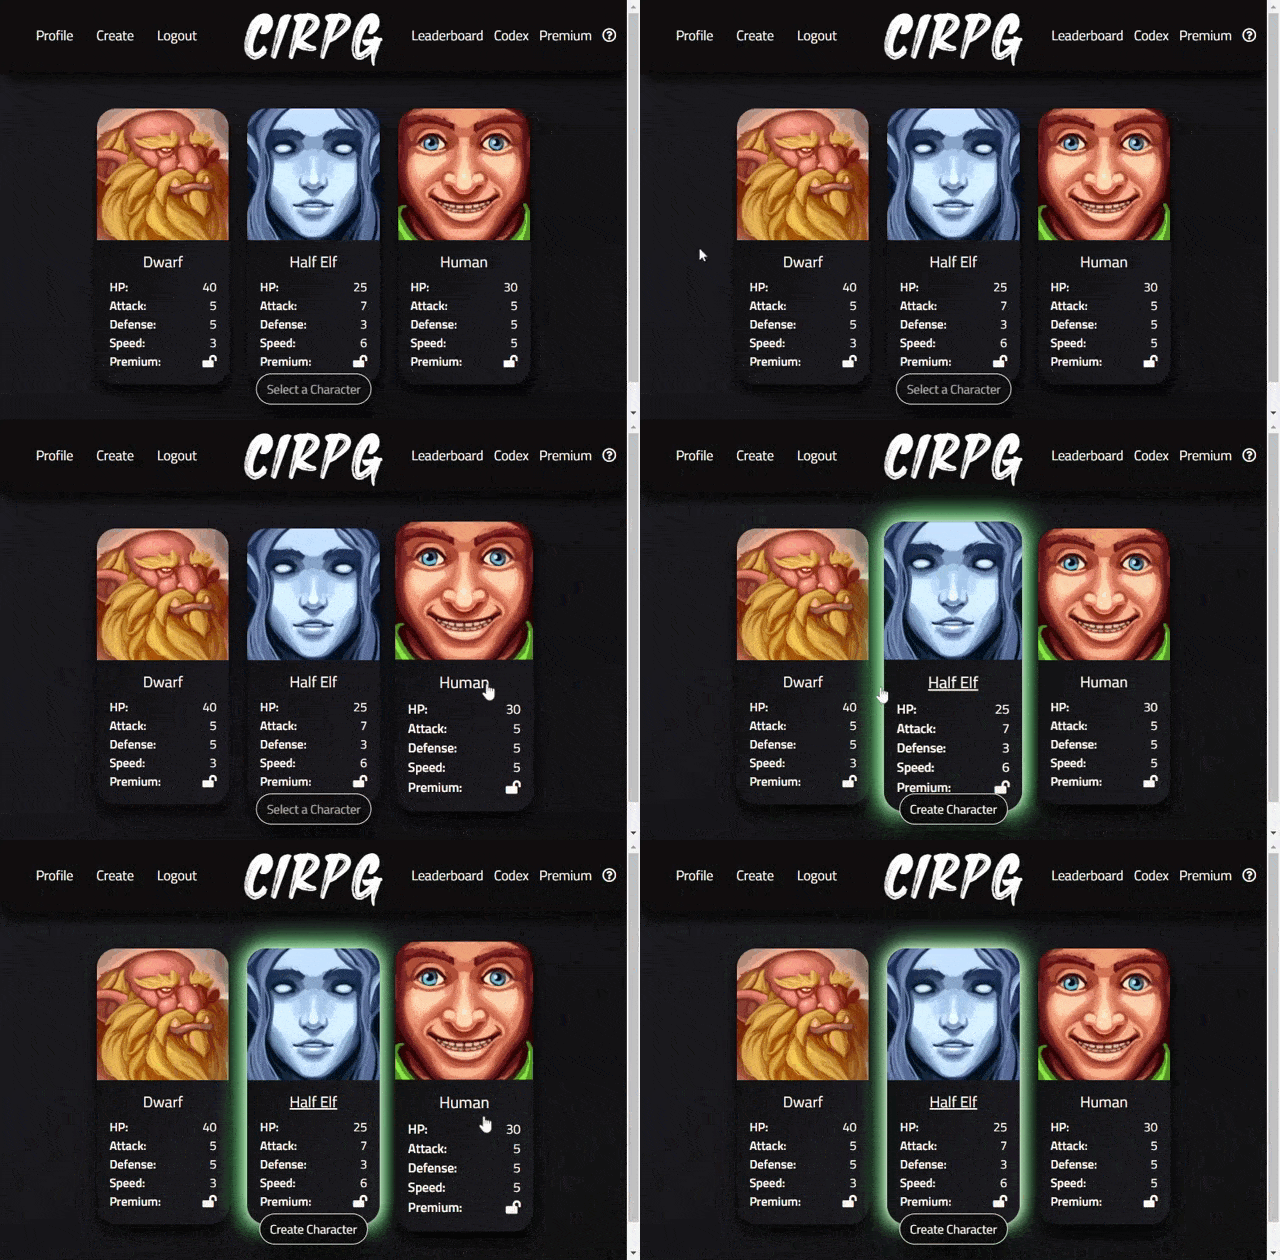
When a user is selecting a character, visual effects have been implemented in order to produce responsive feedback to a user’s inputs, and to aid a user’s understanding of how to interact with this page.
When a user hovers over a character, the container produces a “hover” effect, lifting the highlighted content off the page.
When a user clicks (Desktop) or presses (Mobile) on a character, a green glow effect is set to the selected element.
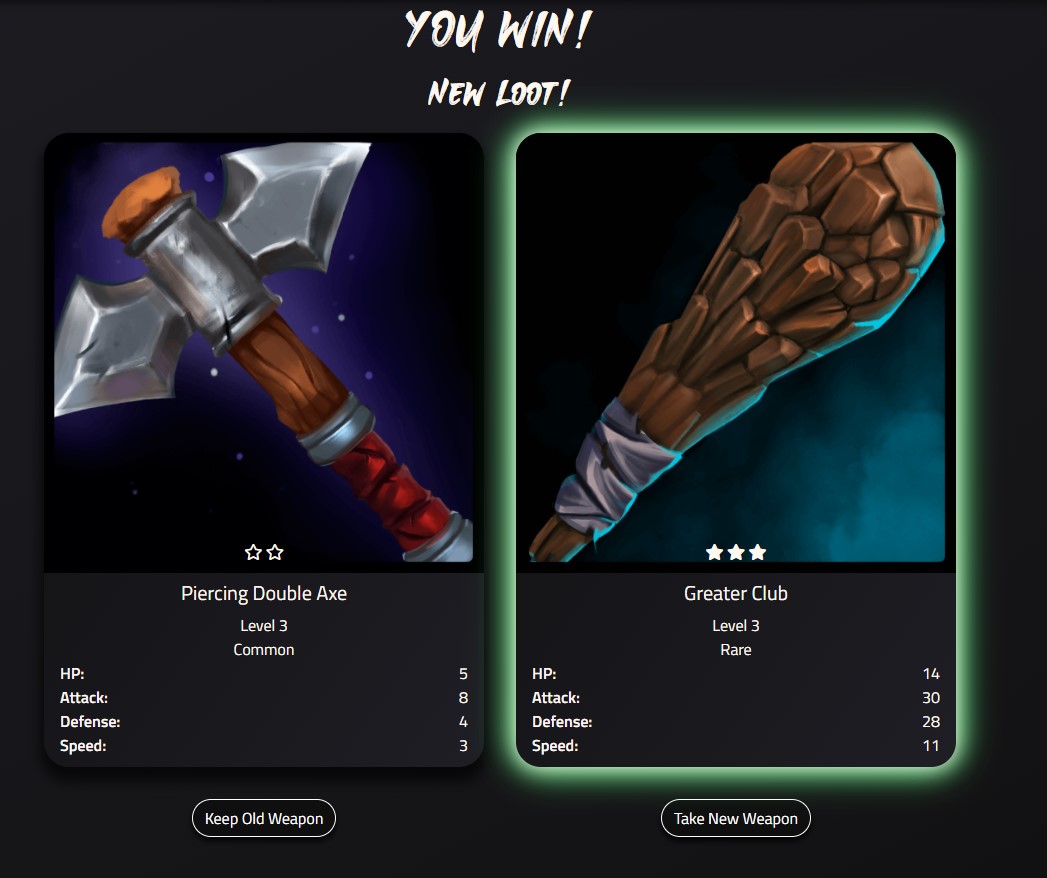
If, when a user wins a battle, they are presented with a new piece of Loot which is of rarity “Uncommon” or higher, a glow effect will be presented on the new piece of loot. The colour of the glow changes depending on the Rarity.
In the above example, the weapon currently equipped is of “common” rarity, and therefore does not have a glow effect. The new weapon awarded is of “rare” rarity, and is therefore accompanied by a green glow effect.
This visual effect enhances the user experience by emphasising the value and strength of the new Loot pulled. This helps build excitement and present a sense of being rewarded as they progress through the game.
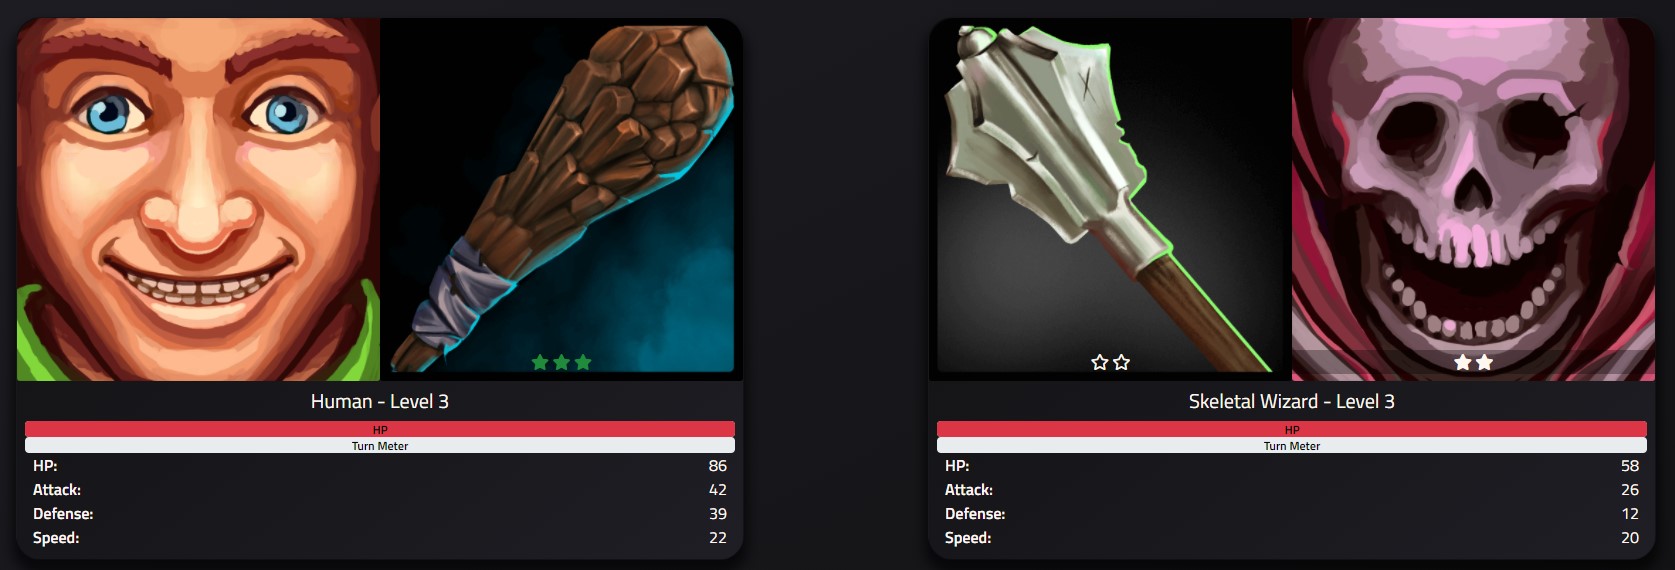
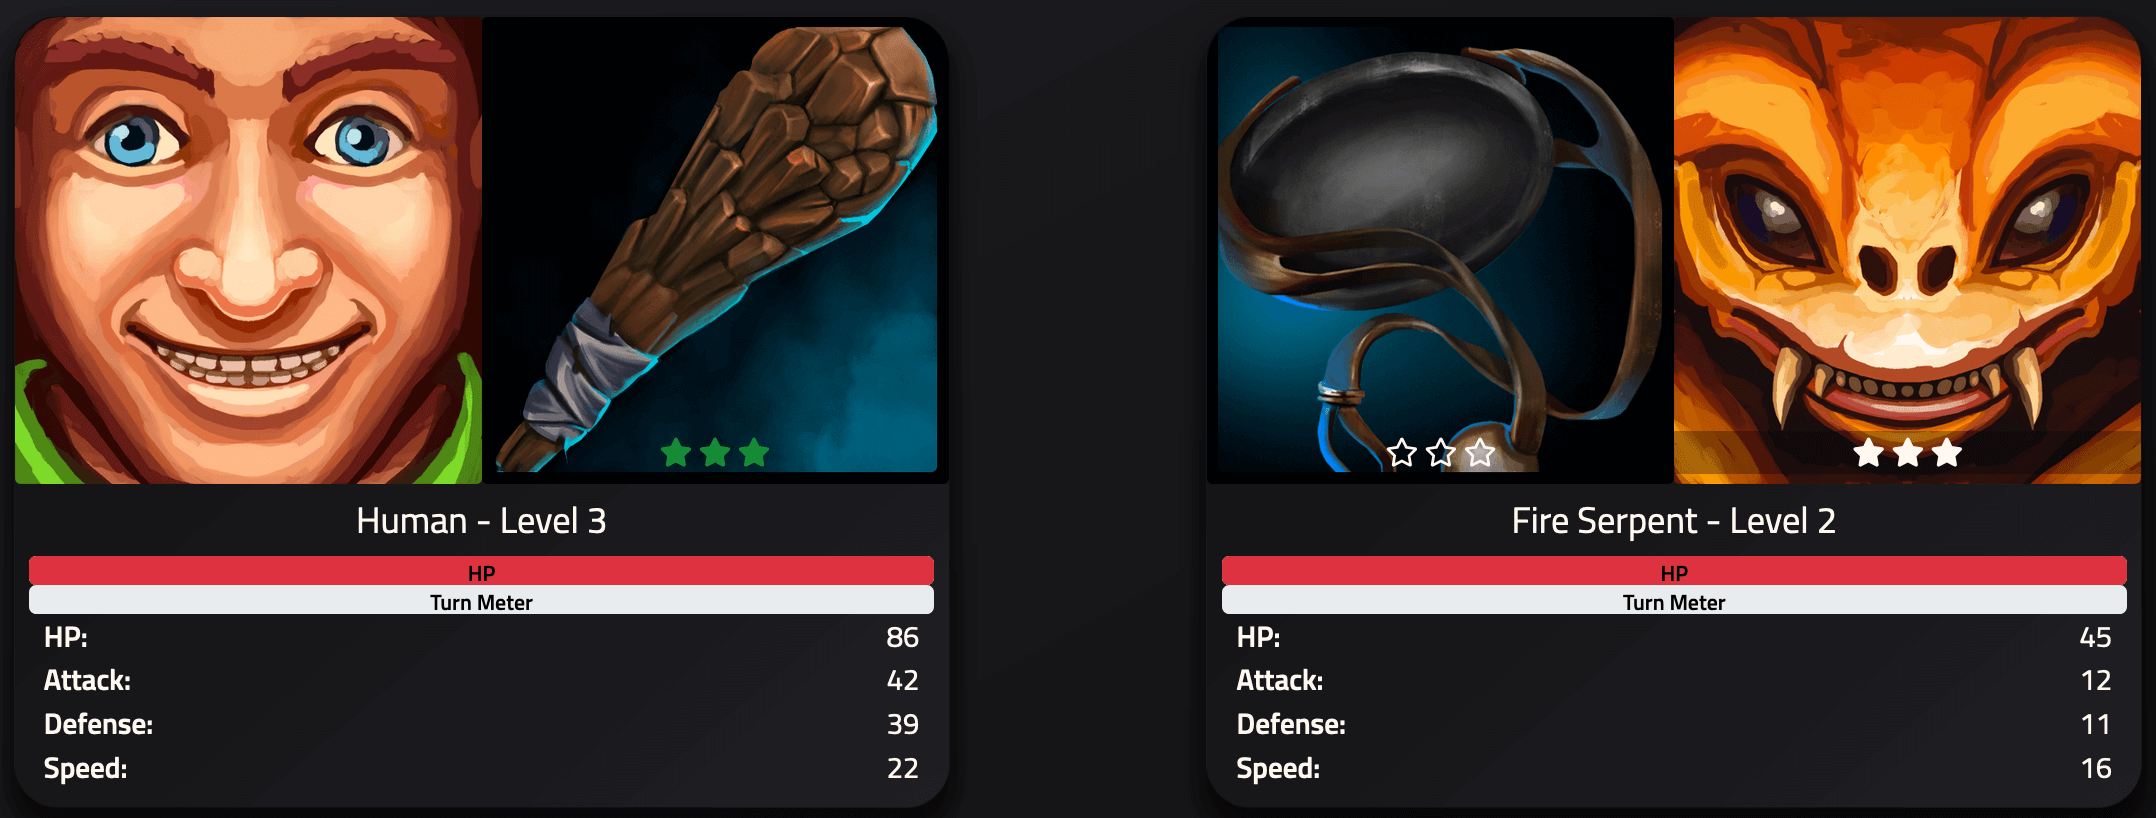
When in battle, the rarity of the weapon is communicated by the colour of the weapon’s Tier rating (stars). This allows the communication of information through the use of colour, without visually overloading the user.
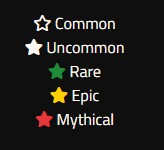
The Rarity scope, and their associated colours, are explained within the game’s How To section:
Certain CTAs throughout the project have a pulse effect tied to them. As you would assume, the CTAs are either important actions, or have the intention of drawing the user’s attention. As such, specific aspects of the site implement this pulse effect to help communicate importance. Examples of this include:
The Upgrade Now button on the Premium Page:
The Attack button during battle when it is the user’s turn to act:
Login and Register buttons on the Home page:
User management is handled through the external package django-allauth, however when a user’s account is verified, a signal is sent to create a Profile for the associated user. Profiles act as a container for a user’s status, including information relating to premium access, active characters, and active battles. Profiles also accumulate a combination of informative statistics regarding a user’s overall time playing the game. Users can access a templated representation of their Profile at any time in order to view:
- The profile’s long-term statistics.
- Current character and weapon (If applicable)
- Current run progress (If applicable)
The Codex, as described in the terminology, acts as a Library for all content within the game. The Codex’ Database stores the core information relating to each entry:
- Name
- Image
- Type (Enemy/Weapon/Hero)
- Tier (1-5)
- Base HP
- Base Attack
- Base Defence
- Base Speed
- Premium (Yes/No)
Entries within the Codex Database are “Immutable” from a user’s perspective, however users with Superuser privileges are able to add, remove, and edit Codex entries.
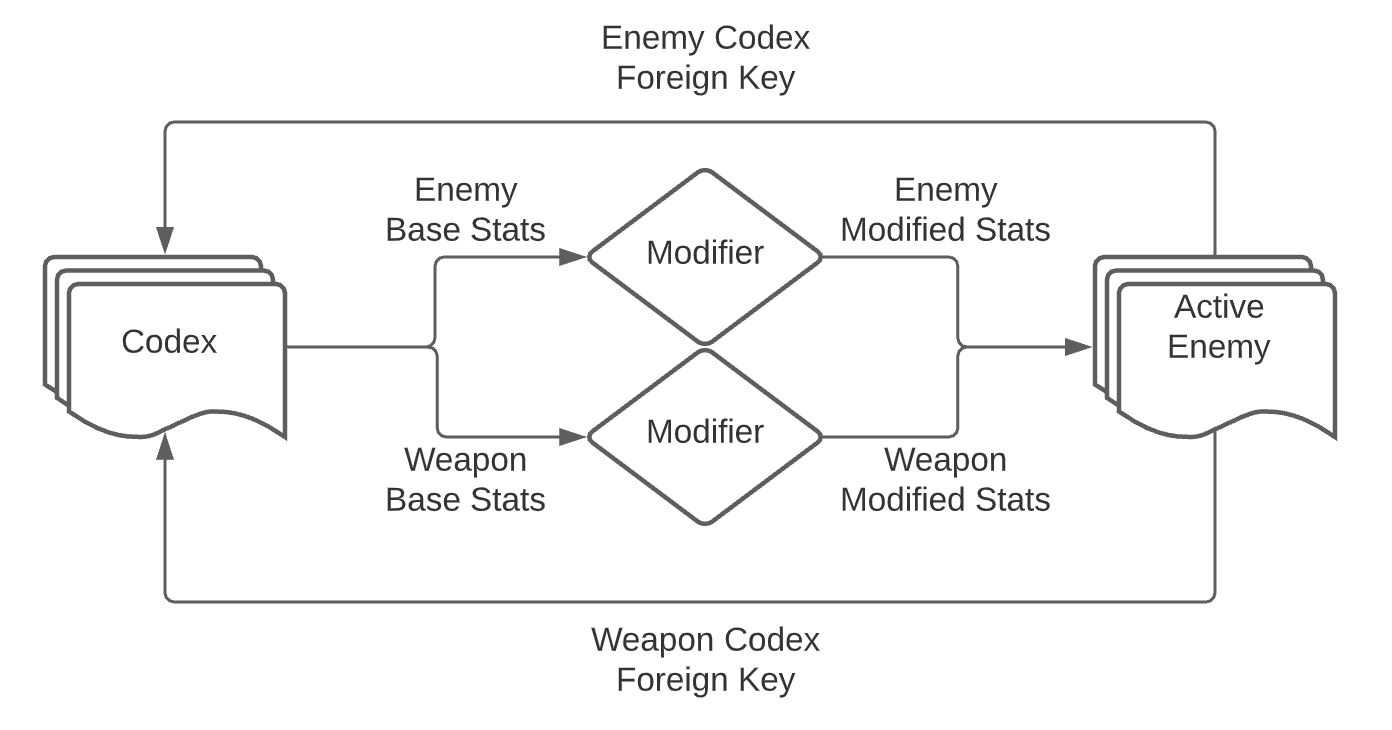
The Codex Database is utilised throughout nearly every feature, Django App, and Database model. However, the entries act as blueprints, whereby an instance’s base values are the foundation on which modifiers are applied before being stored in a separate database as active game content.
For example, when a user enters a Battle, an appropriate enemy and random weapon is selected from the Codex. These entries are assigned levels, and rarity where appropriate, and the Base Stats of these Codex Entries are then modified (as discussed in a Character, Item, and Enemy Statistics), before being stored within the Active Enemy database in conjunction with their associated Foreign Keys:
- Weapon (Codex) Foreign Key
- Weapon Level
- Weapon Rarity
- Modified Weapon HP
- Modified Weapon Attack
- (…)
- Enemy Foreign Key
- Enemy Level
- Modified Enemy HP
- Modified Weapon Attack
- (…)
Users can access a templated overview of all possible content in the game, and can filter and sort the content to meet their needs. This allows free users to see the potential content available as a premium user, and allows all players to see content available at later stages of progression.
Each item within the Codex has a Tier, between 1 and 5. This value is represented visually throughout the project as Stars, as per the Codex image above, or in the below image of the Battle view.
Tiers represent the level the user must be in order for that Tier of content to be available within any given run’s pool of content. Therefore, the pool of available content during a run will increase as the user’s level increases, rewarding users for progressing through the game.
Higher Tiered entries have higher accumulative Base Stats than Lower Tiered entries, so as to logarithmically scale both progression and difficulty as a user progresses through the game.
The core gameplay element of the project surrounds the Battle Mechanics, whereby users engage in an Active Time Battle against a randomly generated enemy and weapon. The mechanics utilise the character’s and enemy’s respective combined stats as discussed in Content Requirements. The gameplay loop was implemented through Object Oriented JavaScript.
The battle progression is communicated through a HP Progress Bar and a Turn Meter Progress Bar:
- HP Bar: Shows respective Hit Points as a % within the progress bar.
- Turn Meter: Shows respective turn progress, as a % within the progress bar.
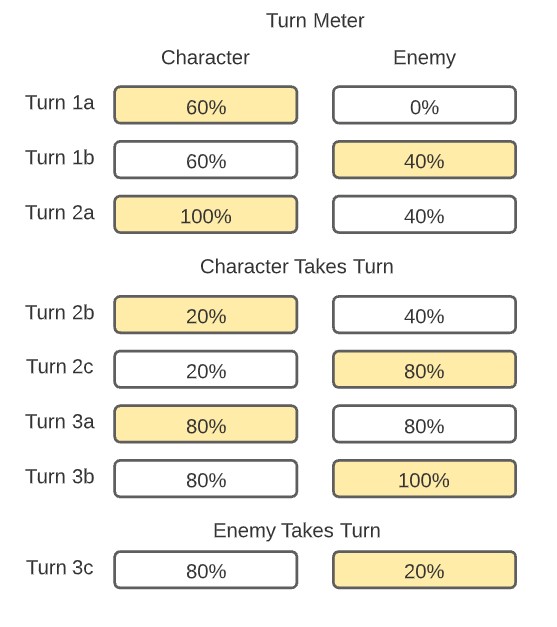
In order to calculate turn progression, each turn the character’s and enemy’s speed (as a % of both speeds combined) is sequentially added to the Turn Meter. When either turn meter reaches or exceeds 100%, the respective unit takes a turn. Any excess % following a unit taking a turn is added back onto the Turn Meter.
For example, the below illustration demonstrates how turn progression is calculated for a Character with 6 Speed, and an Enemy with 4 Speed:
On a character’s turn, they have the ability to “Attack” or “Retreat”, giving users a simple interface to interact with. On the enemy’s turn, they automatically attack the character.
- Whether an attack hits or misses is determined by the opposing party’s probability of evasion, calculated by the respective party’s defence divided by their HP (capped at 75%).
- Players can retreat at any time, but will have to battle the same enemy until the character or enemy loses. They can also retry the battle during their turn, effectively resetting the battle.
Each step of the battle is communicated to the user via text in the the Battle Log, which a user can scroll through at any time.
For each battle a character wins, they gain an amount of XP relative to their own level and their opponent’s level. If, following a character gaining XP, they level up, their stats will increase by a variable amount (see Statistics), and the next Tier of content will be made available within the pool of content.
The game will implement permadeath, which means that when a character’s HP reduces to 0 during a battle, the character is removed from a user’s profile, all progression is lost, and a user must create a new character to play again. As such, when a user starts a new run, their character will start at level 1, and therefore the only content available in the pool of content will be Tier 1.
After each battle, the user is directed to a post-battle screen which displays the result of the battle. This screen dynamically presents content based on the following circumstances:
- Win: The user is presented with their current weapon, and a newly generated weapon, which they can choose to keep or discard.
- Win and Level Up: Along with the new weapon, the user is presented with their previous level stats and their new level stats.
- Win and Max Level: If a free user has reached the maximum level for free users, they will be prompted to upgrade to Premium. A new item be presented regardless.
- Lose (free): If the user is a free user, they will be prompted to upgrade to premium to view their score and access the Leaderboard.
- Lose and Unsuccessful Leaderboard: If the user is a premium user, but have not reached the Leaderboard, their score is presented, and they are prompted to start again.
- Lose and Successful Leaderboard: If the user is a premium user, and has reached the Leaderboard, their score is presented, and they are prompted to view the Leaderboard.
All content other than the user’s initial playable character choice is subject to randomisation; this includes:
- The weapon a character is first allocated on character creation.
- Enemy generation, including level and associated stats.
- Weapon generation, including level, rarity, and associated stats.
- Character stat progression on levelling up.
This reduces repeated content, keeps said content exciting and dynamic, and contributes to making the game exciting, engaging, and enticing, and aims to make users want to return to the game.
Every time a weapon is generated from the database, a rarity is calculated for the weapon. The rarity, as discussed in the below topic of stat modifiers, exponentially increases the stats of the associated weapon.
There are 5 Rarities, and they are represented throughout the project through both text and colour. These rarities unlock progressively as a character’s level surpasses their numerical representation:
- Common (White Outline)
- Uncommon (White Fill)
- Rare (Green)
- Epic (Yellow)
- Mythic (Red)
Given the impact higher rarities have on weapons, the method of calculating a rarity is based on a multitude of factors, and is determined through a recursive algorithm which is demonstrated below:
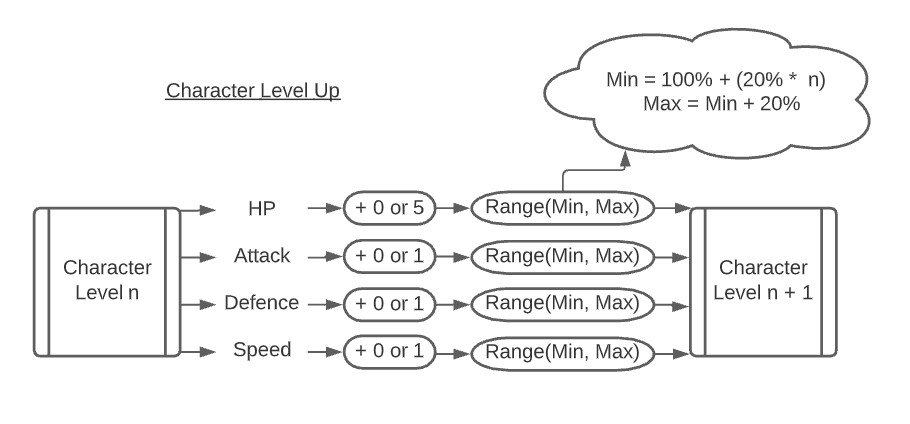
Three main stat modifier algorithms have been implemented into the project, and while the in-depth analysis of these algorithms is beyond the scope of this documentation, a graphical overview has been provided to aid the understanding of their applications:
- Character Stat Modification on Level Up [Relevant Code]
- Enemy Stat Modification on Enemy Generation [Relevant Code]
- Weapon Stat Modification on Weapon Generation [Relevant Code]
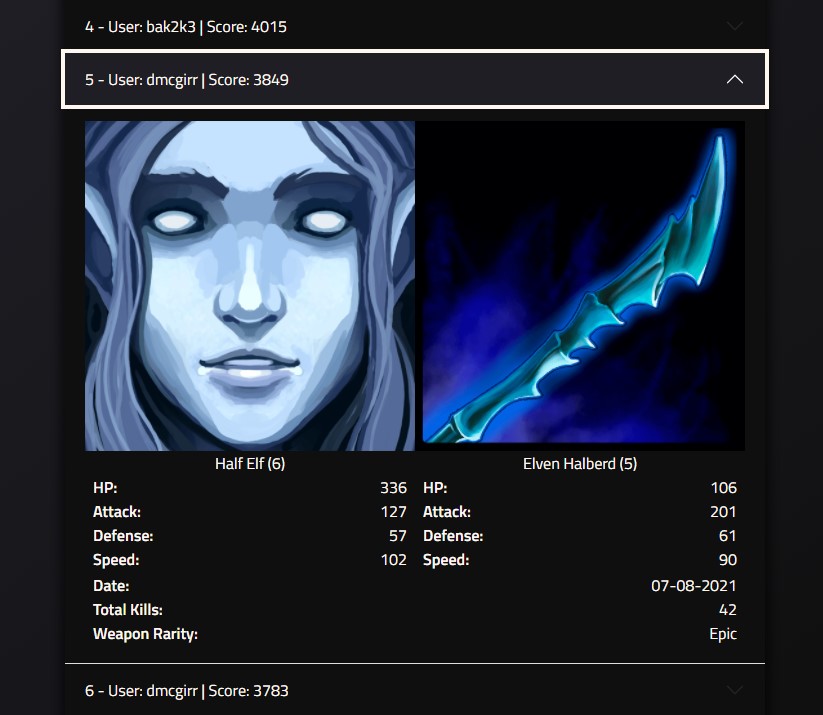
When a premium user’s character is defeated, a score is calculated based on their current level, number of enemies defeated, and combined associated stats. This score is presented to the user, and if in the top 10 scores, will be added to the Leaderboard, replacing the lowest scoring entry. Information is stored regarding the character’s stats and weapon stats and the time of defeat, so other users can view these details amidst the Leaderboard entries. By having a competitively sized Leaderboard, with informative content, this gives users insight into other user’s progression, and entices them to compete to gain a space on the Leaderboard.
Content is paywalled for free users via various methods:
- Profiles and Codex entries contain a paid attribute, which is used as a filtration method when generating content from the game. As such, free users do not have access to content which has a paid flag, substantially reducing the possible content within the game.
- Free user’s character levels are capped at Level 2; given character levels are tied to Codex Tiers, this prevents free user’s from accessing content higher than Tier 2, and as such reduces their accessible content by over 80%.
- In addition to the Tiered content, item rarity is also tied to user Level. As such, free user’s will only be able to generate items of rarity Uncommon or below. This reduces the potential power of free users’ weapon.
- While any user can view the Leaderboard, scores are not calculated (and therefore checked against/submitted to the existing Leaderboard) unless their profile contains the paid flag.
Using Bootstrap, the project has been designed to be fully responsive on all viewports, ensuring all functionality is maintained from 320px width and up. The targeted media queries are based on Bootstrap’s predefined widths. All features have been developed with all viewports in mind, therefore each page has had an adaptive and dynamic structure implemented.
Currently during a battle, users have the choice of attacking or retreating. While the element of evasion (calculated by the opponents defence/HP) allows unpredictable gameplay, and keeps content exciting, future expansions to the project could see the inclusion of additional actions or features to the battle, including:
- Critical Hits (Attack rate multiplied by a random % under certain conditions)
- Riposte (Character Defends, and attacks the next turn at a multiplied value).
Given how the battle script has been implemented, this would be a simple addition to both the interface and the script.
As it currently stands, users must visit their profile to see their progress between levels, unless they level up between battles. Future updates would see this progress being communicated to the user after every battle, including the amount XP earned for each win. This was not implemented to the post-battle screen due to time constraints, however I understand the importance of such gameplay mechanics being communicated to the user without a user trying to obtain this information.
Currently, emails are sent to users (for account activation and premium upgrade confirmation) contain basic unformatted text. Future updates would see this content being created in html, so as to provide a better user experience for the user and to instil further trust in the brand.
One of the primary mechanics of a battle is the probability of either a character or opponent evading an attack. While this information is available in the How To page, a future update would see this stat being added as an additional parameter within the battle view in order to contribute to transparency and aid a user’s understanding of the core gameplay mechanics without having to find this information out themselves.
Given the nature of the project, and the association games have with sound and sound design, a future content update would see the inclusion of atmospheric music sound effects. This was a “like-to-have” feature, but unfortunately was not considered further following the initial planning stages due to the scope of the project and limited timescales available.
- The project was written and tested in VSCode.
- The project was debugged using Google Chrome Dev Tools.
- The project uses GitHub for hosting source code and utilising git version control.
- The project’s Logos were designed using GIMP.
- The project utilised metatags.io for generating Social Media previews.
- The project's wireframes were designed in Balsamiq.
- The project utilised favicon.io to convert the Favicon to the appropriate format.
- The project’s images were compressed using TinyPNG.
- The project’s Flowcharts within the documentation were created using Lucid App.
HTML5 and CSS3 are used throughout this project.
- The project uses Bootstrap 5, a 'Mobile First' HTML/CSS Framework for simple and intuitive responsive web design.
- The project uses FontAwesome v5.15.3, a free icon-set/toolkit for web development.
- The project uses Google Fonts for typography.
- The project's cross-browser compatibility was enhanced using Autoprefixer.io.
This project uses Python version 3.9.5 for back-end infrastructure and data pre-processing.
Packages
| Name | Purpose | Environment |
|---|---|---|
| Django | Framework | Both |
| Flake-8 | Syntax | Dev |
| Bandit | Syntax | Dev |
| Pylint | Syntax | Dev |
| Pylint-django | Syntax | Dev |
| Autopep8 | Syntax | Dev |
| Django-allauth | Django Authentication | Both |
| Pillow | Image Tool | Both |
| Stripe | Payment Services | Both |
| Boto3 | AWS Management | Both |
| Django-storages | Custom Storage Backends | Both |
| gunicorn | WSGI HTTP Server | Both |
| Django-crispy-forms | Front End Bootstrap rendering | Both |
| Crispy-bootstrap5 | Bootstrap 5 Template Pack | Both |
| Dj-database-url | Database Configuration | Both |
| Psycopg2-binary | PostreSQL DB Adapter | Both |
| Coverage | Test Coverage | Dev |
For a full list of these packages’ dependencies, please see:
- requirements.txt for the production dependencies.
- requirements-dev.txt for the development dependencies.
This project uses JavaScript ES6.
- The project uses jQuery, a JavaScript library, for DOM Traversal, HTML Manipulation, and Event Handling.
- The project uses the Stripe.js library for handling Stripe payment objects.
- The project's HTML was validated using W3C HTML Markup Validator.
- The project's CSS was validated using W3C Jigsaw CSS Validator.
- The project's JS was validated using JSHint.
- The project’s Python was validated using Pylint.
- The project's accessibility was assessed via WebAim's W.A.V.E and Contrast Checker and Google Chrome's Lighthouse.
- The project used Toptal's Colorfilter to assess how colour-blind-friendly the site was.
- The project was Unit Tested using django’s testing tools.
- The project uses jsDelivr, Cloudflare as various Content Delivery Networks for packages and libraries.
- The images used in the project's README and TESTING documentation were hosted and served through Cloudinary.
- This project is hosted through Heroku.
- This project’s images are hosted via AWS S3.
The project uses PosteSQL, a relational Database, for data storage, and this is managed via Heroku.
- The project’s Database Fixtures were initially designed in Microsoft Excel.
- The project’s Excel Fixtures were then provisionally re-formatted to Json using Mr Data Converter, before manually adjusting them within the IDE.
- The project’s DB Schema were designed in SQLDBM.
- The project’s Final DB Schema was generated using DBVisualizer.
Testing documentation, processes, and outcomes can be found under TESTING.md.
This project has two branches:
main(Production Environment)dev(Development Environment)
All development and testing takes place in the dev branch, prior to being
merged with the master branch for deployment.
This project was deployed to Heroku via the following steps:
- Navigate to Heroku.
- Log in or Sign
Up for an account.
- If Creating an account, select Python as the Primary development language.
- Activate the account via the confirmation email.
- Accept the Terms of Service.
- Click on Create new app.
- Enter a suitable App Name and Region.
- Click Create App.
- Under the Deploy tab, under the heading Deployment Method, click the GitHub icon, and proceed to click the button which states Connect to GitHub.
- Enter your credentials for GitHub.
- Search for the repository required (in this instance, CIRPG), and click Connect.
This project was set up to automatically re-deploy with any changes made to the Master Branch. The following steps were taken to enable this.
- Navigate to the Automatic deploys section within the Deploy tab.
- Select the branch you would like to link to automatic deployment.
- As stated above, the ‘master’ branch was chosen for automatic deployment.
- Click Enable Automatic Deploys.
- Within Heroku, navigate to Resources.
- Search for Heroku Postrgres.
- Ensure the plan name is Hobby Dev – Free.
- Click Submit Order Form.
The following environment variables must be set within your Heroku Server for the site to deploy and function correctly. Navigate to the Settings tab, and under the heading Config Vars, select Reveal Config Vars, and add the following variables:
- AWS_ACCESS_KEY_ID
- AWS_SECRET_ACCESS_KEY
- These keys can be obtained by creating an S3 Bucket on AWS.
- DATABASE_URL
- This can be obtained by viewing your PostreSQL database within your Heroku Dashboard, and accessing the URI under Settings Database Credentials.
- DJANGO_SECRET_KEY
- A random sequence of characters, required for maintaining session security in Flask. One method of obtaining a Secret Key is through RandomKeygen.
- DOMAIN_URL
- The URL of the hosted project (i.e https://cirpg.herokuapp.com/)
- EMAIL_HOST_PASS
- EMAIL_HOST_USER
- The email address and app password for designated email account.
- STRIPE_PRICE_ID
- STRIPE_PUBLISHABLE_KEY
- STRIPE_SECRET_KEY
- STRIPE_WH_SECRET
- Create a Stripe account.
- Set up a one-off payment Stripe Product, and set the resultant ID to the STRIPE_PRICE_ID.
- In developer settings, under API Keys, obtain the Publishable and Secret Key.
- In developer settings, under Webhooks, add an endpoint as:
- DOMAIN_URL+premium/webhook
- Set the WH_SECRET as the Signing Secret generated as a result.
- USE_AWS
- Set as True.
- Once the PostreSQL add-on has been set up, environment variables have been added and the project has been deployed, open the Heroku Terminal and execute the following lines of code:
heroku run python manage.py migrate
heroku run python manage.py loaddata codex.json
- This will migrate the databases and pre-populate the Codex with the required immutable gameplay content.
- Visit the project’s GitHub Repository.
- Click the "Code" dropdown box above the repository's file explorer.
- Under the "Clone" heading, click the "HTTPS" sub-heading.
- Click the clipboard icon, or manually copy the text presented:
https://github.com/BAK2K3/CIRPG.git - Open your preferred IDE (VSCode, Atom, PyCharm, etc).
- Ensure your IDE has support for Git, or has the relevant Git extension.
- Open the terminal, and create a directory where you would like the Repository to be stored.
- Type git clone and paste the previously copied text
(
https://github.com/BAK2K3/CIRPG.git) and press enter.- If you would like to clone only the dev branch, please type git clone -b dev before the previously copied link to the repository.
- The Repository will then be cloned to your selected directory.
- Visit the project’s GitHub Repository.
- Ensure you have selected the appropriate branch.
- Click the "Code" dropdown box above the repository's file explorer.
- Click the "Download ZIP" option; this will download a copy of the selected branch's repository as a zip file.
- Locate the ZIP file downloaded to your computer, and extract the ZIP to a designated folder which you would like the repository to be stored.
- Open your preferred IDE (VSCode, Atom, PyCharm, etc).
- Navigate to the chosen directory where the Repository was Cloned/Extracted.
- Optional: Create a new Python Virtual Environment
- Type
pip install requirements.txtto install all the required packages.- If you intend to further develop the project, please use
requirements-dev.txtas it includes additional packages specifically intended for a development environment, however, please do not use this for production.
- If you intend to further develop the project, please use
- Type
python manage.py migratein the terminal to migrate the database. - Type
python manage.py loaddata codex.jsonin the terminal to set up the immutable Codex dictionary. - You will now be hosting the repository from your IDE.
- When running this project locally, the Environment Variables must be set in order for it to function as intended.
- If using VSCode, this can be done by creating a new file called
launch.jsonwithin the project’s.vscodefolder, once the project has been cloned/downloaded:
{
"version": "0.2.0",
    "configurations": [
        {
            "name": "Python: Django",
            "type": "python",
            "request": "launch",
            "program": "\${workspaceFolder}\\manage.py",
            "args": [
                "runserver",
                ],
            "django": true,
            "env": {
                "DJANGO_SECRET_KEY": "<variable>",
                "DEVELOPMENT": "Yes",
                "STRIPE_PUBLISHABLE_KEY": "<variable>",
                "STRIPE_SECRET_KEY": "<variable>",
                "STRIPE_PRICE_ID": "<variable>",
                "STRIPE_WH_SECRET": "<variable>",
                "DOMAIN_URL": "<variable>",
            },
        }
    ]
}
- Within this file, declare the environment variables described previously,
replacing the
<variable>with the required variables. - Please note that using a local/development environment may use:
DEVELOPMENT: “Yes”
- However, it’s important to note that in Development mode, Email/Key and USE_AWS are not required.
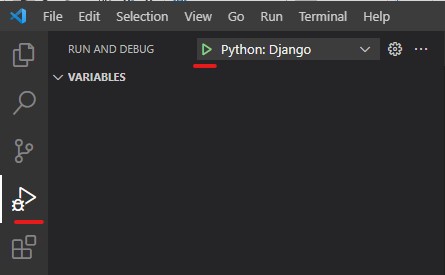
- It’s important to note that in order to run the Django server utilising the aforementioned Environment Variables, the program must be run in debug mode, selecting the customised launch Json from the previous step:
- Additional Research was conducted via Invision with regards to Interaction Design.
- All concepts were original, including gameplay logic.
- All instructional and navigational text on the site was self-written.
- The names of Codex Entries were self-written, heavily inspired by Dungeons and Dragons Races, Equipment, and Monsters.
- All stats for Codex Entries were devised and calculated manually. The original Excel file used to balance stats can be found here. The subsequent JSON fixtures file can be found here.
- CSS: Code Snipped taken from CSS-Tricks which produces a “grow on hover” effect.
- CSS: ColorSpace was used to generate a background colour gradient.
- HTML/CSS/JS: Code for Back to Top button was original devised from Code Institute’s Boutique Ado project, with additional modifications inspired by moderncss, and manual modifications to suit the style and content of the relevant pages.
- HTML/CSS/JS: The Bootstrap documentation was extensively utilised to implement various features of the framework.
- HTML/CSS: Border Shadows were generated from both html-css-js and neomorphism before being manually modified to suit the project’s style.
- HTML/CSS: Code extract taken from StackOverflow to evenly space horizontal list items, and modified to suit the positioning and layout of the project accordingly.
- HTML/CSS: Code extract taken from UI Snippets for underline on hover effect used for links and buttons.
- HTML/CSS: Code extract taken from W3Bits and modified to create an animated Nav Menu Icon.
- HTML/CSS: Code for creating a glowing effect around a container was inspired by this StackOverflow post.
- HTML/CSS: Code for creating a pulsing button was inspired by Florin Pop.
- HTML/CSS: Code snippet taken from StackOverflow and modified to overlay and centre text on a Bootstrap 5 progress bar.
- HTML/CSS: General guidance on how to overlay test on an image/container was obtained from Tutorial Republic.
- JavaScript: Code extract taken from StackOverflow to simulate a synchronous “sleep” function to pause scripts. Additional general guidance on the concept of asynchronous/synchronous delays in JavaScript was obtained from Praveen Kumar Purushothaman’s blog.
- JavaScript: Codex extract taken from StackOverflow to programmatically determine whether a HTML element exists in the DOM.
- JavaScript: General guidance on JavaScript Syntax was obtained from MDN Web Docs.
- Python/JS: Two tutorials from testdriven.io were followed to implement Stripe Checkout with Django (Tutorial One – Tutorial Two), along with the Official Stripe Checkout Documentation for additional customisation.
- Python: Code extract taken from Code Institute’s Boutique-Ado project for creating a CustomClearableFileInput, with the associated custom html being heavily customised.
- Python: Code extract taken from StackOverflow to create a for-in-range loop based on a single integer.
- Python: General guidance on Django Class Based Views was obtained from CCBV.
- Python: General guidance on how to create custom Querysets and Model Managers obtained from Audiolion.
- Python: General guidance on how to effectively utilise UserPassesTestMixin for Django’s DeleteView was obtained from StackOverflow.
- Python: General guidance on how to efficiently obtain a random DB entry from Django Models was obtained from StackOverflow.
- Python: General guidance on how to extract a pk from a hidden post form for deleting a DB entry was obtained from StackOverflow.
- Python: General guidance on how to implement Choices within Django Models was obtained from StackOverflow and the Django Documentation.
- Python: General guidance on how to import font files into Django was obtained from StackOverflow.
- Python: General guidance on how to Log in to Django-Allauth for Django Unit Tests was obtained from StackOverflow.
- Python: General guidance on how to Redirect using Class Based Views in Django was obtained from StackOverflow.
- Python: General guidance on how to test AJAX/Json Views in Django was obtained from StackOverflow. Guidance on how to decode the subsequent json responses was also obtained from StackOverflow.
- Python: Guidance on how to implement a custom template filter using multiple parameters was obtained from StackOverflow.
- Python: The Django documentation was extensively utilised to learn Class Based Views, and to implement various other features of the framework.
- The concept for this project was devised from my unapologetic, and questionably unhealthy, obsession for games; the ultimate goal was to produce a game that I would want to play myself. This has been a project that has been in the back of my mind for many years, and I’m excited that I’ve finally gained the knowledge and experience to allow this project to finally come to fruition.
- Thank you to my wife, for her relentless patience and support.
- Thank you to my mentor, Dick Vlaanderen, for his encouragement and guidance.
- Thank you to Daisy McGirr for the sheer amount of testing she undertook on the project.
- Thank you to Naoise Gaffney for the huge amount of user testing he performed for me.
This website is for educational purposes only; the project is not intended for profit and therefore the Stripe account will remain in Test mode.
