Stay Awake. Arrive Alive.
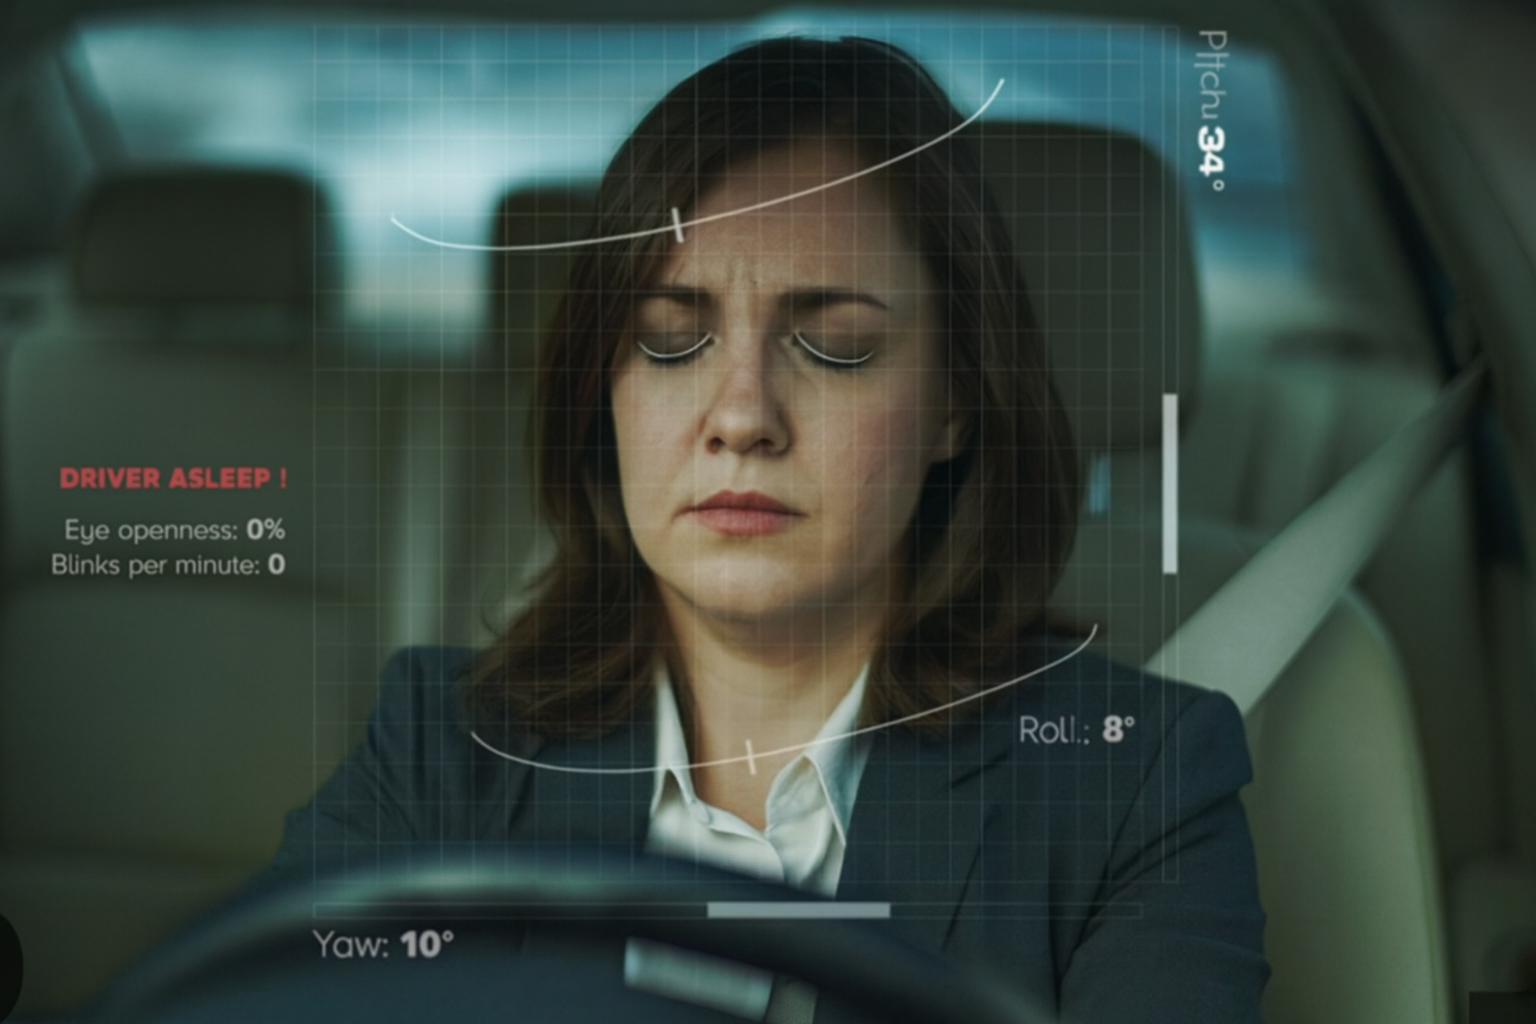
An intelligent drowsiness detection system that uses real-time computer vision to monitor driver fatigue and prevent accidents before they happen.
- Overview
- Features
- Tech Stack
- Project Structure
- Installation
- Quick Start
- API Documentation
- Configuration
- Troubleshooting
- Contributing
IndraNav is a next-generation drowsiness detection system that combines advanced computer vision algorithms with real-time monitoring to ensure driver safety. The system uses facial landmark detection and Eye Aspect Ratio (EAR) calculations to identify signs of drowsiness and trigger alerts before it becomes dangerous.
- Real-time Processing: Monitors driver facial features at 30 FPS
- Intelligent Detection: Uses 68-point facial landmark detection for accurate drowsiness identification
- Multi-sensory Alerts: Audio alerts with visual indicators on the video feed
- Web Dashboard: Modern React-based interface for live monitoring
- RESTful API: FastAPI backend with CORS support for seamless frontend integration
- ✅ Real-time Monitoring: Advanced computer vision algorithms track blink rate, eye closure duration, and head posture 60 times per second
- ✅ Adaptive Alerts: Multi-sensory warnings escalate from gentle vibrations to loud auditory alarms based on danger levels
- ✅ Live Dashboard: Web-based interface for real-time video feed and system control
- ✅ Facial Landmark Detection: 68-point facial landmark detection using dlib
- ✅ Eye Aspect Ratio (EAR) Calculation: Precise drowsiness detection algorithm
- ✅ Video Streaming: MJPEG streaming for low-latency video feed
- Automatic Camera Detection: Tries multiple camera indices for automatic setup
- Thread-safe Processing: Background frame processing with thread locks
- Start/Stop Controls: API endpoints for remote system control
- Health Monitoring: Backend status checking and connection verification
- FastAPI: Modern, fast web framework for building APIs
- OpenCV (cv2): Computer vision library for image processing
- dlib: Machine learning library for facial landmark detection
- NumPy & SciPy: Numerical computing and spatial distance calculations
- imutils: Image processing utilities
- PyGame: Audio alert system
- Uvicorn: ASGI server for running FastAPI
- React 19: Modern UI library
- TypeScript: Type-safe JavaScript
- Vite: Fast build tool and dev server
- Tailwind CSS: Utility-first CSS framework (via inline classes)
- dlib's 68-point Facial Landmark Predictor: Pre-trained model for facial feature detection
- Model file:
Backend/models/shape_predictor_68_face_landmarks.dat
- Model file:
IndraNav/
│
├── Backend/                      # FastAPI backend server
│   ├── fastapi_server.py        # Main FastAPI application
│   ├── Drowsiness_Detection.py  # Standalone detection script
│   ├── requirements.txt         # Python dependencies
│   ├── models/                  # ML models
│   │   └── shape_predictor_68_face_landmarks.dat
│   ├── assets/                  # Image assets
│   ├── music.wav                # Alert sound file
│   ├── simple_test.py           # Testing utilities
│   └── test_camera.py           # Camera testing script
│
├── Frontend/                     # React frontend application
│   ├── src/                     # Source files (if structured)
│   ├── components/              # React components
│   │   ├── LiveDashboard.tsx   # Main dashboard component
│   │   ├── Hero.tsx            # Landing page hero section
│   │   ├── Features.tsx        # Features showcase
│   │   ├── SystemDesign.tsx    # System architecture info
│   │   ├── Navbar.tsx          # Navigation component
│   │   ├── Footer.tsx          # Footer component
│   │   └── Icons.tsx           # Icon components
│   ├── App.tsx                  # Main app component
│   ├── index.tsx                # Entry point
│   ├── types.ts                 # TypeScript type definitions
│   ├── package.json             # Node.js dependencies
│   ├── vite.config.ts           # Vite configuration
│   └── tsconfig.json            # TypeScript configuration
│
├── start-backend.bat            # Windows batch script to start backend
├── start-backend.ps1            # PowerShell script to start backend
├── start-frontend.bat           # Windows batch script to start frontend
├── start-frontend.ps1           # PowerShell script to start frontend
├── START_INSTRUCTIONS.md        # Quick start guide
└── README.md                    # This file
- Python 3.7+ (recommended: Python 3.9 or higher)
- Node.js 14+ and npm (comes with Node.js)
- Webcam/Camera connected to your system
- Windows 10/11 (scripts are Windows-specific, but code works cross-platform)
-
Navigate to the Backend directory:
cd Backend
-
Create a virtual environment (recommended):
python -m venv venv venv\Scripts\activate -
Install Python dependencies:
pip install -r requirements.txtOr install manually:
pip install fastapi uvicorn opencv-python dlib imutils numpy scipy pygameNote: Installing
dlibon Windows may require:- Visual C++ Build Tools
- CMake
- Or use pre-built wheels:
pip install dlib-binary
-
Download the facial landmark predictor model:
- The model file should be in
Backend/models/shape_predictor_68_face_landmarks.dat - If missing, download from: http://dlib.net/files/shape_predictor_68_face_landmarks.dat.bz2
- Extract and place in the
Backend/models/directory
- The model file should be in
-
Navigate to the Frontend directory:
cd Frontend
-
Install Node.js dependencies:
npm install
-
Start Backend:
- Double-click
start-backend.bat(or right-clickstart-backend.ps1→ Run with PowerShell)
- Double-click
-
Start Frontend:
- Open a new terminal/PowerShell window
- Double-click
start-frontend.bat(or right-clickstart-frontend.ps1→ Run with PowerShell)
Terminal 1 - Backend:
cd Backend
python -m uvicorn fastapi_server:app --reload --port 8000
Terminal 2 - Frontend:
cd Frontend
npm run dev-
Backend API:
http://localhost:8000 -
Frontend Dashboard:
http://localhost:3000(or check terminal output) -
Open your browser and navigate to:
http://localhost:3000 -
Click "Live Dashboard" → Click "START SYSTEM" to begin monitoring
http://localhost:8000
Health check endpoint.
Response:
{
  "status": "backend live",
  "running": false
}Start the drowsiness detection system.
Response:
{
  "message": "Drowsiness detection started."
}Stop the drowsiness detection system.
Response:
{
  "message": "Drowsiness detection stopped."
}MJPEG video stream of the camera feed with drowsiness detection overlay.
Response: Multipart MJPEG stream
Usage in HTML:
<img src="http://localhost:8000/video_feed" alt="Live Feed" />Once the backend is running, visit:
- Swagger UI:
http://localhost:8000/docs - ReDoc:
http://localhost:8000/redoc
Key parameters in Backend/fastapi_server.py:
thresh = 0.25          # Eye Aspect Ratio threshold (lower = more sensitive)
frame_check = 20 # Number of frames to check before alertingThe system automatically tries camera indices 0, 1, and 2. To use a specific camera, modify the camera detection code in fastapi_server.py.
Allowed origins are configured in Backend/fastapi_server.py:
http://localhost:3000http://127.0.0.1:3000http://localhost:5173(Vite default)http://127.0.0.1:5173
To add more origins, update the allow_origins list in the CORS middleware.
API URL is configured in Frontend/components/LiveDashboard.tsx:
const API_URL = 'http://localhost:8000';Change this if your backend runs on a different host/port.
Problem: Camera not detected
- Ensure your webcam is connected and not being used by another application
- Check camera permissions in Windows settings
- Try running as Administrator
Problem: dlib installation fails
- On Windows, install Visual C++ Build Tools
- Or use:
pip install dlib-binary - Alternatively, use conda:
conda install -c conda-forge dlib
Problem: Module not found errors
- Ensure virtual environment is activated
- Run:
pip install -r requirements.txt - Check Python version:
python --version(should be 3.7+)
Problem: Port 8000 already in use
- Change the port:
uvicorn fastapi_server:app --reload --port 8001 - Update frontend API_URL accordingly
Problem: CORS errors in browser
- Ensure backend is running on port 8000
- Check that CORS middleware is properly configured
- Verify backend and frontend are on the same network
Problem: Vite cache permission error (EPERM)
- Run:
cd Frontend && rmdir /s /q node_modules\.vite - Or double-click
Frontend/clean-vite-cache.bat - Close OneDrive sync temporarily if files are in OneDrive folder
Problem: npm install fails
- Clear npm cache:
npm cache clean --force - Delete
node_modulesandpackage-lock.json, then runnpm installagain - Ensure Node.js version is 14 or higher
Problem: Frontend can't connect to backend
- Verify backend is running: visit
http://localhost:8000in browser - Check browser console for specific error messages
- Ensure both servers are running on correct ports
Problem: Video feed not showing
- Ensure camera is not being used by another application
- Check browser console for errors
- Verify the
/video_feedendpoint works: visithttp://localhost:8000/video_feeddirectly
Problem: Drowsiness detection not working
- Ensure system is started via "START SYSTEM" button
- Check that face is clearly visible in camera
- Verify model file exists:
Backend/models/shape_predictor_68_face_landmarks.dat - Check backend terminal for error messages
- Frame Capture: Camera captures frames at ~30 FPS
- Face Detection: dlib's HOG face detector identifies faces in grayscale frames
- Landmark Detection: 68-point facial landmark predictor identifies key facial features
- EAR Calculation: Eye Aspect Ratio is calculated using the formula:
Where p1-p6 are the eye landmark points
EAR = (|p2-p6| + |p3-p5|) / (2 * |p1-p4|) - Threshold Check: If EAR < 0.25 for 20+ consecutive frames, alert is triggered
- Alert System: Audio alert plays and visual indicator is drawn on frame
┌─────────────┐      ┌──────────────┐      ┌─────────────┐
│   Camera    │─────▶│   Backend    │─────▶│  Frontend   │
│  (OpenCV)   │      │  (FastAPI)   │      │   (React)   │
└─────────────┘      └──────────────┘      └─────────────┘
                            │
                            ▼
                     ┌──────────────┐
                     │  dlib ML     │
                     │  Detection   │
                     └──────────────┘
Contributions are welcome! Here's how you can help:
- Fork the repository
- Create a feature branch (
git checkout -b feature/AmazingFeature) - Commit your changes (
git commit -m 'Add some AmazingFeature') - Push to the branch (
git push origin feature/AmazingFeature) - Open a Pull Request
- Follow PEP 8 for Python code
- Use TypeScript for all frontend code
- Add comments for complex algorithms
- Test thoroughly before submitting PR
This project is open source and available for educational purposes.
Akarsh Jha
- GitHub: @Akarshjha03
- Project: PocketProjects
- dlib - Facial landmark detection library
- OpenCV - Computer vision framework
- FastAPI - Modern Python web framework
- React - UI library
- 68-point Facial Landmark Model - Trained dlib model
For issues, questions, or contributions:
- Open an issue on GitHub
- Check the Troubleshooting section
- Review the API Documentation
Made with ❤️ for safer roads
⭐ Star this repo if you found it helpful!