
- API Gateway
- Lambda
- DynamoDB
- S3
- Cloudfront
- SES
It runs completely serverless - free of any inflexible hardware infrastructure. The whole system running as a team of small misroservices means that the running expenses are without any overhead even at the smallest scale.
- Have an AWS account
- Have your domain/subdomain set up in Route53
- make sure you can receive email on one of the following adressees for https certificate generation (if you dont have mail server set up, you can use https://github.com/sirceljm/AWS-SES-simple-mail-forward to forward emails to your email address)
- administrator@domain.com
- hostmaster@domain.com
- postmaster@domain.com
- webmaster@domain.com
- admin@domain.com
- request a new certificate in AWS ACM (https://console.aws.amazon.com/acm/home?region=us-east-1#/) (HAS TO BE ISSUED IN us-east-1 REGION!!!)
- if you are using just the domain - certificate name should be domain.com
- if you are using subdomain - certificate name should be subdomain.domain.com or *.domain.com
- download this repo, unzip and cd to project folder
- run
npm install - Create a new user in IAM
- [IAM -> Users -> Add User -> Access type -> check Programmatic access]
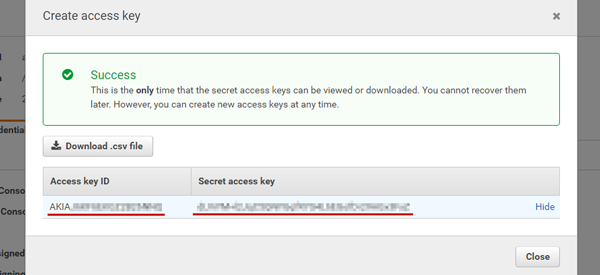
- On the last step click on "Download .csv file" and save the file in project folder
- Add permissions to the user
- [IAM -> Users -> your_user -> Permissions -> Add inline policy -> Custom policy]
- Copy the following JSON and give your inline policy a name
{
   "Version": "2012-10-17",
   "Statement": [
       {
           "Sid": "Stmt1481118325000",
           "Effect": "Allow",
           "Action": [
               "iam:CreatePolicy",
               "iam:CreateRole",
               "iam:GetPolicy",
               "iam:GetRole",
               "iam:AttachUserPolicy",
               "iam:AttachRolePolicy",
               "iam:PassRole",
               "route53:ListHostedZones",
               "acm:ListCertificates"
           ],
           "Resource": [
               "*"
           ]
       }
   ]
}- (install script will add other permisions that are necessary for installation)
- run
node install.js - wizard will take you through the process of installation
- if everything went smooth you should see your page after CloudFront changes resolve (usually takes around 15 minutes)
- download this repo, unzip and cd to project folder
- run
npm install - Create a new user in IAM (you will put this user name into install_config.js later)
- [IAM -> Users -> Add User -> Access type -> check Programmatic access]
- Copy account keys for the user and make a json file that looks like this:
{
   "accessKeyId": "AK************",
   "secretAccessKey": "BX**********************",
   "region": "eu-west-1"
}- add a new inline policy to the user
- [IAM -> Users -> your_user -> Permissions -> Add inline policy -> Custom policy -> Select -> Copy JSON below and enter a policy name
{
 "Version": "2012-10-17",
 "Statement": [
     {
         "Sid": "Stmt1481118325000",
         "Effect": "Allow",
         "Action": [
             "iam:CreatePolicy",
             "iam:CreateRole",
             "iam:GetPolicy",
             "iam:GetRole",
             "iam:AttachUserPolicy",
             "iam:AttachRolePolicy",
             "iam:PassRole"
         ],
         "Resource": [
             "*"
         ]
     }
 ]
}
-> Attach policy]
- (install script will add other permisions that are necessary for installation)
- Copy and save Hosted Zone ID for your domain
- copy this certificate ARN - and paste it into install_config.js
- get your recaptcha key (you can edit this later in API Gateway)
- copy install/install_config_template.js to install/install_config.js
- change values in install/install_config.js
- run
node install.js - if everything went smooth you should see your page after CloudFront changes resolve (usually takes around 15 minutes)

