
NOTE: Some may say that you need .edu domain only but now GitHub, Azure accepts all student domains mine got accepted (.ac.in), if yours doesn't then contact GitHub Support and explain them that you are a student but your email was not accepted. They'll contact you in a few days with a code to use for a student's subscription


Go to GitHub Benefits on https://education.github.com/pack

Connect it to GitHub and Then Scroll down to claim free 6 month subscription


Using this procedure one can upload Code to Stm32f103c8

Resources Needed for Initial Configuration(Booting) Stm32f103c8
Once code is uploaded Connect Stm32f103c8 to Ultrasonic sensor(HC-SR04), GPS sensor(Neo-6m) and Esp8266
RX1,TX1 -> Hardware Serial 1
RX2,TX2 -> Hardware Serial 2
RX3,TX3 -> Hardware Serial 3


Using this same procedure one can connect Esp8266 and other Esp Boards to Arduino Iot Cloud

Once above step is done you would see get 1 thing on this page

Click on the thing and start creating variables
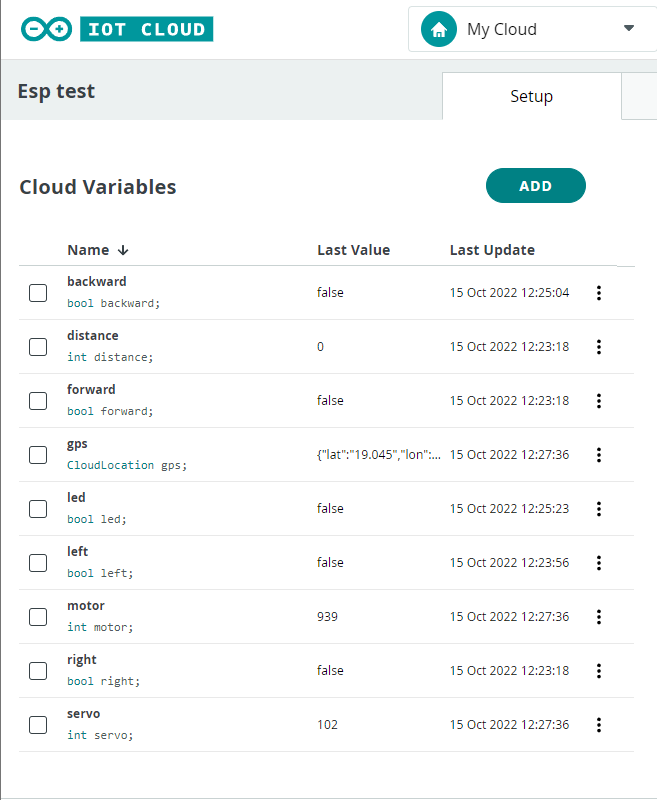
Set Permission and Update policy for variables:
forward

backward

right

left

distance

gps

led

servo

motor


Add the following widgets:

forward

backward

right

left

distance

gps

led

servo

motor

Login on Azure and go to Virtual Machines

Video Tutorial

Go to Networking


Add

Open the same port for OutBound Connection

Add
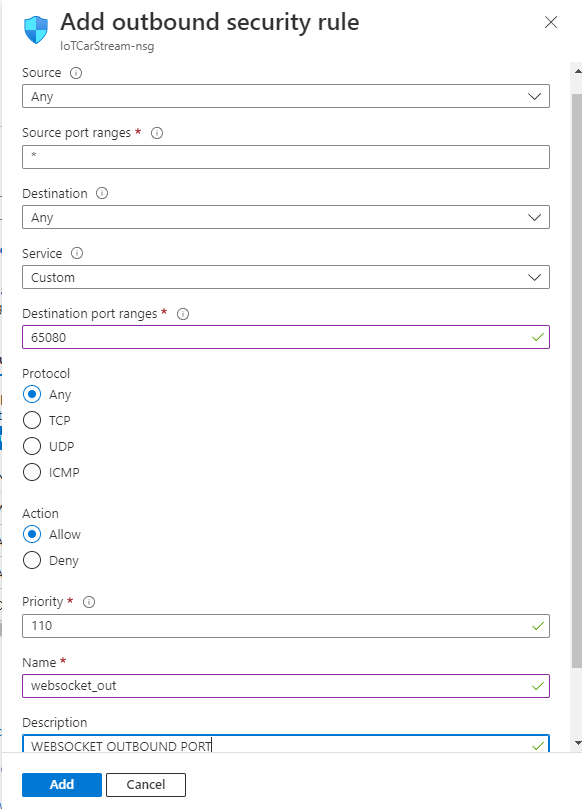
Using Above Steps You can create more a secure rule than mine, like accepting from a specific IP only (but I chose not to as this is just prototyping for a personal project
NOTE: In the Video the VM is made on GCP we made the same thing on Azure, follow the same steps as showed in the video after this the stream should show in the "<PublicIPofVM>/client" url
Once done now upload code to ESP8266 to Control Car
Go to Sketch

Install Arduino Create Agent

Click on Learn More then Download

Copy Paste the code from my github repo Arduino_iot_cloud_Nodemcu and upload the sketch to your nodemcu
NOTE: To burn code use these videos as reference

The Connection Overview of GPS, Ultrasonic, STM32, Esp8266 have been shown here
How to Use H-Bridge L298N