...menustart
- Deprecated: StoreKit 2 is MORE recommended !!
- IAP (StoreKit 1)
- Advanced StoreKit
- Testing on Xcode12
...menuend
Offering, Completing, and Restoring In-App Purchases
- Load In-App identifiers
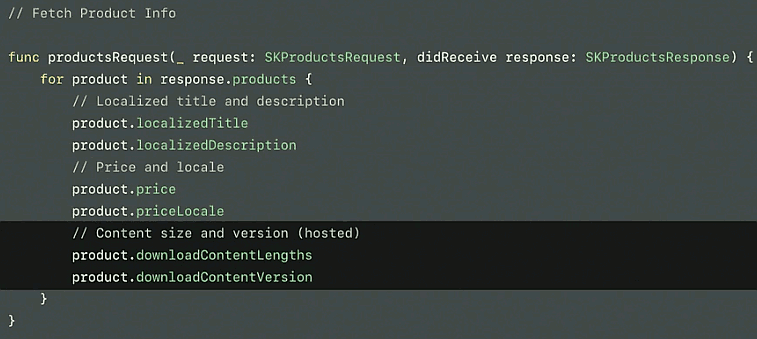
- Fetch Product Info
- using those identifiers , you can fetch localized product information from App store
- Show In-App UI
- once you have that localized information for the products, you can display in-app UI to the user
- Request Payment
- the UI gives user an opportunity to tap that Buy button and agree to purchase it
- at which point it's up to you to go ahead and request a payment
- the user then , elects to buy your IAP and authenticate the payment
- Process Transaction
- And it's up to you, to then process the transaction that comes back from Storekit
- Unlock Content
- Once the transaction's been processed, it's up to you to unlock the content.
- Finish Transaction
- And finally, the last step is to finish the transaction.
- when it comes to loading these identifiers in your applications, you can do it a couple of ways.
- Firstly, you can just bake them directly into your application
// example: hard code IPA identifiers
let identifiers = ["com.temporary.renew" , "not_exist_iap_id" , "com.temporary.c" , "com.temporary.nc"]
- Or the other way, of course, is to maybe fetch them from your own server.
- Firstly, you can just bake them directly into your application
- anyways you will have this set of strings
let request = SKProductsRequest( productIndentifiers : identifierSet )
request.delegate = self
request.start()
Now, you've set a delegate method on this so you'll get a response in the didReceive response callback
- one more important point, here, just to highlight, is that you shouldn't cache the SKProduct that comes back in this point.
- It's really important that you get up to date product information, by performing these requests regularly.
- Because things like currency can fluctuate. You know, a user might log out, log into a different store front.
-
There has useful tips about how to format this particular page in a way that can, you know, improve your sales.
-
One tip, though, just on formatting the product price.
- So, when it comes to the product price, this is the technique you can use to actually display that in your UI.
- Create a number formatter object. Set the number style to be the currency style.
let formatter = NumberFormatter()
formatter.numberStyle = .currency
formatter.locale = product.priceLocale // Not the device locale!
let formattedString = formatter.string( from: product.price )
-
Another point, here, don't perform any currency conversion yourself.
-
You can let StoreKit handle all this for you.
-
You take that SKProduct that the user's agreed to buy, pass it into an SKPayment initializer to create a payment object.
-
Then, you add that payment to the SKPaymentQueue's default queue.
let payment = SKPayment(product: product)
SKPaymentQueue.default().add(payment)
-
Now, as soon as you add the payment to the default queue, the user sees this great new looking in-app purchase payment sheet. So, this is new in iOS 11.
-
And the user, of course, can just authenticate the purchase using Touch ID, and then, continue using your app.
Now, at this point, I'll just take a quick sidestep to talk a bit about detecting irregular activity.
- For applications with their own account management
- Provide an
opaque identifierforyour user's accountlet payment = SKPayment(product: product) payment.applicationUsername = hash( yourCustomerAccountName ) SKPaymentQueue.default().add(payment)
-
Right at the beginning of your application lifecycle.
- And here, I'm doing it at the
didFinishLaunchingWithOptionsapp delegate method. - It's important to set a transaction observer onto the SKPayment queue.
func application(_ application: UIApplication, didFinishLaunchingWithOptions launchOptions: [UIApplication.LaunchOptionsKey: Any]?) -> Bool {
    // Attach an observer to the payment queue.
    SKPaymentQueue.default().add(StoreObserver.shared)
    return true
}

func applicationWillTerminate(_ application: UIApplication) {
    // Remove the observer.
    SKPaymentQueue.default().remove(StoreObserver.shared)
}
- And here, I'm doing it at the
-
here I'm adding the actual AppDelegate, as my SKPayment transaction observer.
-
The really important thing here, is that it's happening as early on in the application lifecycle, as possible.
- See, transactions can come into this transaction observer any point during your application lifecycle.
-
So, make sure that you're registering it right at the start.
-
But once that's registered, you're ready to start receiving transactions in the callbacks.
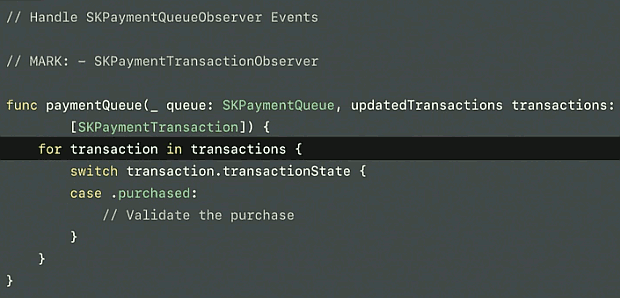
-
There's this one callback updated transactions, which is kind of the center of where this all happens.
-
You receive an array of transactions that come in, and you can check the transaction state on each of these transactions.
-
And you'll look for a transaction in the purchased state.
- This is a transaction that's StoreKit deems appropriate for you to go ahead and check for validity and unlock content for, accordingly.
-
There are some other states here, that we won't go into in this talk.
- But one of the ones that I will call out, is the deferred state.
- A transaction can come through in a deferred state if the user has asked to buy turned on.
- So, a child might ask to buy an in-app purchase and a request goes to their parent for approval to actually approve the purchase.
-
So, it's important if something comes through in this deferred state, while they're waiting for an approval, that you allow access to the application.
-
Allow them to keep using your app, and don't let them get stuck on any kind of modal loading spinners or things like that.
-
In order to test out deferred transactions, we provide a way for you to do this.
- You can create a mutable payment object.
- And you can set the simulatesAskToBuy flag on this object.
- Now, this is effective when you're using the Sandbox environment.
let payment = SKPayment(product: product)
payment.simulatesAskToBuyInSandbox = true
SKPaymentQueue.default().add(payment)
When it comes to handling errors, couple of points to remember.
- Now, not all errors that come through this process are equal.
- And that means you really need to pay attention to the error code that comes through with a transaction.
- Now, once a transaction comes through in the purchased state, I mentioned that it's important for you to verify that transaction.
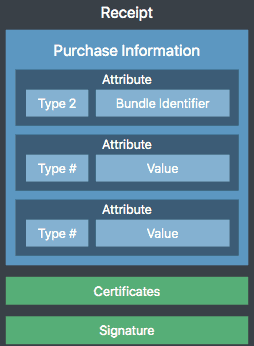
- Well, we use the application receipt to do this
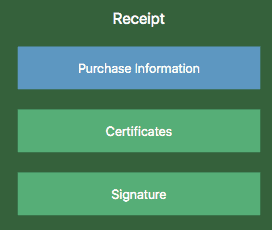
- it's a trusted record of the app and any in-app purchases that have occurred for a particular application.
- Trusted record of app and IAPs
- Stored on device
- Issued by the App Store
- Singed and verifiable
- For you app, on that device only
- So, this receipt document can't be shared across devices.
- To be sure that the document that you're using to check these transactions is indeed a valid one, you do what we call receipt validation.
- Receipt validation can be done a couple of ways.
- You can do it directly on the user's device using on device validation.
- The other way is to use server to server validation.
- Once you've confirmed that this receipt is an authentic document, you can go ahead and read in transactions and ensure that this transaction that's come through in this process is present in the receipt.
- If you are downloading content for in-app purchases, there's a couple of ways you can do this.
- Apple actually offers two techniques for you to use, as well.
- on-demand resources
- hosted in-app purchase downloadable content
- you can associate downloadable content through iTunes Connect that's accessed through the SKProduct object, directly.
-
it's important to finish all transactions that come through this process.
SKPaymentQueue.default().finishTransaction(transaction)
- if downloading hosted content, wait until after the download completes
-
Even if they're in like an error state, you got to finish all transactions that come through in this flow.
- And that includes when you're dealing with auto-renewable subscriptions. Any renewal transactions that come in this flow, as well.
-
Otherwise , the payment will stay in the queue.
-
When you're in app review, you must have a Restore button if you've got non-consumable or auto-renewable subscription products in your application.
- And this Restore button has to be a separate button from the actual purchase button.
-
So, if you're selling consumable products or non-renewing subscriptions, you've got to persist the state of those things, yourself.
-
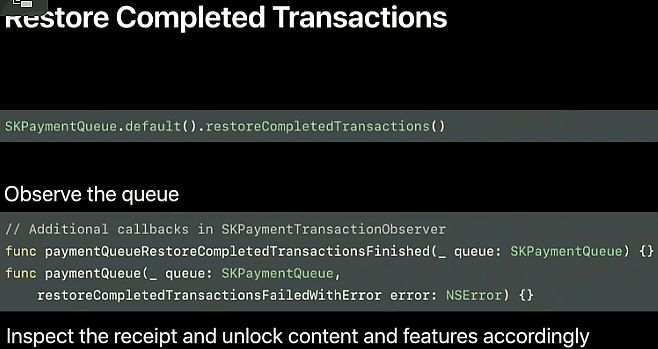
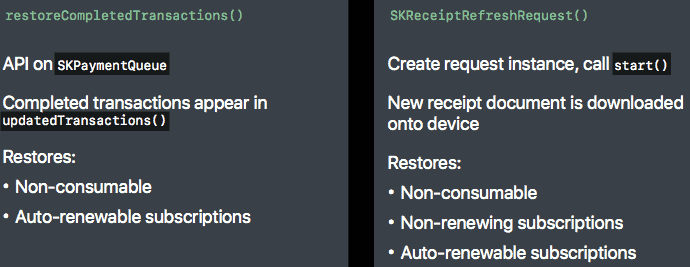
In order to actually restore them, this is the API for it. It's
restoreCompletedTransactionsas the method, and it's on the default payment queue.- If you call that, that's going to cause all the completed transactions in those categories to reappear on the updated transactions callback. So, you can just do the same process that we just saw, check for them being in the purchase state, do receipt validation, unlock all the features accordingly.
SKPaymentQueue.default().restoreCompletedTransaction()
- 订阅 需要用到服务器, 以维护在不同设备上的订阅状态
func application(application: UIApplication, didFinishLaunchingWithOptions
    launchOptions: [NSObject: AnyObject]?) -> Bool {
    SKPaymentQueue.default().add(self)
    return true
}
func paymentQueue(_ queue: SKPaymentQueue, updatedTransactions transactions:
[SKPaymentTransaction]) {
for transaction in transactions {
switch transaction.transactionState {
case .purchased:
// Validate the purchase
}
}
}- On-device validation
- Unlock features and content within the app
- Server-to-server validation
- Online validation through a request to the App Store
- Unlock features/subscription state on your server
Do not use online validation directly from the device
- The basics
- Stored in the app bundle
- API to get the path
- Single file
- Purchase data
- Signature to check authenticity
- Stored in the app bundle
- Standards 工业标准
- It is actually a pkcs7 DER stream
- Signing
- PKCS#7 Cryptographic Container
- Data Encoding
- ASN.1
- Options for verifying and reading
- OpenSSL, asn1c, and more
- OpenSSL is a framework that not only provides the functionality for secure web traffic tunneling, it also includes functions to be able to read in the data encoding from an ASN.1 payload and also check the signing on a cryptographic container like this.
- Create your own
- OpenSSL, asn1c, and more
// get receipt data from StoreKit,  encode it by base64
        // Get the receipt if it's available
        if let appStoreReceiptURL = Bundle.main.appStoreReceiptURL,
            FileManager.default.fileExists(atPath: appStoreReceiptURL.path) {

            do {
                let receiptData = try Data(contentsOf: appStoreReceiptURL, options: .alwaysMapped)
                print(receiptData)
                let receiptString = receiptData.base64EncodedString(options: [])
                print( receiptString )
                // Read receiptData
            }
            catch { print("Couldn't read receipt data with error: " + error.localizedDescription) }
}- OpenSSL doesn't actually ship with iOS. You have to build it and include it in your app yourself.
- Build your own static library (.a file)
- Not a dynamic library
- Include Apple Root CA Certificate
- Available online
- When it comes to the actual certificate check, you can download the Apple Root certificate authority's certificate from the Apple site.
- And you can use that certificate to actually perform that check using OpenSSL to see that it is a verified document from Apple.
- If bundled in app, watch out for expiry
- Available online
- Documentation online
- maybe download a pre-build solution from github
- Convenience comes at a price
- Reusing code brings with it bugs and vulnerabilities
- Single exploit affects many
- It’s your revenue stream
- Make decisions that suit your product
- Know and own the risks
- When you're verifying the receipt -- the actual certificate used to sign the receipt, a couple of tips here.
- Do not check the expiry date of the certificate relative to current date
- Compare expiry date to purchase date of the transaction
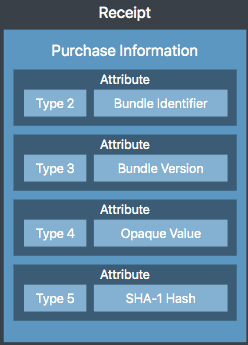
- Check the bundle identifier
- Check the bundle version
- Use hardcoded values
- Not Info.plist values, plist 很容易被伪造修改
- 接下来的步骤时 检查用户适用的设备 是否与文件匹配
- use type4 / type5
- only type5 need to check
- Attribute 5 is a SHA-1 hash of three key values
- Device identifier
device.identifierForVendor
- Opaque value (Attribute 4)
- it's a little bit of cryptographic entropy.
- A bit of secret salt that allows that SHA-1 hash to change over time, even the bundle ID and the device ID aren't changing.
- Bundle identifier
- Device identifier
- Unique to your app on this device
- this SHA-1 hash is unique to this app on the device.
- Create hash using those values, compare it to the one in type number 5.
So now you've done those three checks. That's the process of validating the receipt on the device.
- So let's take a look at the next step which is to actually update state and inspect the contents of these in-app purchases inside the receipt.
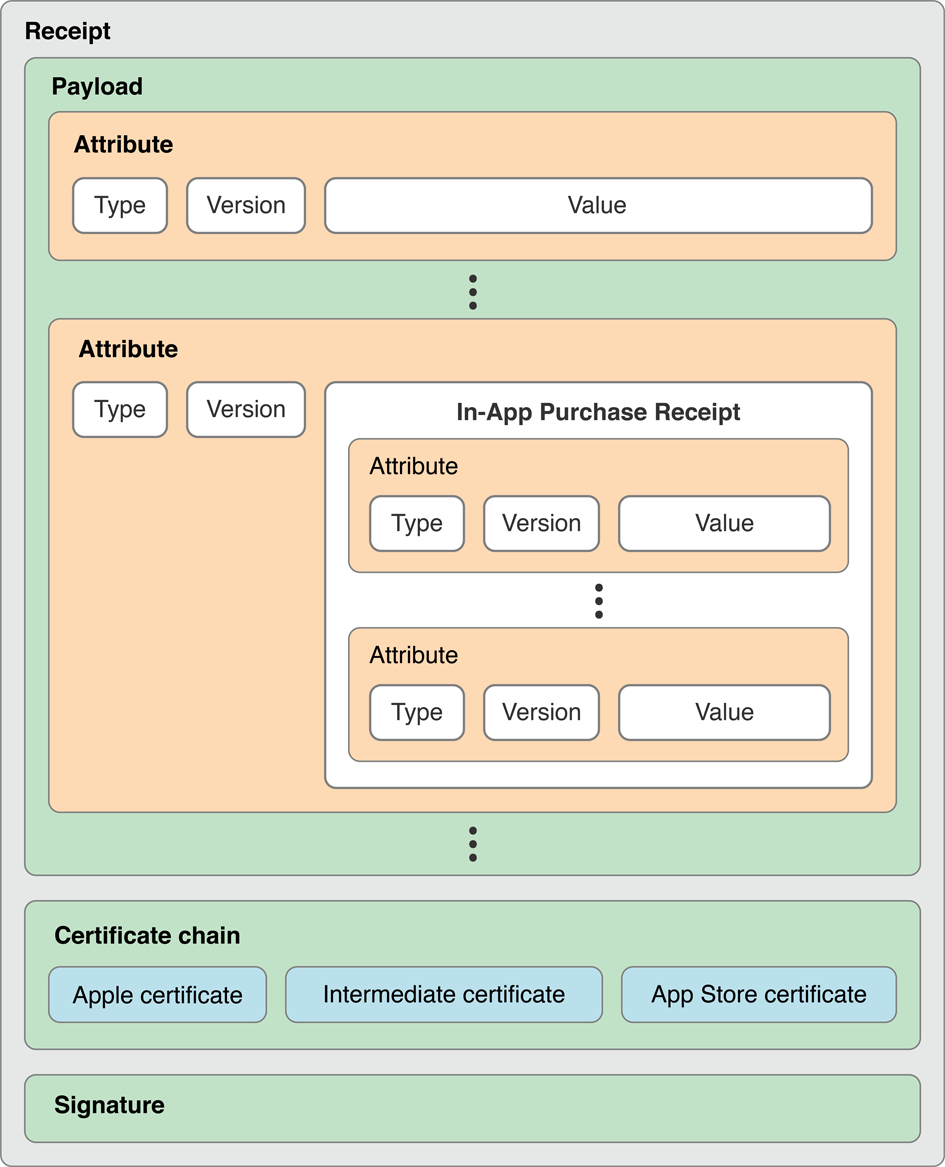
- The receipt contains a specific type, type 17 for every transaction that occurs for this user on this device.
- Now in each type 17, the actual payload is another ASN.1 encoded container.
- So we have things like a quantity, a product identifier, a transaction ID.
- these are values that you can use to verify that a transaction exists in the real world.
- One more to call out while I'm here is type 1708.
- This is particularly important if you're dealing with auto renewable subscriptions.
- This contains the expiry date for a particular transaction for a particular billing period.
- For more types: see Receipt Validation Programming Guide
- Transaction will appear in updatedTransactions callback
- Transaction observer must be registered early in lifecycle
- Receipt payload contains in-app purchase transactions
- Verify transaction in updatedTransactions callback is present in a receipt transaction
- So you can use things like the transaction ID, the purchase date, the product identifier that it's saying the user bought, and if you can verify that there's a transaction that matches then great. You can trust the transaction that StoreKit's telling you.
- Valid receipt ≠ subscribed
- Filter transactions by originalTransactionId
- Matches the first in-app purchase for that subscription
- Check matching transactions for latest expiry date
- Type 1708
- If there’s no valid transaction, can refresh receipt
- Repeat above steps
- For determining if subscription is valid, inspect
- Purchase date
- Expiry date
- System date
- if you're doing this purely on the device, the only data you actually have to compare these to is the user system data.
- Caveat for on-device subscription state
- Device clock could be wound back!
- So what's stopping the user from just winding their clock back and putting themselves into an active subscription period?
- Not a lot, unfortunately.
- So if this is a problem for you, it's probably likely that you're going to need to look at some kind of server side solution.
- Device clock could be wound back!
- If the receipt doesn’t exist or is invalid, refresh the receipt using StoreKit
- Receipt refresh will require network
- Store sign-in will be required
- Avoid continuous loop of validate-and-refresh
- it will prompt user to login again and again, you should send only 1 request.
let request = SKReceiptRefreshRequest()
request.delegate = self
request.start()- If the receipt is invalid
- Receipt refresh will require network
- Store sign-in will be required
- Exit app with code 173 to refresh receipt
exit(173)
- you'll notice that consumable products are absent from both of these types of requests.
- If you're dealing with consumable product purchases, they're just going to appear both in the updated transactions and on the receipt at the time of purchase.
- So you kind of have that one chance to actually verify the consumable product and it won't be restored for either of these calls.
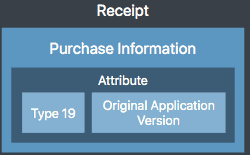
- Now one other tip for dealing with receipts is if you're looking to switch to subscriptions, maybe you've got a paid application and you want to switch it to being a subscription model, you can use this type 19 value in the application receipt.
- This contains the original application version.
- you can use this application version that a user originally downloaded as kind of a gate to know as to whether you need to provide a content based on a paid app or based on a subscription.
- You know it's not a great experience if you've paid for an application and then suddenly you lose access to that functionality you paid for if it's now a subscription model.
- So use type 19 as a bit of a gate to be able to supply that.
- Know whether the app was purchased as paid version, or is a subscription version
- Finish all transactions once content is unlocked
- If downloading hosted content, wait until after the download completes
- Includes all auto-renewable subscription transactions
- Otherwise, the payment will stay in the queue
- Subscription billing retry depends on up-to-date information about transaction
- 关于订阅结算重试,我们有一个特定的逻辑: 如果你使用自动续约订阅,很重要的一点,你必须finish these transactions.
- 这样,如果出现任何类型的结算错误,我们的订阅结算重试逻辑可以继续尝试,并且向用户的信用卡收费。
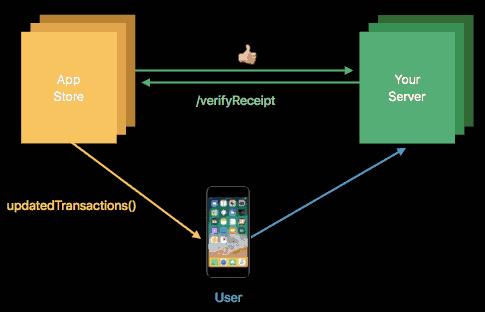
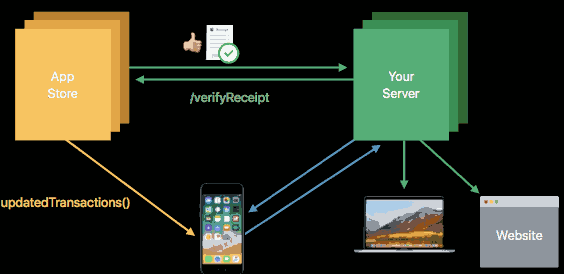
- Allows your servers to validate the receipt
- Your server sends the receipt to the App Store
- Endpoint is
verifyReceipt
- Response is in JSON
- Returns status on whether receipt is valid or not
- AGAIN: Never send the receipt directly from your app to the App Store server
- only the http channel between your server and AppStore Server is secure.
- these are whole steps to validate receipt by server, it is very simple.
- In addition to receipt validity,
verifyReceiptreturns- Latest decoded application receipt
- Contains array of in-app purchase transactions
- Verify product in the
updatedTransactionscallback on device is present in a transaction
- Verify product in the
- Tell the device to finishTransaction()
- Filter transactions by
originalTransactionId- Matches the first IAP for taht subscription
- Check matching transactions for latest expiry date
- the receipt data returned from AppStore server is latest.
- particularly on the server
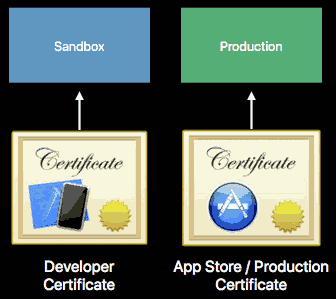
- Environment for testing purchases during development
- Based on certificate used to sign your application
- Can request expired and/or revoked receipts
- Time contraction for subscriptions
- There's a different endpoint as well when it comes to server-to-server validation. We provide a different url for that verify receipt endpoint.
- Setup in iTunes Connect
- Create test user
- Enter products for sale
- Build and sign your app
- Buy products
- Sign in with test user when prompted
- macOS only: Launch app from Finder once to fetch receipt
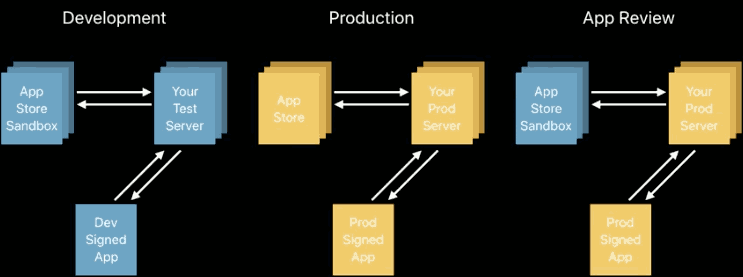
- Try the production environment
- If receipt is from Sandbox
- Receive error 21007
- Then try against Sandbox
- Not separate production and Sandbox servers
- Sandboxing is handled by a parameter in the payload
- Use the
environmentkey in payload
Receipt validation is different in Xcode. While Apple’s root certificate signs receipts in Sandbox, a certificate local to Xcode signs receipts in Xcode.
To use the local Xcode certificate, you must first retrieve and store it in your Xcode project. Then you have to tell Xcode to use the certificate when locally validating receipts.
To get the certificate:
- open a StoreKit configuration file
- you created configuration file, then you can run app in xcode with this configuration file so as to test IAP before you creating IAP products in AppStore.
- select Editor ▸ Save Public Certificate from the menu
- Save the certificate in the provided Certificates folder.
Next, you’ll change the validation code to use that certificate.
#if DEBUG
let certificate = "StoreKitTestCertificate"
#else
let certificate = "AppleIncRootCertificate"
#endif// Get the receipt if it's available
if let appStoreReceiptURL = Bundle.main.appStoreReceiptURL,
FileManager.default.fileExists(atPath: appStoreReceiptURL.path) {
do {
let receiptData = try Data(contentsOf: appStoreReceiptURL, options: .alwaysMapped)
print(receiptData)
let receiptString = receiptData.base64EncodedString(options: [])
// Read receiptData
}
catch { print("Couldn't read receipt data with error: " + error.localizedDescription) }
}StoreKit Testing in Xcode 12: Getting Started
| Testing Environment | Requires App Store Connect Setup | Provides app receipts that are signed by App Store | Charges users when testing Buy transactions |
|---|---|---|---|
| StoreKit Testing in Xcode | No | No (signed by Xcode) | No |
| Sandbox | Yes | Yes | No |
| TestFlight (uses Sandbox) | Yes | Yes | No |
| Test Scenario | Sandbox | StoreKit Testing in Xcode |
|---|---|---|
| Test different storefronts to affect price tiers and locale | Yes | Limited. (No price tiers) |
| Clear the purchase history | No | Yes |
| Test subscription upgrades, downgrades, crossgrades, and canceling auto-renew | Yes | Yes |
| Reset eligibility for introductory offers | Yes | Yes |
| Introduce forced StoreKit errors for testing | No | Yes |
| Speed up or slow down the rate of time for testing subscription renewals | No | Yes |
| Common StoreKit Scenarios | ... | ... |
| Repurchase a non-consumable purchase, for repeated testing | No | Yes |
| Refund an in-app purchase | No | Yes |
| Test a failed purchase attempt when payment authorization failed | No | Yes |
| Retrieve configured in-app purchases from App Store Connect | Yes | No (Returns data from the StoreKit configuration file) |
| Subscriptions and Ask to Buy | ... | ... |
| Resolve an Ask to Buy transaction by approving or rejecting it | No | Yes |
| Process a canceled or refunded subscription | No | Yes |
