For whatever function a device with an ESP8266 might have, it can be useful to read live variables from your application, as well as change variables or inputs on the fly, for instance to toggle a relay, or to switch on a LED. This dashboard is provided in the web interface and shows live updates of your application. Just like the configuration manager, this dashboard is generated from a JSON file. A struct is generated from this file, which is then communicated to the web interface over websockets.
Usage of this class is easy. See below how to define your dashboard parameters. Once you have done this, these can be viewed or changed from the browser, and simply be called in the rest of your application as dash.data.parameterName.
A more detailed example of how to use this in your code is in the examples folder.
bool begin(int sampleTimeMs = 1000);This method must be called from the setup of the application. The optional argument will determine the sample rate in milliseconds with which updates are sent to the web interface.
void loop();This is the periodic function to keep sending the latest version of dash.data to the interface at the specified interval.
void send();This sends a one time update over web socket of the latest version of dash.data.
dashboardData data;This member is the structure in RAM that contains the controls and display items of the dashboard.
The configuration data is defined in the JSON file gui/js/dashboard.json.
However, if you use the framework as a PlatformIO library, you need to define the filename that points to your configuration JSON file. This can be done in your platformio.ini file by adding a custom build flag:
build_flags = -DDASHBOARD_PATH=dashboard_filename.jsonThis configuration file will be automatically copied into the library folder before each build.
Important: After you have changed the JSON file, you also need to regenerate the web interface to reflect the latest changes by enabling the REBUILD_HTML build flag, otherwise the web interface will show the old configData. Refer to this section for more details.
An example of how this file could look is shown below:
[
    {
        "name": "projectName",
        "type": "char",
        "length": 32,
        "direction": "display"
    },
    {
        "name": "stringInput",
        "type": "char",
        "length": 32,
        "direction": "control"
    },
    {
        "name": "dummyInt",
        "type": "uint16_t",
        "direction": "display"
    },
    {
        "name": "dummyBool",
        "type": "bool",
        "direction": "display"
    },
    {
        "name": "dummyFloat",
        "type": "float",
        "direction": "display",
        "display": "graph",
        "xaxis": 20
    },
    {
        "name": "inputInt",
        "type": "uint16_t",
        "direction": "control"
    },
    {
        "name": "inputBool",
        "type": "bool",
        "direction": "control"
    },
    {
        "name": "inputFloat",
        "type": "float",
        "min": 1,
        "max": 10,
        "direction": "control"
    }
]
Supported data types are: bool, uint8_t, int8_t, uint16_t, int16_t, uint32_t, int32_t, float and char. The length argument is mandatory for datatype char to indicate the length of the string. Variable length strings are not supported. Also, arrays are not supported for now. Finally, the type can also be set to color. In this case the field will be shown as a color picker which will be represented in your code as an array with 3 numbers for the rgb values.
there are a few other specific fields. the direction field is mandatory, and display will show the items in the live dashboard whereas control will put the items as control inputs in the dashboard. For display items, "display": "graph", will turn them into a live graph, with the x-axis length in seconds defined by "xaxis": 20. For displayed floats, the field digits can be used to limit the number of digits shown.
For control items, "control": "select", will turn them into a drop down menu, with the options defined as "options": [1, 2, 3]. In addition, you can specify "optionLabels": ['one', 'two', 'three'] if you want the GUI to show more user-friendly labels in your drop down menu.
For control items, "control": "slider", will turn them into a slider, the min, max and step properties will also apply to the slider. This is only valid for numeric types.
"control": "password", will turn the item into a hidden field.
The fields below can be used for purposes of the HTML page and will have no functional impact:
{
    "type": "separator"
},
{
    "type": "header",
    "text": "Header text here"
},
{
    "type": "label",
    "text": "Label text here"
},
For this example, the pre-build python script preBuildDash.py will generate the files dash.h containing the type definition. This should be fairly self explanatory and show how the JSON file is translated into a C struct.
Important: After you have changed the JSON file, you also need to regenerate the web interface to reflect the latest changes by enabling the REBUILD_HTML build flag, otherwise the web interface will show the old dashboard data. Refer to this section for more details.
#ifndef DASH_H
#define DASH_H

struct dashboardData
{
	char projectName[32];
	char stringInput[32];
	uint16_t dummyInt;
	bool dummyBool;
	float dummyFloat;
	uint16_t inputInt;
	bool inputBool;
	float inputFloat;
};
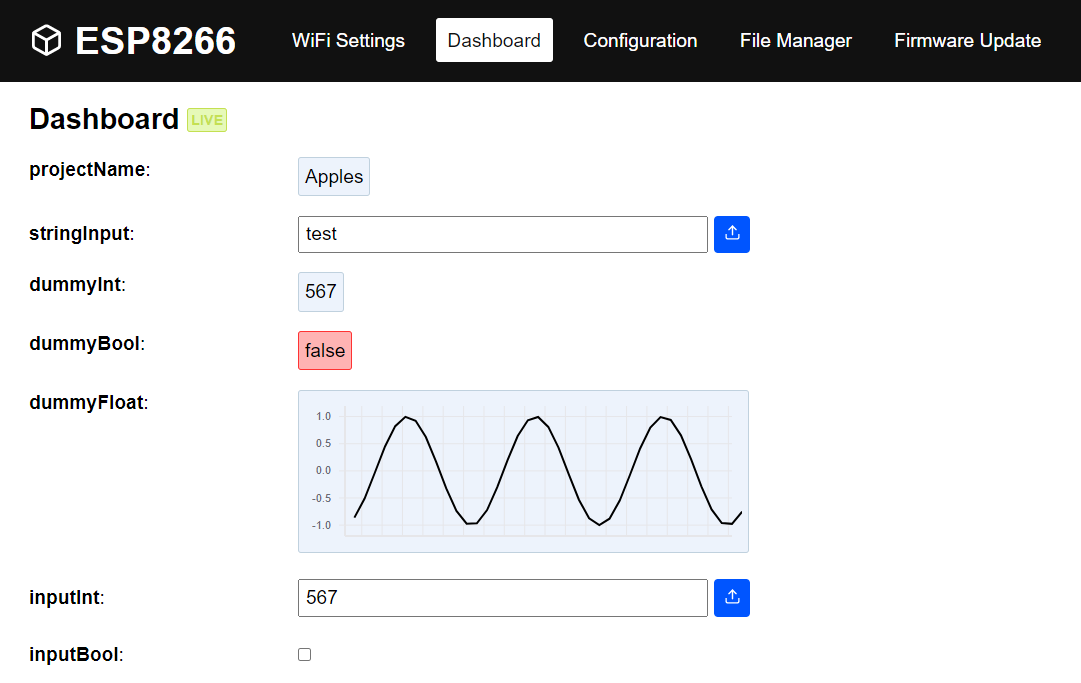
#endifThe page in the web interface that is connected to the dashboard is shown below. The javascript generating that page will read directly from the JSON and interact with the ESP through a websocket to get the current values and to request to store new values.