在Netty中,ChannelPipeline和ChannelHandler类似于Servlet和Filter过滤器,这类拦截器实际上是责任链模式的一种变形,这么设计是为了方便事件的拦截和用户业务逻辑的定制。
Servlet和Filter是JAVAEE中的基础组件,初学JAVAEE的小伙伴再熟悉不过了,它能够拦截到HTTP请求以及响应,并读出请求和响应的数据用作业务逻辑的处理,通过这种方式Servlet和Filter可以对Web应用程序进行预处理和后置处理。
Netty的Channel过滤器实现原理与ServletFilter机制一致,它将Channel的数据管道抽象为ChannelPipeline, 消息在ChannelPipeline中流动和传递。ChannelPipeline 持有I/O事件拦截器ChannelHandler的链表,由ChanneIHandler对I/O事件进行拦截和处理,可以方便地通过新增和删除ChannelHandler来实现不同的业务逻辑定制,不需要对已有的ChannelHandler进行修改,能够实现对修改封闭和对扩展的支持。总的而言,在Netty中,pipeline相当于Netty的大动脉,负责Netty的读写事件的传播。
ChannelPipeline是ChannelHandler的容器,它负责ChannelHandler的管理和事件拦截。下面用一张图来展示在Netty中,一个“消息”被ChannelPipeline拦截,然后被ChannelHandler处理的过程,流程如下:
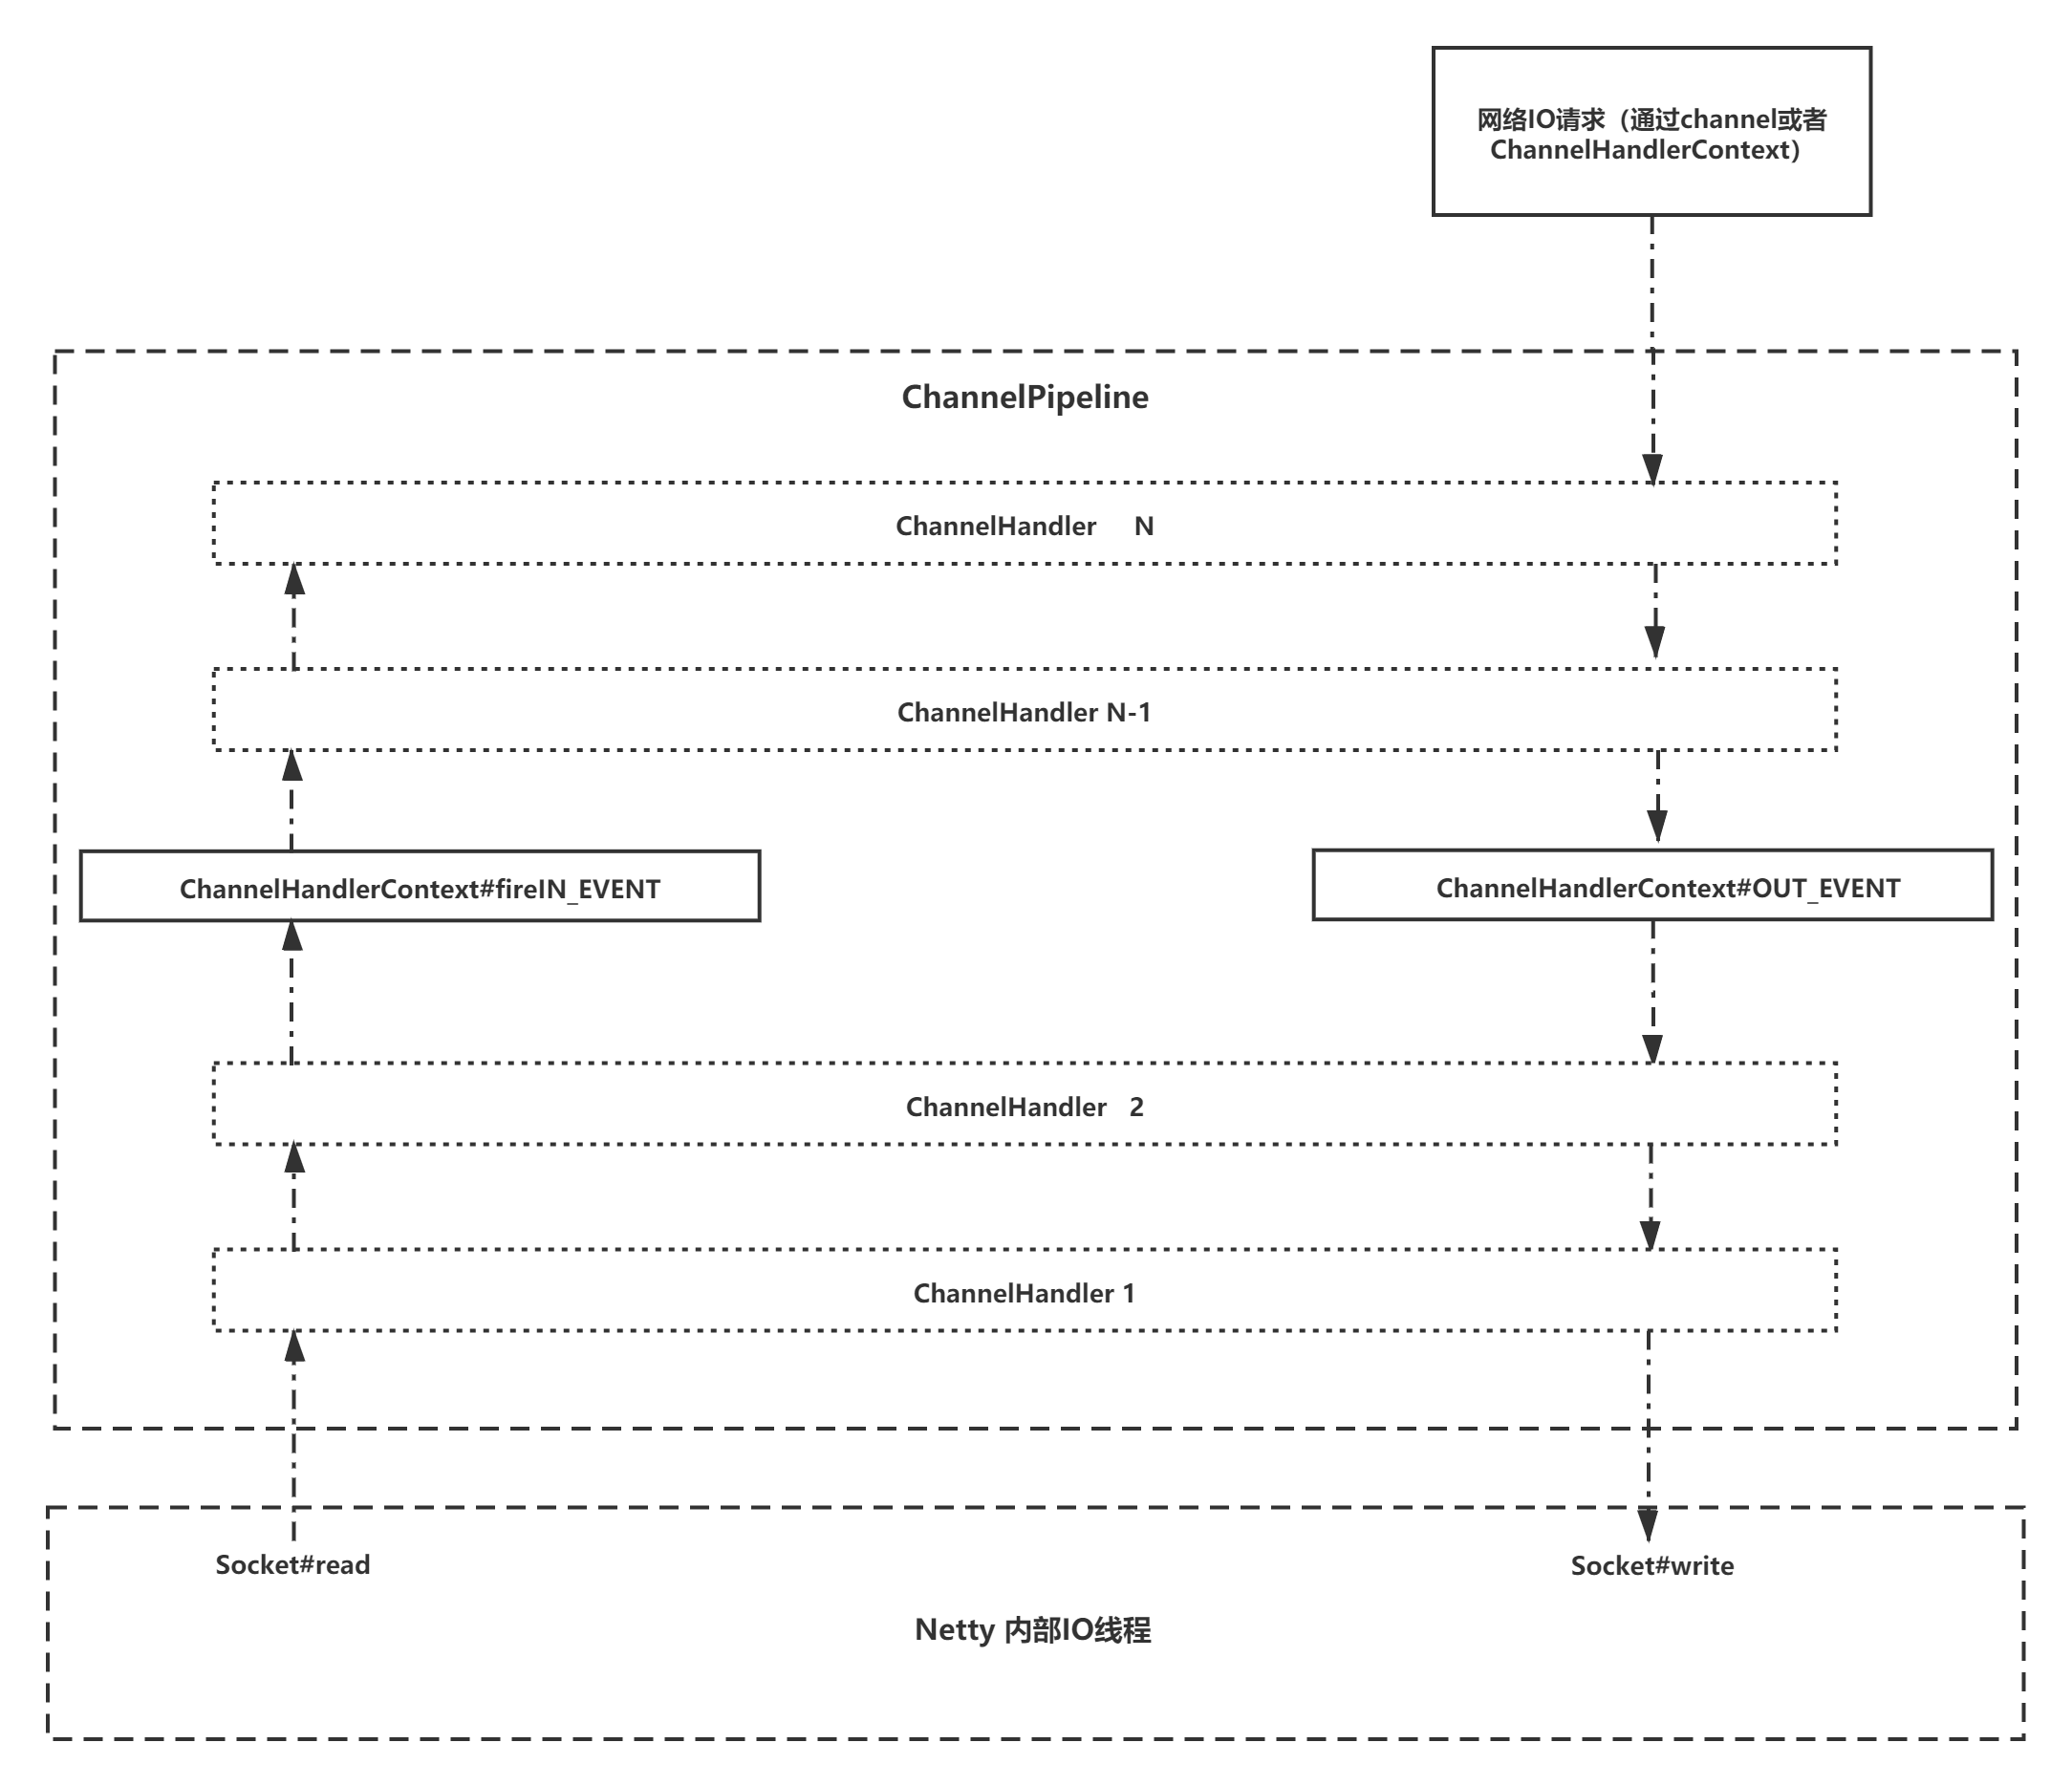
- 底层的SocketChannel read(方法读取ByteBuf, 触发ChannelRead 事件,由I/O线程NioEventLoop 调用ChannelPipeline 的fireChannelRead(Object msg)方法, 将消息 (ByteBuf)传输到ChannelPipeline中
- 消息依次被HeadHandler、ChannelHandler1、 ChannelHander2.....TailHandler 拦截和处理,在这个过程中,任何ChannelHandler都可以中断当前的流程,结束消息的传递
- 调用ChannelHandlerContext的write方法发送消息,消息从TailHandler开始,途经ChannelHanderN.....ChannelHandlerl. HeadHandler, 最终被添加到消息发送缓冲区中等待刷新和发送,在此过程中也可以中断消息的传递,例如当编码失败时,就需要中断流程,构造异常的Future返回
Netty中的事件分为inbound事件和outbound事件.inbound事件通常由1/O线程触发,例如TCP链路建立事件、链路关闭事件、读事件、异常通知事件等,它对应上图的左半部分。
触发inbound事件的方法如下:
- ChannelHandlerContext#fireChannelRegistered(): Channel 注册事件
- ChannelHandlerContext#fireChannelActive(): TCP链路建立成功, Channel激活事件
- ChannelHandlerContext#fireChannelRead(Object): 读事件
- ChannelHandlerContext#fireChannelReadComplete(): 读操作完成通知事件;
- ChannelHandlerContext#fireExceptionCaught(Throwable): 异常通知事件;
- ChannelHandlerContext#fireUserEventTriggered(Object): 用户自定义事件:
- ChannelHandlerContext#fireChannelWritabilityChanged(): Channel 的可写状态变化通知事件;
- ChannelHandlerContext#fireChannellnactive(): TCP连接关闭,链路不可用通知事件。
Outbound事件通常是由用户主动发起的网络I/O操作,例如用户发起的连接操作、绑定操作、消息发送等操作,它对应上图的右半部分。
触发outbound事件的方法如下:
- ChannelHandlerContext#bind( SocketAddress, ChannelPromise):绑定本地地址事件
- ChannelHandlerContext#connect(SocketAddress, SocketAddress, ChannelPromise):连接服务端事件
- ChannelHandlerContext#write(Object, ChannelPromise):发送事件
- ChannelHandlerContext#flushO): 刷新事件
- ChannelHandlerContext#read(): 读事件
- ChannelHandlerContext#disconnect(ChannelPromise): 断开连接事件
- ChannelHandlerContext#close(ChannelPromise): 关闭当前Channel事件
为了接下来能够方便的学习原理以及阅读源码,我们先看下ChannelPipeline的接口的继承关系图:
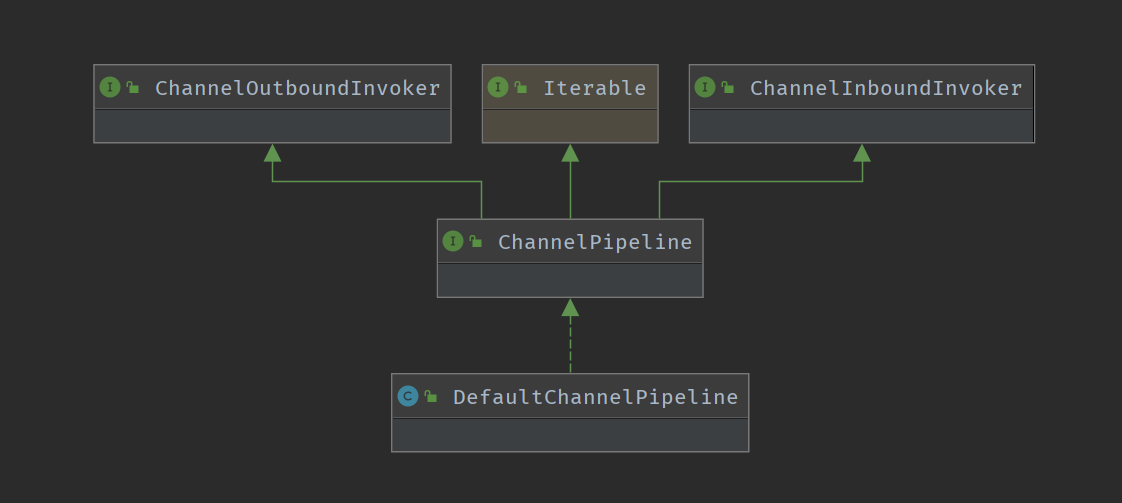
可以发现,ChannelPipeline接口还继承了ChannelOutboundInvoker以及ChannelInboundInvoker,这两个invoker接口作为ChannelPipeline接口的增强接口。分别看下ChannelPipeline和ChannelOutboundInvoker、ChannelInboundInvoker这三个接口定义。
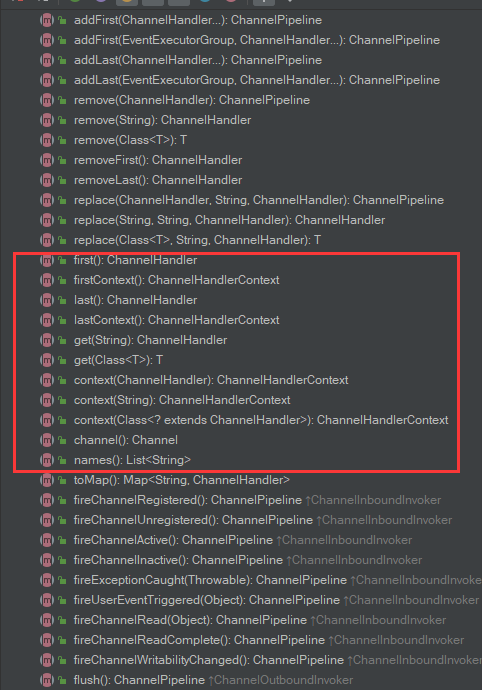
对于ChannelPipeline接口,方法分别可以分为以下几组类别方法:
第一组是向ChannelPipeline中添加ChannelHandler,如下图所示:
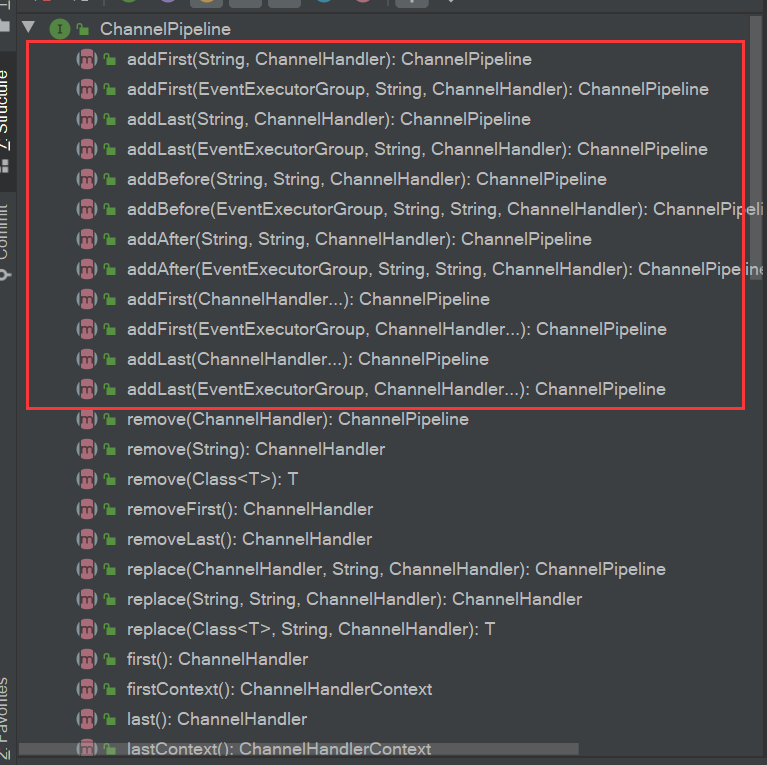
这里需要提前知道的是,ChannelPipeline维护这一组双向链表的数据结构。
addFirst是向ChannelPipeline双向链表头补添加节点,addLast是向ChannelPipeline双向链表尾部添加节点,addBefore是向ChannelPipeline双向链表中指定的ChannelHandler之前添加一个新的节点,addAfter是向ChannelPipeline双向链表中指定的ChannelHandler之后添加一个节点。
第二组是向ChannelPipeline中移除ChannelHandler
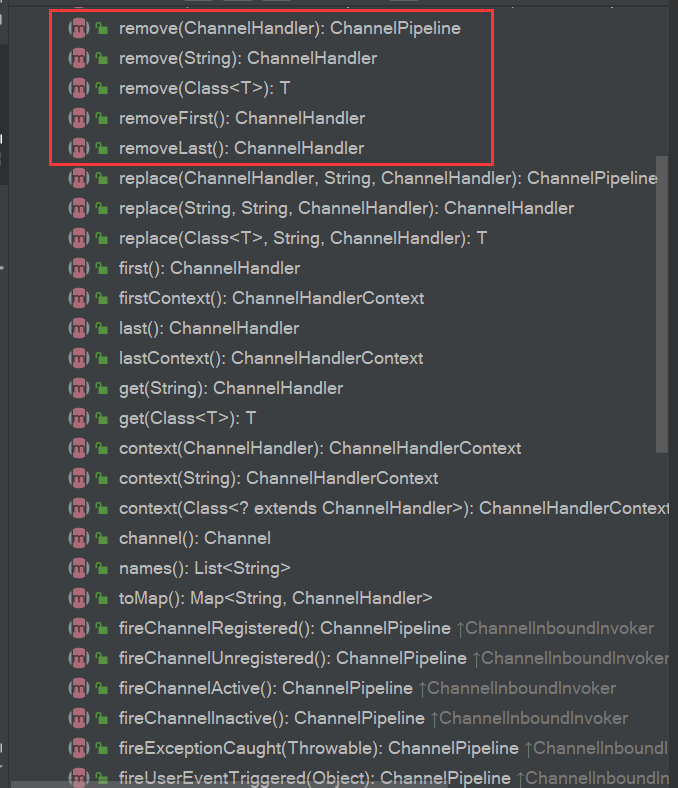
第三组是向获取ChannelHandlerContext对象
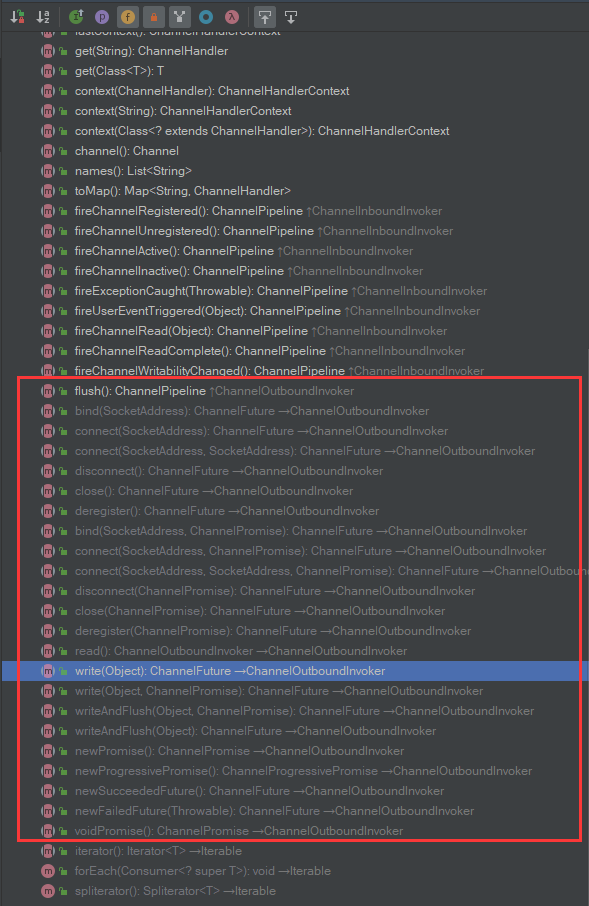
第四组是ChannelInboundInvoker接口增强而来的方法

第五组是ChannelOutboundInvoker接口增强而来的方法
在Netty中,ChannelPipeline是一个双向链表的数据结构,那么链表节点是什么呢?答案就是ChannelHandlerContext对象。
在Netty中,ChannelHandlerContext对象就是存在ChannelPipeline双向链表中的节点元素,在ChannelPipeline中,Netty会为其初始化Head头结点和Tail尾结点,在ChannelPipeline实现类:DefaultChannelPipeline中可以看到定义:
    final AbstractChannelHandlerContext head;
    final AbstractChannelHandlerContext tail;
DefaultChannelPipeline构造方法中,对head和tail进行了初始化
    protected DefaultChannelPipeline(Channel channel) {
        // 给channel赋值channel对象
        this.channel = ObjectUtil.checkNotNull(channel, "channel");
        succeededFuture = new SucceededChannelFuture(channel, null);
        voidPromise =  new VoidChannelPromise(channel, true);

        // 节点对象是AbstractChannelHandlerContext对象,是用于进行业务处理
        // HeadContext和TailContext就是用户可以模仿实现的ChannelHandler实现类
        // channelPipeline双向连表的头节点
        tail = new TailContext(this);
        // channelPipeline双向连表的尾结点
        head = new HeadContext(this);

        // channelPipeline: head -> tail
        head.next = tail;
        tail.prev = head;
    }
当Netty初始化完DefaultChannelPipeline对象之后,ChannelPipeline中就已经存在了head和tail两个节点了,自然Netty会通过前面介绍的addXxx方法来添加,下面看下ChannelPipeline的addXxx方法源代码:
DefaultChannelPipeline.java
    @Override
    public final ChannelPipeline addLast(String name, ChannelHandler handler) {
        return addLast(null, name, handler);
    }

    @Override
    public final ChannelPipeline addLast(EventExecutorGroup group, String name, ChannelHandler handler) {
        final AbstractChannelHandlerContext newCtx;
        synchronized (this) {
            checkMultiplicity(handler);

            /**
             * 生成一个新的ChannelHandlerContext对象,这里返回的是DefaultChannelHandlerContext对象
             */
            newCtx = newContext(group, filterName(name, handler), handler);

            /**
             * 向pipeline链表中添加一个新的节点
             */
            addLast0(newCtx);

            // If the registered is false it means that the channel was not registered on an eventLoop yet.
            // In this case we add the context to the pipeline and add a task that will call
            // ChannelHandler.handlerAdded(...) once the channel is registered.
            if (!registered) {
                newCtx.setAddPending();
                // 触发handlerAdded方法,并开始传播handlerAdded事件,此处最终会调用ChannelInitializer#handlerAdded方法,并最终调用到initChannel方法。
                callHandlerCallbackLater(newCtx, true);
                return this;
            }

            /**
             * 从NioEventLoopGroup中获取到NioEventLoop对象
             */
            EventExecutor executor = newCtx.executor();
            if (!executor.inEventLoop()) {
                callHandlerAddedInEventLoop(newCtx, executor);
                return this;
            }
        }
        // 调用HandlerAdded方法
        callHandlerAdded0(newCtx);
        return this;
    }

    // 向尾结点添加一个节点,并移动指针位置
    private void addLast0(AbstractChannelHandlerContext newCtx) {
        AbstractChannelHandlerContext prev = tail.prev;
        newCtx.prev = prev;
        newCtx.next = tail;
        prev.next = newCtx;
        tail.prev = newCtx;
    }

    private AbstractChannelHandlerContext newContext(EventExecutorGroup group, String name, ChannelHandler handler) {
        return new DefaultChannelHandlerContext(this, childExecutor(group), name, handler);
    }
那么,对于拥有双向链表结构的ChannelPipeline来说,是如何让事件在链表结构中进行转移执行的?
就拿fireChannelRead方法来分析:
这里需要提前知道的一点是,AbstractCHannelHandlerContext#fireChannelRead方法会被复写了channelRead方法的ChannelHandler调用。
AbstractCHannelHandlerContext.java
    @Override
    public ChannelHandlerContext fireChannelRead(final Object msg) {
        /**
         * findContextInbound 返回的-> AbstractChannelHandlerContext对象
         */
        invokeChannelRead(findContextInbound(MASK_CHANNEL_READ), msg);
        return this;
    }

    /**
     * 查找下一个Inbound节点
     * @param mask
     * @return
     */
    private AbstractChannelHandlerContext findContextInbound(int mask) {
        AbstractChannelHandlerContext ctx = this;
        EventExecutor currentExecutor = executor();
        do {
            ctx = ctx.next;
        } while (skipContext(ctx, currentExecutor, mask, MASK_ONLY_INBOUND));
        return ctx;
    }

    private static boolean skipContext(
            AbstractChannelHandlerContext ctx, EventExecutor currentExecutor, int mask, int onlyMask) {
        // Ensure we correctly handle MASK_EXCEPTION_CAUGHT which is not included in the MASK_EXCEPTION_CAUGHT
        return (ctx.executionMask & (onlyMask | mask)) == 0 ||
                // We can only skip if the EventExecutor is the same as otherwise we need to ensure we offload
                // everything to preserve ordering.
                //
                // See https://github.com/netty/netty/issues/10067
                (ctx.executor() == currentExecutor && (ctx.executionMask & mask) == 0);
    }
经过while循环遍历出下一个节点之后,变调用DefaultChannelPipeline#invokeChannelRead方法。
DefaultChannelPipeline
    static void invokeChannelRead(final AbstractChannelHandlerContext next, Object msg) {
        final Object m = next.pipeline.touch(ObjectUtil.checkNotNull(msg, "msg"), next);
        EventExecutor executor = next.executor();
        // 在Netty线程中,则直接调用
        if (executor.inEventLoop()) {
            next.invokeChannelRead(m);
        } else {
            // 不在Netty线程中,则另开一个线程来调用ChanelRead方法
            executor.execute(new Runnable() {
                @Override
                public void run() {
                    next.invokeChannelRead(m);
                }
            });
        }
    }

    private void invokeChannelRead(Object msg) {
        // 过滤handler的状态
        if (invokeHandler()) {
            try {
                // 调用inboundHandler的channelRead方法
                ((ChannelInboundHandler) handler()).channelRead(this, msg);
            } catch (Throwable t) {
                invokeExceptionCaught(t);
            }
        } else {
            fireChannelRead(msg);
        }
    }
就这样,前一个节点的ChannelRead方法执行完,就会遍历出下一个节点的ChannelRead并执行,以此达到了在双向链表中移动节点元素的效果。
Netty中,ChannelPipeline对象是在Channel被创建的时候生成的,看源码。
AbstractChannel.java
    protected AbstractChannel(Channel parent) {
        this.parent = parent;
        // channel的标识
        id = newId();
        // channel的unsafe类
        // NioSocketChannel和NioServerSocketChannel的unsafe对象都一样
        unsafe = newUnsafe();
        // 新建pipeline
        pipeline = newChannelPipeline();
    }

    protected DefaultChannelPipeline newChannelPipeline() {
        // 随后调用DefaultChannelPipeline对象构造方法,在构造方法中生成TailContext和HeadContext,并维护好他们的链表关系
        return new DefaultChannelPipeline(this);
}ChannelPipeline是通过ChannelHandler接口来实现事件的拦截和处理,一般ChannelHandler只需要继承ChannelHandlerAdapter,然后覆盖自己关心的方法即可。
对于ChannelHandler接口,先看下其接口实现图:
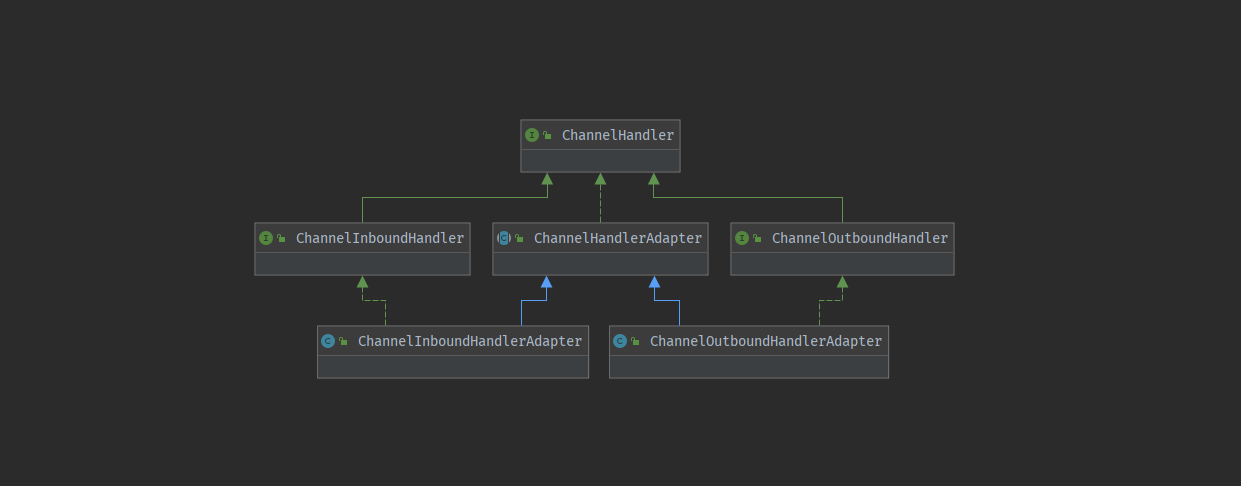
可以看到ChannelHandler接口的子类实现图中,有两个重要的子接口:ChannelInboundHandler、ChannelOutboundHandlerAdapter,这两个子接口扩展了ChannelHandler的功能,分别对应着ChannelPipeline章节中介绍的inbound和outbound事件功能。先看看ChannelHandler接口定义了哪些方法。
public interface ChannelHandler {

    /**
     * 添加ChannelHandler的回调
     */
    void handlerAdded(ChannelHandlerContext ctx) throws Exception;

    /**
     * 移除ChannelHandler的回调
     */
    void handlerRemoved(ChannelHandlerContext ctx) throws Exception;

    /**
     *
     */
    @Deprecated
    void exceptionCaught(ChannelHandlerContext ctx, Throwable cause) throws Exception;

    @Inherited
    @Documented
    @Target(ElementType.TYPE)
    @Retention(RetentionPolicy.RUNTIME)
    @interface Sharable {
        // no value
    }
}
ChannelHandler是作为业务处理器保存在ChannelPipeline中的,它的其他功能都是在子类实现或者是子接口继承的,下面看下: ChannelHandlerAdapter
public abstract class ChannelHandlerAdapter implements ChannelHandler {
    /**
     * 判断当前这个ChannelHandler是否有@Shareble修饰,有的话该ChannelHandler就可以在不同的ChannelPipeline之间共享
     */
    public boolean isSharable() {
        /**
         * Cache the result of {@link Sharable} annotation detection to workaround a condition. We use a
         * {@link ThreadLocal} and {@link WeakHashMap} to eliminate the volatile write/reads. Using different
         * {@link WeakHashMap} instances per {@link Thread} is good enough for us and the number of
         * {@link Thread}s are quite limited anyway.
         *
         * See <a href="/netty/netty/issues/2289">#2289</a>.
         */
        Class<?> clazz = getClass();
        Map<Class<?>, Boolean> cache = InternalThreadLocalMap.get().handlerSharableCache();
        Boolean sharable = cache.get(clazz);
        if (sharable == null) {
            sharable = clazz.isAnnotationPresent(Sharable.class);
            cache.put(clazz, sharable);
        }
        return sharable;
    }

    @Skip
    @Override
    @Deprecated
    public void exceptionCaught(ChannelHandlerContext ctx, Throwable cause) throws Exception {
        ctx.fireExceptionCaught(cause);
    }

}
可以看到,ChannelHandlerAdapter作为抽象类只实现了顶级接口ChannelHandler的两个方法:isShareble和exceptionCaught,这里是Netty的风格之一,就是定义完顶级接口后,分别有公共抽象子类、子接口来对功能进行增强。那么对于ChannelHandler的功能增强,则由:ChannelOutboundHandler、ChannelInboundHandler来进行的增强。
public interface ChannelInboundHandler extends ChannelHandler {

    /**
     * 通道注册完成的回调方法,方法中多以fireChannelRegistered方法为主,作用是往pipeline中传播channelRegistered事件
     */
    void channelRegistered(ChannelHandlerContext ctx) throws Exception;

    /**
     * 通道解除注册的回调方法
     */
    void channelUnregistered(ChannelHandlerContext ctx) throws Exception;

    /**
     * 通道触发
     */
    void channelActive(ChannelHandlerContext ctx) throws Exception;

    /**
     * The {@link Channel} of the {@link ChannelHandlerContext} was registered is now inactive and reached its
     * end of lifetime.
     */
    void channelInactive(ChannelHandlerContext ctx) throws Exception;

    /**
     * 通道读取到消息
     */
    void channelRead(ChannelHandlerContext ctx, Object msg) throws Exception;

    /**
     * Invoked when the last message read by the current read operation has been consumed by
     * {@link #channelRead(ChannelHandlerContext, Object)}.  If {@link ChannelOption#AUTO_READ} is off, no further
     * attempt to read an inbound data from the current {@link Channel} will be made until
     * {@link ChannelHandlerContext#read()} is called.
     */
    void channelReadComplete(ChannelHandlerContext ctx) throws Exception;

    /**
     * Gets called if an user event was triggered.
     */
    void userEventTriggered(ChannelHandlerContext ctx, Object evt) throws Exception;

    /**
     * Gets called once the writable state of a {@link Channel} changed. You can check the state with
     * {@link Channel#isWritable()}.
     */
    void channelWritabilityChanged(ChannelHandlerContext ctx) throws Exception;

    /**
     * Gets called if a {@link Throwable} was thrown.
     */
    @Override
    @SuppressWarnings("deprecation")
    void exceptionCaught(ChannelHandlerContext ctx, Throwable cause) throws Exception;
}
public interface ChannelOutboundHandler extends ChannelHandler {
/**
* 绑定socket事件回调
*/
void bind(ChannelHandlerContext ctx, SocketAddress localAddress, ChannelPromise promise) throws Exception;
/**
* socket连接回调
*/
void connect(
ChannelHandlerContext ctx, SocketAddress remoteAddress,
SocketAddress localAddress, ChannelPromise promise) throws Exception;
/**
* socket断开连接回调
*/
void disconnect(ChannelHandlerContext ctx, ChannelPromise promise) throws Exception;
/**
* socket关闭回调
*/
void close(ChannelHandlerContext ctx, ChannelPromise promise) throws Exception;
/**
* Called once a deregister operation is made from the current registered {@link EventLoop}.
*
* @param ctx the {@link ChannelHandlerContext} for which the close operation is made
* @param promise the {@link ChannelPromise} to notify once the operation completes
* @throws Exception thrown if an error occurs
*/
void deregister(ChannelHandlerContext ctx, ChannelPromise promise) throws Exception;
/**
* Intercepts {@link ChannelHandlerContext#read()}.
*/
void read(ChannelHandlerContext ctx) throws Exception;
/**
*
*/
void write(ChannelHandlerContext ctx, Object msg, ChannelPromise promise) throws Exception;
/**
*
*/
void flush(ChannelHandlerContext ctx) throws Exception;
}在来看看ChannelInitializer这个抽象类,定义了什么功能。
@Sharable
public abstract class ChannelInitializer<C extends Channel> extends ChannelInboundHandlerAdapter {

    private static final InternalLogger logger = InternalLoggerFactory.getInstance(ChannelInitializer.class);
    // initMap用于保存在不同pipeline之间共享的ChannelHandler对象,减少开销
    private final Set<ChannelHandlerContext> initMap = Collections.newSetFromMap(
            new ConcurrentHashMap<ChannelHandlerContext, Boolean>());

    /**
     * 初始化channel的抽象方法,具体由子类提供实现逻辑
     */
    protected abstract void initChannel(C ch) throws Exception;

    @Override
    @SuppressWarnings("unchecked")
    public final void channelRegistered(ChannelHandlerContext ctx) throws Exception {
        // 通道注册完成后,对通道进行初始化
        if (initChannel(ctx)) {
            // 将通道注册完这个事件往pipeline里传播
            ctx.pipeline().fireChannelRegistered();

            // We are done with init the Channel, removing all the state for the Channel now.
            removeState(ctx);
        } else {
            ctx.fireChannelRegistered();
        }
    }

    /**
     * Handle the {@link Throwable} by logging and closing the {@link Channel}. Sub-classes may override this.
     */
    @Override
    public void exceptionCaught(ChannelHandlerContext ctx, Throwable cause) throws Exception {
        if (logger.isWarnEnabled()) {
            logger.warn("Failed to initialize a channel. Closing: " + ctx.channel(), cause);
        }
        ctx.close();
    }

    /**
     * {@inheritDoc} If override this method ensure you call super!
     */
    @Override
    public void handlerAdded(ChannelHandlerContext ctx) throws Exception {
        if (ctx.channel().isRegistered()) {
            // This should always be true with our current DefaultChannelPipeline implementation.
            // The good thing about calling initChannel(...) in handlerAdded(...) is that there will be no ordering
            // surprises if a ChannelInitializer will add another ChannelInitializer. This is as all handlers
            // will be added in the expected order.
            if (initChannel(ctx)) {

                // We are done with init the Channel, removing the initializer now.
                removeState(ctx);
            }
        }
    }

    @Override
    public void handlerRemoved(ChannelHandlerContext ctx) throws Exception {
        initMap.remove(ctx);
    }

    @SuppressWarnings("unchecked")
    private boolean initChannel(ChannelHandlerContext ctx) throws Exception {
        if (initMap.add(ctx)) { // Guard against re-entrance.
            try {
                // 调用抽象方法initChannel(channel)
                initChannel((C) ctx.channel());
            } catch (Throwable cause) {
                // Explicitly call exceptionCaught(...) as we removed the handler before calling initChannel(...).
                // We do so to prevent multiple calls to initChannel(...).
                exceptionCaught(ctx, cause);
            } finally {
                ChannelPipeline pipeline = ctx.pipeline();
                if (pipeline.context(this) != null) {
                    pipeline.remove(this);
                }
            }
            return true;
        }
        return false;
    }

    // 将Channelhandler从initMap中移除
    private void removeState(final ChannelHandlerContext ctx) {
        // The removal may happen in an async fashion if the EventExecutor we use does something funky.
        if (ctx.isRemoved()) {
            initMap.remove(ctx);
        } else {
            // The context is not removed yet which is most likely the case because a custom EventExecutor is used.
            // Let's schedule it on the EventExecutor to give it some more time to be completed in case it is offloaded.
            ctx.executor().execute(new Runnable() {
                @Override
                public void run() {
                    initMap.remove(ctx);
                }
            });
        }
    }
}
对于ChannelInboundHandlerAdapter这个抽象类来说,已经实现了ChannelInboundHandler这个接口的所有方法了,而ChannelOutboundHandlerAdapter抽象类同样已经实现了ChannelOutboundHandler接口的所有方法,因此继承了ChannelInitializer的实现类,只需要实现initChannel(Channel ch)方法即可。
下面看一个ChannelInitializer的例子
public class HttpHelloWorldServerInitializer extends ChannelInitializer<SocketChannel> {

    private final SslContext sslCtx;

    public HttpHelloWorldServerInitializer(SslContext sslCtx) {
        this.sslCtx = sslCtx;
    }

    @Override
    public void initChannel(SocketChannel ch) {
        ChannelPipeline p = ch.pipeline();
        if (sslCtx != null) {
            p.addLast(sslCtx.newHandler(ch.alloc()));
        }
        p.addLast(new HttpServerCodec());
        p.addLast(new HttpServerExpectContinueHandler());
        p.addLast(new HttpHelloWorldServerHandler());
    }
}
由上面的例子知道,对于initChannel(Channel ch)方法而言,主要是用于往pipeline中添加ChannelHandler的。
ChannelHandlerContext接口定义
public interface ChannelHandlerContext extends AttributeMap, ChannelInboundInvoker, ChannelOutboundInvoker {

    /**
     * 获得一个channel对象
     */
    Channel channel();

    /**
     * 获取一个EventExecutor对象,这里实际获得的是NioEventLoop
     */
    EventExecutor executor();

    /**
     * 获取ChannelHandler的名称
     */
    String name();

    /**
     * 绑定在ChannelHandlerContext上的ChannelHandler
     */
    ChannelHandler handler();

    boolean isRemoved();

    @Override
    ChannelHandlerContext fireChannelRegistered();

    @Override
    ChannelHandlerContext fireChannelUnregistered();

    @Override
    ChannelHandlerContext fireChannelActive();

    @Override
    ChannelHandlerContext fireChannelInactive();

    @Override
    ChannelHandlerContext fireExceptionCaught(Throwable cause);

    @Override
    ChannelHandlerContext fireUserEventTriggered(Object evt);

    @Override
    ChannelHandlerContext fireChannelRead(Object msg);

    @Override
    ChannelHandlerContext fireChannelReadComplete();

    @Override
    ChannelHandlerContext fireChannelWritabilityChanged();

    @Override
    ChannelHandlerContext read();

    @Override
    ChannelHandlerContext flush();

    /**
     * 获取pipeline
     */
    ChannelPipeline pipeline();

    /**
     * 获取一个内存分配器
     */
    ByteBufAllocator alloc();

    /**
     * @deprecated Use {@link Channel#attr(AttributeKey)}
     */
    @Deprecated
    @Override
    <T> Attribute<T> attr(AttributeKey<T> key);

    /**
     * @deprecated Use {@link Channel#hasAttr(AttributeKey)}
     */
    @Deprecated
    @Override
    <T> boolean hasAttr(AttributeKey<T> key);
}
可以看到ChannelHandlerContext分别继承了ChannelInboundInvoker和ChannelOutboundInvoker接口,在分析Channelpipeline章节时,介绍过其二者定义的功能,ChannelInboundInvoker多以fireXxxx方法构成,代表的是触发的Xxx事件的传播,例如:
    @Override
    public ChannelHandlerContext fireChannelRegistered() {
        invokeChannelRegistered(findContextInbound(MASK_CHANNEL_REGISTERED));
        return this;
    }
fireChannelRegistered方法就是触发了ChannelRegistered事件能够在ChannelPipeline中进行传播。
而ChannelOutboundInvoker多以socket的绑定、连接、读和写为住,常见的方法由write、flush以及writeAndFlush。
    @Override
    public ChannelFuture writeAndFlush(Object msg, ChannelPromise promise) {
        write(msg, true, promise);
        return promise;
    }
按照Netty架构的习惯,在给定一个接口之后,一般都会有对应的公共抽象类来定义公共的方法,并将需要定制的方法定义为抽象方法供不同的子类实现,照着这个思路可以找到AbstractChannelHandlerContext这个抽象类。
成员变量定义
在分析AbstractChannelHandlerContext源码之前,我们先看下它的成员变量定义,入下图所示,定义了两个volatile对象:
- volatile AbstractChannelHandlerContext next
- volatile AbstractChannelHandlerContext prev
这两个AbstractChannelHandlerContext对象作为指针实现了ChannelPipeline作为双向链表的数据结构。
    private static final AtomicIntegerFieldUpdater<AbstractChannelHandlerContext> HANDLER_STATE_UPDATER =
AtomicIntegerFieldUpdater.newUpdater(AbstractChannelHandlerContext.class, "handlerState");关于XxxFieldUpdater类,可以阅读:https://my.oschina.net/u/4072299/blog/3115164
接着是AbstractChannelHandlerContext的状态:
- private static final int ADD_PENDING = 1
- private static final int ADD_COMPLETE = 2
- private static final int REMOVE_COMPLETE = 3
ADD_PENDING表示正在调用handlerAdded,ADD_COMPLETE表示已经调用完成了handlerAdded,而REMOVE_COMPLETE表示已经调用完handlerRemoved方法。
而ChannelHandlerContext中还会存有ChannelPipeline。
private final DefaultChannelPipeline pipeline还有一个handlerState变量,用于定义当前ChannelHandler对象的状态,初始为INIT状态,表示handlerAdded和handlerRemove都还未调用过。
private volatile int handlerState = INIT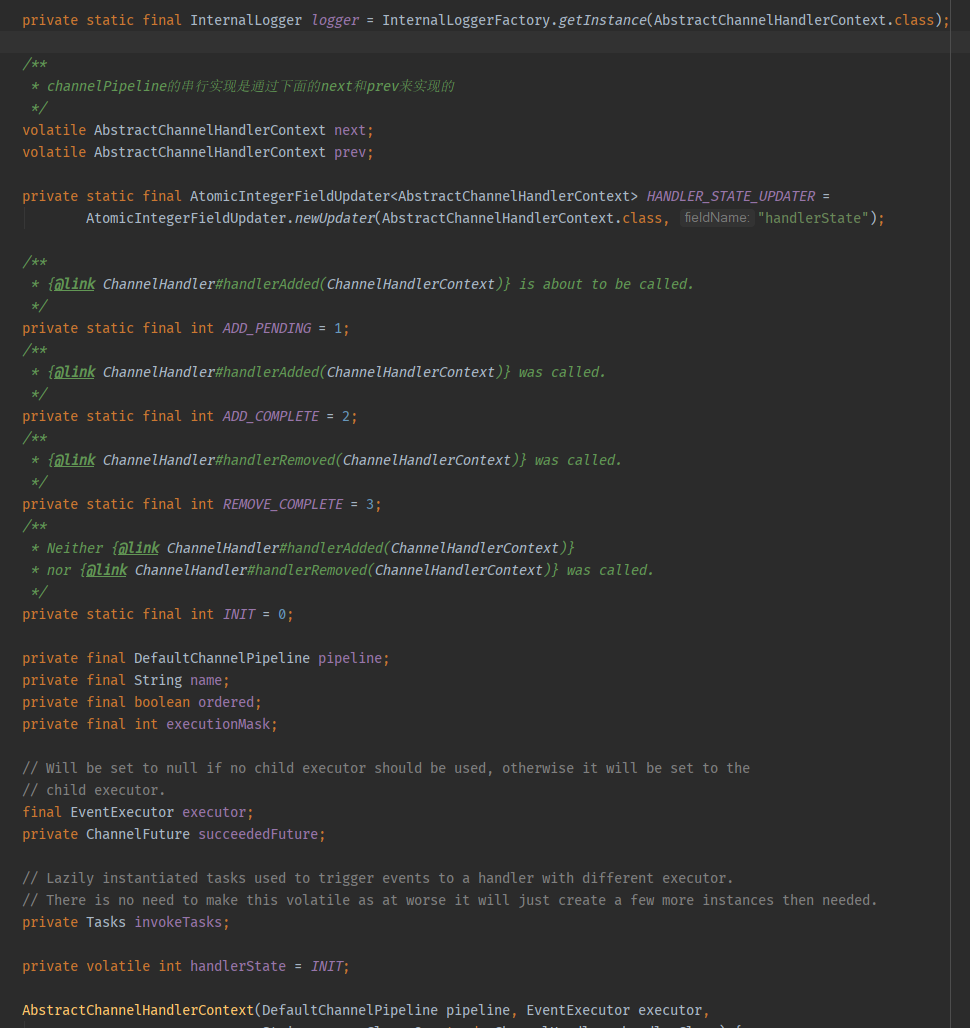
对于ChannelPipeline中的ChannelHandler是如何被调用以及如何移动双向链表中的对象的,实现原理就在这几个方法之间:
AbstractChannelHandlerContext.java
    /*
     * 触发ChannelActive事件
     */
    @Override
    public ChannelHandlerContext fireChannelActive() {
        invokeChannelActive(findContextInbound(MASK_CHANNEL_ACTIVE));
        return this;
    }

    static void invokeChannelActive(final AbstractChannelHandlerContext next) {
        // 获取NioEventLoop线程
        EventExecutor executor = next.executor();
        // 如果获取到的NioEventLoop线程是当前的线程
        if (executor.inEventLoop()) {
            next.invokeChannelActive();
        } else {
            // 另开一个线程去执行
            executor.execute(new Runnable() {
                @Override
                public void run() {
                    next.invokeChannelActive();
                }
            });
        }
    }

    private void invokeChannelActive() {
        // 检查ChannelHandler的状态
        if (invokeHandler()) {
            try {
                ((ChannelInboundHandler) handler()).channelActive(this);
            } catch (Throwable t) {
                invokeExceptionCaught(t);
            }
        } else {
            // 遍历下一个节点,重新调用下一个节点
            fireChannelActive();
        }
    }

    /*
     * 找到inbound节点
     */
    private AbstractChannelHandlerContext findContextInbound(int mask) {
        AbstractChannelHandlerContext ctx = this;
        // 拿到当前的NioEventLoop线程
        EventExecutor currentExecutor = executor();
        do {
            // 获取ChannelPipeline中的next节点
            ctx = ctx.next;
        } while (skipContext(ctx, currentExecutor, mask, MASK_ONLY_INBOUND));
        return ctx;
    }

    // 判断是否跳过此节点
    private static boolean skipContext(
            AbstractChannelHandlerContext ctx, EventExecutor currentExecutor, int mask, int onlyMask) {
        return (ctx.executionMask & (onlyMask | mask)) == 0 ||
                (ctx.executor() == currentExecutor && (ctx.executionMask & mask) == 0);
    }
当调用来到
((ChannelInboundHandler) handler()).channelActive(this);会触发下一个Handler的channelActive,此处就拿Tail节点的channelActive来分析。
    @Override
    public void channelActive(ChannelHandlerContext ctx) {
        ctx.fireChannelActive();
        readIfIsAutoRead();
    }
可以看到,调用又来到了ChannelHandlerContext#fireChannelActive,这样又要进行节点的遍历,就这样把事件传播了下去。
由于篇幅原因,剩余ChannelPipeline的分析放在下一篇进行。