Current document contains tip to help and understand the first steps that needed to be performed to build custom images with different JetBrains IDEs.
In order to build the container images locally, make sure, that Docker version is 18.09 or higher, since the build scripts use Docker BuildKit.
For macOS users, it is needed to ensure that
gnu-getoptis installed in the system.
In order to build the container image with the custom JetBrains IDE distribution, there is an ability to pass particular distribution through the --tag and --url parameters to ./projector.sh build.
The complete command looks:
./projector build --tag name:tag --url downloadUrlThis command will perform the build of name:tag image with the given IDE distribution provided by downloadUrl. This download URL should point to tar.gz packaging. For example, navigate to download page, click "Other versions" and copy the link for the IDE packaging. Please ensure that you select tar.gz with JBR, not without.
Then, it is only need to call ./projector.sh run command to run the container locally:
./projector.sh run name:tagAfter that, navigate to http://localhost:8887, to access the JetBrains IDE.
Below you can find a few examples how to build different JetBrains IDEs using --url parameter:
-
Build the container image with WebStorm 2020.3.3
$ git clone https://github.com/che-incubator/jetbrains-editor-images && cd jetbrains-editor-images
$ ./projector.sh build --tag che-webstorm:latest --url https://download.jetbrains.com/webstorm/WebStorm-2020.3.3.tar.gz
$ ./projector.sh run che-webstorm:latest
-
Build the container image with PyCharm Community 2020.3.5
$ git clone https://github.com/che-incubator/jetbrains-editor-images && cd jetbrains-editor-images
$ ./projector.sh build --tag che-pycharm:latest --url https://download.jetbrains.com/python/pycharm-community-2020.3.5.tar.gz
$ ./projector.sh run che-pycharm:latest
-
Build the container image with IntelliJ IDEA Ultimate 2020.2.2
$ git clone https://github.com/che-incubator/jetbrains-editor-images && cd jetbrains-editor-images
$ ./projector.sh build --tag che-idea-ultimate:latest --url https://download.jetbrains.com/idea/ideaIU-2020.2.2.tar.gz
$ ./projector.sh run che-idea-ultimate:latest
After performing any build scenario, which provided above, navigate to http://localhost:8887, to access the JetBrains IDE.
It is also available to select predefined IDE distribution from the wizard during image build. When --tag or --url parameters are ommitted, then select wizard is called. Predefined configurations, that are currently supported are provided in compatible-ide.json.
The complete command looks:
./projector.sh buildThis command will prompt user to select the IDE packaging to build:
[info] Select the IDE package to build (default is 'IntelliJ IDEA Community'):
       1) IntelliJ IDEA Community
       2) PyCharm Community
Then prompt to choose IDE packaging version to build (in case of selecting default choice):
[info] Select the IDE package version to build (default is '2020.3.3'):
       1) 2020.3.3
       2) 2020.3.2
3) 2020.3.1The next step will be tag and push the resulting image by adding your namespace using the following command pattern:
$ docker tag <containerName>:latest <username>/<containerName>:latest
$ docker push <username>/<containerName>:latest
for example:
$ docker tag che-pycharm:latest superuser/che-pycharm:latest
$ docker push superuser/che-pycharm:latest
Make sure, that you are logged in using
$ docker logincommand to be able to push an image to your namespace.
Now it is possible to use the built image as Che Editor in Eclipse Che. One way to do that is to create a file named che-editor.yaml under the folder .che in the project repository. Bellow you can find an example for che-editor.yaml based on the IntelliJ IDEA Community Edition:
inline:
  schemaVersion: 2.1.0
  metadata:
    name: IntelliJ IDEA Community Edition
  commands:
    - id: init-container-command
      apply:
        component: che-idea-injector
  events:
    preStart:
      - init-container-command
  components:
    - name: che-idea-runtime-description
      container:
        image: 'quay.io/devfile/universal-developer-image:ubi8-eda6672'
        command:
          - /projector/entrypoint-volume.sh
        env:
          - name: PROJECTOR_ASSEMBLY_DIR
            value: /projector
          - name: PROJECTOR_CONFIG_DIR
            value: /home/user/.jetbrains
        volumeMounts:
          - name: projector-volume
            path: /projector
        memoryLimit: 2048Mi
        memoryRequest: 256Mi
        cpuLimit: 500m
        cpuRequest: 30m
        endpoints:
          - name: intellij
            attributes:
              type: main
              cookiesAuthEnabled: true
              discoverable: false
              urlRewriteSupported: true
            targetPort: 8887
            exposure: public
            path: '/?backgroundColor=434343&wss'
            secure: false
            protocol: http
      attributes:
        app.kubernetes.io/component: che-idea-injector
        app.kubernetes.io/part-of: che-idea.eclipse.org
    - name: projector-volume
      volume: {}
    - name: che-idea-injector
      container:
        image: 'quay.io/che-incubator/che-idea:2020.3.4-next'
        command: ["/projector/entrypoint-init-container.sh"]
        env:
          - name: PROJECTOR_VOLUME_MOUNT
            value: /projector-volume
          - name: PROJECTOR_ASSEMBLY_DIR
            value: /projector
        volumeMounts:
          - name: projector-volume
            path: /projector-volume
        memoryLimit: 128Mi
        memoryRequest: 32Mi
        cpuLimit: 500m
cpuRequest: 30mActivation code for offline usage is a file with license code, that can be retrieved from the license management section of your JetBrains Account, for the license that is assigned to you. When you purchase a personal subscription or are assigned a commercial subscription by your organization, you'll be sent an email prompting you to create a JetBrains Account that becomes connected with the license.
Note: if you are using an activation code to activate a Product, you will need to generate a new activation code and apply it to your product each time the subscription is renewed.
IntelliJ IDEA Community and PyCharm Community doesn't require this procedure, as they are free.
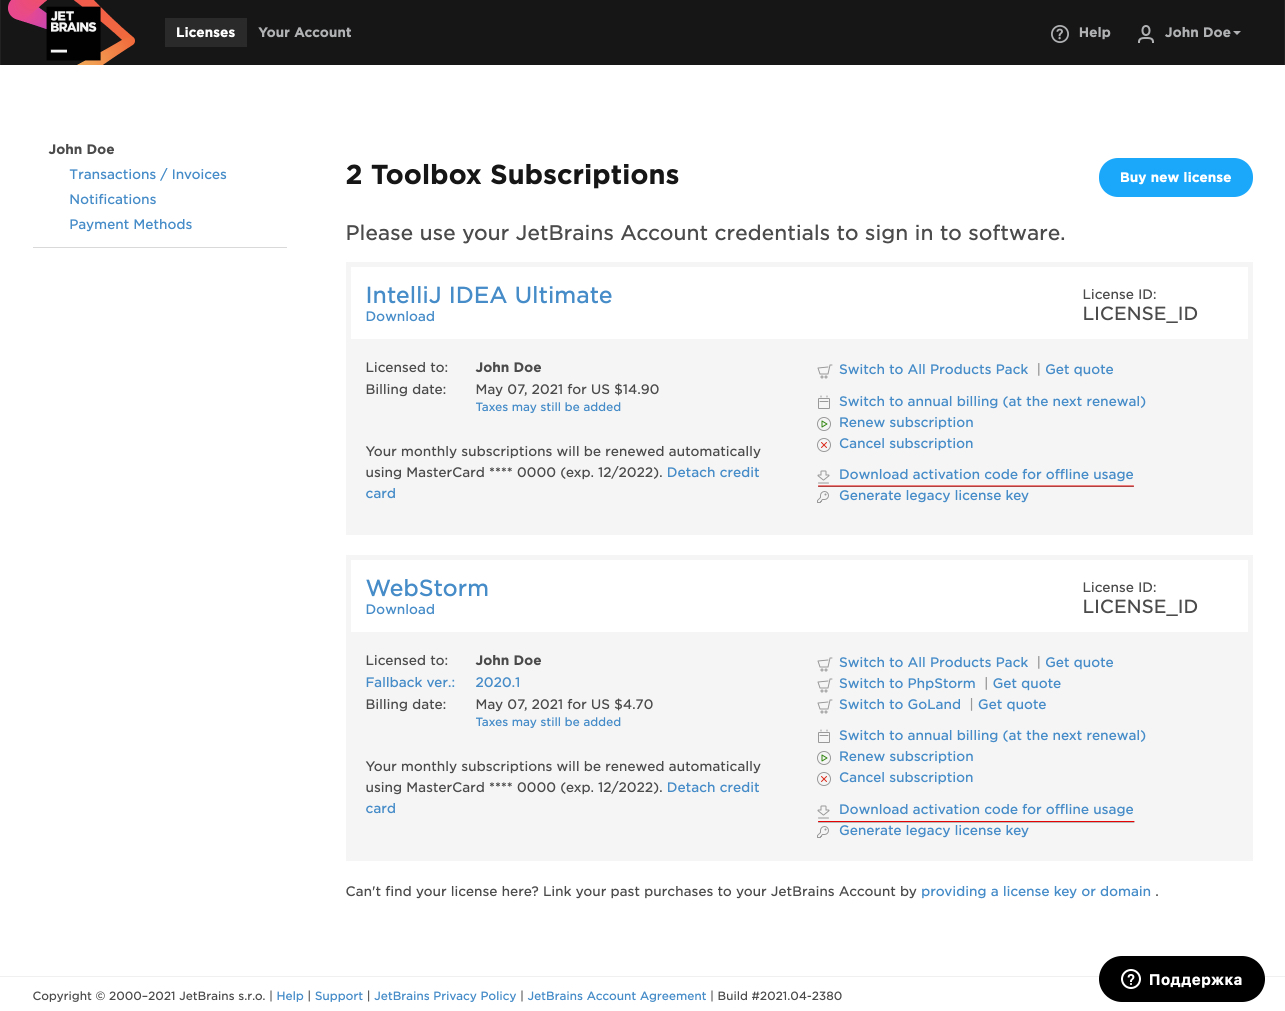
Activation code can be retieved from JetBrains account:
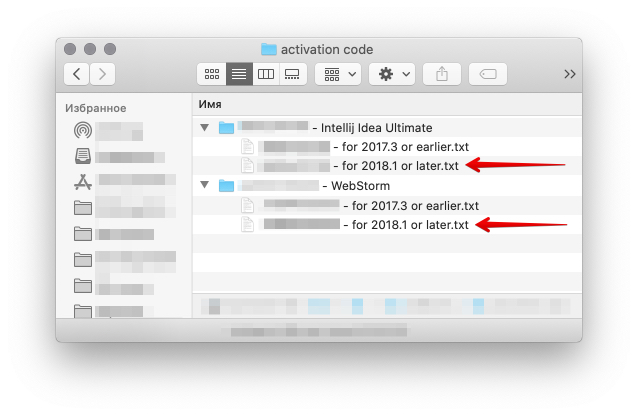
JetBrains provides zip archive with two types of activation code. <License ID> - for 2018.1 or later.txt file should be used.
When you run the container on your local machine, it is possible to provide the activation code for offline usage to register the JetBrains IDE. The container image contains scripts, which perform this operation. You only need to map the activation codes, that are located on your host, as volume mounts when running the container with Docker. For example:
$ docker run --env DEV_MODE=true --rm -p 8887:8887 -v <path to text file on your host>:/tmp/<product>.key -it <containerName>Mount path /tmp/<product>.key should be used according to the JetBrains product used in the Docker image. For example:
/tmp/idea.key/tmp/pycharm.key/tmp/webstorm.key/tmp/phpstorm.key/tmp/goland.key
Since Eclipse Che runs in Kubernetes environment, it is possible to provision the activation code for offline usage with Kubernetes Secrets.
To understand what is a Kubernetes Secret and how to operate it, see: Kubernetes Documentation
Let's create a Kubernetes Secret, that will instruct Eclipse Che to mount the activation code into container which is based on the JetBrains specific product:
apiVersion: v1
kind: Secret
metadata:
  name: jetbrains-offline-activation-code
  labels:
    controller.devfile.io/mount-to-devworkspace: 'true'
    controller.devfile.io/watch-secret: 'true'
  annotations:
    controller.devfile.io/mount-path: /tmp/
    controller.devfile.io/mount-as: file
data:
  idea.key: <base64 encoded data content here>
  pycharm.key: <base64 encoded data content here>
  webstorm.key: <base64 encoded data content here>
  phpstorm.key: <base64 encoded data content here>
  goland.key: <base64 encoded data content here>
