![]()
![]()
![]()
![]()
Medusa on steroid, take your medusa project to the next level with some badass features 🚀
The extender provides an out-of-the-box application architecture which allows developers and teams to create highly testable, scalable, loosely coupled, and easily maintainable applications.
In also increase medusa extensibility and customisation for special use cases. It comes with handy
decorators approach to increase the DX and full typings support for easier development. It is a complement to medusa but not a replacement 🚀


- Introduction
- Getting started 🚀
- Application Architecture
- CLI
medex - Full code API 🔍
- API documentation 💡
- Starters
- Internal modules (Optional)
- Resources
- Discussions
- Like my work? 💓
- Contribute
Medusa is an open source headless commerce platform that allows you to create your own store in a matter of minutes. Part of what makes Medusa a good choice for your ecommerce store is its extensibility. Now, it is also possible to create multi-vendor marketplaces using Medusa but you can also do so much more.
👉 And here is why I've done that package for medusa
"I've been looking for an e-commerce solution that could provide me with some core features while being fully customisable... After some research, where I found that none of the present solutions could provide what I needed, I chose Medusa as it provided me with many of the needed features while being easy to extend. I ended up loving the community atmosphere, especially the proximity with the team, and have been helping those in the community looking for a similar fully-customisable solution by sharing a part of my private project. This is how the medusa-extender was born." — Adrien de Peretti
Depending on your situation, pick the right getting started section.
In that case, you must already have scaffold a new medusa store project. If that's not the case you can follow the tutorial here.
Run the following command in your terminal (The last version is 1.6.1)
npm install medusa-extender
./node_modules/.bin/medex init
That's it, you are now ready to run your server 🚀
Note: The default port is 9000, if you want to run the server on a custom port update medusa-config.js as follows:
module.exports = {
  /* ... */
  serverConfig:{
    port: <PORT_NUMBER>
  }
  /* ... */
};
You can directly clone the starters/server to get started quickly.
First, update your medusa-config.js accordingly to your needs.
Then, follow the next command to be ready in minutes
npx degit github:adrien2p/medusa-extender/starters/server#main server
cd server
npm i
npm run build
npm run start
That's it, your server is now up and running 🚀
Using this package help you organise your code in a module approach. That means that you can go for a modular architecture and decoupled your code depending on your domains.
Here is the proposed folder structure that you can add to your medusa project
.
├── ...
├── src                                 # Here are located all the files that make your application
│   ├── modules                         # Where you can put all your modules using the medusa-extender
|       ├── Module1
|           ├── module1.entity.ts
|           ├── module1.migration.ts
|           ├── module1.service.ts
|           ├── module1.repository.ts
|           ├── module1.middleware.ts
|           ├── module1.module.ts       # This is where the above components are referenced
|           ├── ...
|       ├── Module2
|           ├── ...
|       ├── Module3
|           ├── ...
│   ├── main.ts                         # this is where the magic happen and your modules will be passed to the load method
└── ...
To install the cli globally instead of using the local one, you can run the following command
npm i -g medusa-extenderTo make things easier for you, the project comes with a CLI that allow you to generate any component with minimum code implementation and also to be able to run the migrations and show the list of applied and to be applied migrations.
| Name | Alias | Description |
|---|---|---|
init |
-i |
Create or update your medusa project configuration in order to gives you a working api using the medusa-extender. |
migrate |
m |
Migrate the migrations that has not been applied yet. Can also show you the migrations already applied and to be applied. |
generate |
g |
Generate a new component among: module, service, entity, repository, migration, validator, router, middleware |
Each time a component is generated, the cli will try to find the closest module to
that newly created component and add it to the imports list automatically.
./node_modules/.bin/medex g [option]| Name | Alias | Description |
|---|---|---|
<name> |
Component name to generate | |
--module |
-m |
Generate a new module. |
--middleware |
-mi |
Generate a new middleware. |
--service |
-s |
Generate a new service. |
--router |
-r |
Generate a new router. |
--entity |
-e |
Generate a new entity. |
--repository |
-re |
Generate a new repository. |
--migration |
-mi |
Generate a new migration. |
--validator |
-va |
Generate a new validator. |
--path |
-p |
specify the path where the component must be generated (by default the component will be generated at [src/modules/<name>/<name>.<type>.ts]. |
Lets run the following command
./node_modules/.bin/medex g -m myModuleThis command will generate a new myModule component. Without specifying the path (-p)
where to generate the component, the cli will automatically create the directory myModule under src.
The result will be the generation of the module component at src/modules/myModule/myModule.module.ts.
./node_modules/.bin/medex m [option]In order to be flexible you can specify complement path to the migration files
in your medusa-config.js file using the cliMigrationsDirs config.
It can be useful when you have installed some external modules that contains migrations. In that case, you can specify the relative paths and globs to the plugin/shareable module migrations.
Let see an example
modules.exports = {
    /* ... */
    projectConfig: {
        /* ... */
        cliMigrationsDirs: ['node_modules/external-module/dist/**/*.migration.js']
        /* ... */
    }
    /* ... */
}| Name | Alias | Description |
|---|---|---|
--run |
-r |
Run migrations up method. |
--show |
-s |
Show all applied and non applied migrations. |
If you want to access to the code documentation generated by typedoc you can follow that link
Here, We will see the different tools that the extender provides you in order to allow you to customise your medusa api according to your needs.
Lets start with the decorators. They are the main API you will use in your project. Let see each of the decorators that are available and what are there purpose.
📕 Here is a summary of whats coming in the following sections:
| Decorator | Parameters | Description |
|---|---|---|
@Entity |
{ resolutionKey?: string; override?: Type<TOverride>; } |
Allow to create a new entity or to override an existing entity from medusa. |
@Repository |
{ resolutionKey?: string; override?: Type<TOverride>; } |
Allow to create a new custom repository or to override an existing custom repository from medusa. |
@Service |
{ scope?: LifetimeType; resolutionKey?: string; override?: Type<TOverride>; } |
Allow to create a new service or to override an existing service from medusa. |
@Middleware |
{ requireAuth: boolean; routes: MedusaRouteOptions[]; } |
Allow to apply a custom middleware that will be resolve before or after the authentication on the specified routes. |
@Router |
{ requiredAuth: boolean; method: MedusaRouteMethods; path: string; handlers: ((...args: unknown[]) => void)[]; } |
Allow to register new custom routes with a set of handlers. |
@Validator |
{ override: Type<TOverride>; } |
Allow to override an existing validator from medusa. |
@Migration |
Create a new migration to applied for your entity modifications. | |
@Module |
{ imports: Type[] } |
Import all previous components including modules. |
@OnMedusaEntityEvent.When.Action |
take an entity and an option object such as { async: boolean; metatype?: Type; } |
Emit and listen to entity subscriber events. |
This decorator gives you the ability to either create a new entity that will then be handled by medusa or, to override an existing entity in order to add some custom fields or other stuff in it.
👉 Create a new entity
In some cases, you will need to create new entity in order to represent a custom data model that correspond to a specific need of yours.
Let see an example
import { Column, Entity } from "typeorm";
import { Entity as MedusaEntity } from "medusa-extender";

@MedusaEntity()
@Entity()
export class MyCustomEntity {
    @Column()
    name: string;
}
@MedusaEntitydecorator will only be used by medusa in order to store that entity into the container. The stored entity will then be added to typeorm.
👉 Override an existing entity
There is other cases where you will need to extends an existing entity provided by medusa. In those cases, medusa does not provides a way to do that (not event typeorm).
For example, you would like to add a new field to the product entity in order to store
the store_id.
Let see an example
import { Column, Entity } from "typeorm";
import { Product as MedusaProduct } from '@medusa/medusa/dist';
import { Entity as MedusaEntity } from "medusa-extender";

@MedusaEntity({ override: MedusaProduct })
@Entity()
export class Product extends MedusaProduct {
    @Column()
    customField: string;
}
The
overrideparameter of the@MedusaEntitydecorator allow to specify which entity from the core must be overridden.
This decorator gives you the ability to either create a new custom repository that will then be handled by medusa or, to override an existing custom repository in case you've overridden and existing entity as seen in the previous section.
👉 Create a new custom repository
In some cases, you will need to create new custom repository in order to interact with your custom entity and being able to add some custom logic related to that entity.
Let see an example
import { Repository as MedusaRepository } from "medusa-extender";
import { EntityRepository, Repository } from "typeorm";
import { MyCustomEntity } from "./custom.entity";

@MedusaRepository()
@EntityRepository(MyCustomEntity)
export default class MyCustomRepository extends Repository<MyCustomEntity> {}
@MedusaRepositorydecorator will only be used by medusa in order to store that custom repository into the container. The stored repository will be accessible through the dependency injection in any of your services. You can also access the container to resolve a dependency in your routes handler throughreq.scope.resolve('myCustomRepository').
👉 Override an existing custom repository
There is other cases where you will need to extends an existing custom repository provided by medusa in order to reflect the changes you've made with the custom entity. Also, it will allow you to extends custom logic that could have been implemented in the custom repository by the medusa core.
To follow the previous example, we need to create a custom repository that extends the one provided by medusa to manage our extended entity created in the previous section.
Let see an example
import { ProductRepository as MedusaProductRepository } from "@medusajs/medusa/dist/repositories/product";
import { Repository as MedusaRepository, Utils } from "medusa-extender";
import { EntityRepository } from "typeorm";
import { Product } from "./product.entity";

@MedusaRepository({ override: MedusaProductRepository })
@EntityRepository(Product)
export default class UserRepository extends Utils.repositoryMixin<Product, MedusaProductRepository>(MedusaProductRepository) {}
The
overrideparameter of the@MedusaRepositorydecorator allow to specify which custom repository from the core must be overridden. You can also access the container to resolve a dependency in your routes handler throughreq.scope.resolve('key').
The
Utils.repositoryMixinis a special utility exported by the extender that allow multiple class inheritance. This is mandatory to be able to extend an existing custom repository.
This decorator allow you to apply new migrations. That can be used to update an existing entity that you've extended or a new entity that you've created. The migration is manage by typeorm and work as usual.
Let see an example
import { MigrationInterface, QueryRunner } from 'typeorm';
import { Migration } from 'medusa-extender';

@Migration()
export default class addCustomFieldToProduct1611063162649 implements MigrationInterface {
    public async up(queryRunner: QueryRunner): Promise<void> {
        const query = `ALTER TABLE public."product"
            ADD COLUMN IF NOT EXISTS "customField" text;`;
        await queryRunner.query(query);
    }

    public async down(queryRunner: QueryRunner): Promise<void> {
        const query = `ALTER TABLE public."product"
            DROP COLUMN "customField";`;
        await queryRunner.query(query);
    }
}This decorator gives you the ability to either create a new service that will then be handled by medusa or, to override an existing service in case you need to add extra logic or to override existing logic to solve one of your problem.
👉 Create a new service
If you are currently adding a new feature on top of medusa or extending an existing feature that require to split the logic into another service, here is how you can achieve that.
Let see an example
import { Service } from 'medusa-extender';
import { EntityManager } from 'typeorm';

type ConstructorParams = {
    manager: EntityManager;
};

@Service()
export default class MyCustomService {
    static resolutionKey = 'myCustomService';

    private readonly manager: EntityManager;

    constructor(private readonly container: ConstructorParams) {
        this.manager = container.manager;
    }
}
@Servicedecorator will only be used by medusa in order to store that service into the container. The stored service will be accessible through the dependency injection in any of your other services. You can also access the container to resolve a dependency in your routes handler throughreq.scope.resolve('myCustomService').
The @Service decorator also accept a scope property that is of type LifetimeType.
The scope will be used by the container to manage that resource.
👉 Scoped service
In some cases, you'll maybe have register new resources to the container through a middleware.
Since those resources are registered during the request handling, it is only available
for newly created resources. The resources that use the scope with the value scoped are
re created for each new request.
Let's imagine that one of your middleware register the loggedInUser into the container
when a request hit a protected end point. If you need to be able to access that loggedInUser,
your service must be scoped in order to get a fresh cradle where your resources will be accessible.
Let see an example
import { Service } from 'medusa-extender';
import { EntityManager } from 'typeorm';
import { User } from '../user/user.entity';

type ConstructorParams = {
    loggedInUser: User;
    manager: EntityManager;
};

@Service({ scope: 'SCOPED' })
export default class MyCustomService {
    static resolutionKey = 'myCustomService';

    private readonly manager: EntityManager;

    constructor(private readonly container: ConstructorParams) {
        super(container);
        this.manager = container.manager;
    }

    public customMethod(): void {
        const loggedInUser = this.container.loggedInUser;
        console.log(loggedInUser);
    }
}
As you can see, we've added the loggedInUser to the ConstructorParamstype and
we are getting the loggedInUser through the container in the customMethod for a later
usage.
👉 Override an existing service
In some other case, you will need to override an existing service to either be able to add new functionalities or to add new logic using existing code blocks.
Let see an example
import { EntityEventType, MedusaEventHandlerParams, OnMedusaEntityEvent, Service } from 'medusa-extender';
import { ProductService as MedusaProductService } from '@medusajs/medusa/dist/services';
import { EntityManager } from 'typeorm';
import EventBusService from '@medusajs/medusa/dist/services/event-bus';
import { ProductVariantRepository } from '@medusajs/medusa/dist/repositories/product-variant';
import { ProductOptionRepository } from '@medusajs/medusa/dist/repositories/product-option';
import ProductVariantService from '@medusajs/medusa/dist/services/product-variant';
import ProductCollectionService from '@medusajs/medusa/dist/services/product-collection';
import { ProductTypeRepository } from '@medusajs/medusa/dist/repositories/product-type';
import { ProductTagRepository } from '@medusajs/medusa/dist/repositories/product-tag';
import { ImageRepository } from '@medusajs/medusa/dist/repositories/image';
import DefaultSearchService from '@medusajs/medusa/dist/services/search';
import ProductRepository from './product.repository';
import { Product } from './product.entity';
import { User } from '../user/user.entity';
import { FindConfig } from '@medusajs/medusa/dist/types/common';

interface ConstructorParams<TSearchService extends DefaultSearchService = DefaultSearchService> {
    loggedInUser: User;
    manager: EntityManager;
    productRepository: typeof ProductRepository;
    productVariantRepository: typeof ProductVariantRepository;
    productOptionRepository: typeof ProductOptionRepository;
    eventBusService: EventBusService;
    productVariantService: ProductVariantService;
    productCollectionService: ProductCollectionService;
    productTypeRepository: typeof ProductTypeRepository;
    productTagRepository: typeof ProductTagRepository;
    imageRepository: typeof ImageRepository;
    searchService: TSearchService;
}

@Service({ override: MedusaProductService, scope: 'SCOPED' })
export default class ProductService extends MedusaProductService {
    private readonly manager: EntityManager;

    constructor(private readonly container: ConstructorParams) {
        super(container);
        this.manager = container.manager;
    }

    @OnMedusaEntityEvent.Before.Insert(Product, { async: true })
    public async attachStoreToProduct(
        params: MedusaEventHandlerParams<Product, 'Insert'>
    ): Promise<EntityEventType<Product, 'Insert'>> {
        const loggedInUser = this.container.loggedInUser;
        const { event } = params;
        event.entity.store_id = loggedInUser.store_id;
        event.entity.handle = loggedInUser.store_id.replace('store_', '') + '-' + event.entity.handle;
        return event;
    }

    public prepareListQuery_(selector: Record<string, any>, config: FindConfig<Product>): object {
        if (Object.keys(this.container).includes('loggedInUser')) {
            selector['store_id'] = this.container.loggedInUser.store_id;
        }
        return super.prepareListQuery_(selector, config);
    }
}
The
overrideparameter of the@ProductServicedecorator allow to specify which service from the core must be overridden.
As we've seen in the previous section, the
scopevalue allow you to specify the behaviour of the resource that is managed by the container. In that case, the service will be re created for each new request in order for you to access theloggedInUseras we've seen in the previous section.
⚠️ You should have the less possible resources using thescopedlifetime to avoid lower performance, it must be used in special cases such as being able to access specific values that does exists only during the request processing.⚠️
The middleware decorator allow you to create new middleware on specific routes that can be handled before the authentication or after the authentication but always before your handler.
In this example, we will see how to get and store the loggedInUser into the container
through a new middleware (as we've used in the previous section).
Let see an example
import { MedusaAuthenticatedRequest, MedusaMiddleware, Middleware } from 'medusa-extender';
import { NextFunction, Response } from 'express';

import UserService from './user.service';

@Middleware({ requireAuth: true, routes: [{ method: "all", path: '*' }] })
export class LoggedInUserMiddleware implements MedusaMiddleware {
    public async consume(req: MedusaAuthenticatedRequest, res: Response, next: NextFunction): Promise<void> {
        if (req.user && req.user.userId) {
            const userService = req.scope.resolve('userService') as UserService;
            const loggedInUser = await userService.retrieve(req.user.userId, {
                select: ['id', 'your_custom_field'],
            });

            req.scope.register({
                loggedInUser: {
                    resolve: () => loggedInUser,
                },
            });
        }
        next();
    }
}
In this scenario, the middleware is applied after the medusa authentication strategy.
We need to be after the authentication to be able to be sure that the user is already
authenticated and that we have access to the userId.
This middleware is applied to all routes and will retrieve the authenticated user to store it in the underlying container. You will be then be able to get access to it into your servives as we've seen in the previous sections.
This decorator allow you to create new custom routes in your application.
Let see an example
import { Router } from 'medusa-extender';
import myCustomController from './myCustomController.controller';

@Router({
    routes: [
        {
            requiredAuth: true,
            path: '/admin/custom-route/',
            method: 'get',
            handlers: [myCustomController.handleCustomroute],
        },
    ],
})
export class DashboardRouter {}
In that example, we are attaching a new route on the admin, /admin/custom-route/.
This route will be handle by the custom controller. The custom controller is just
a class that provide some methods. The file export an instance of that class (which is not decorated).
In that particular case, to be able to access the route, the user need to be authenticated.
In some cases, when you override a service to extends its logic because you've added a custom field to an existing entity, you might encounter an error. When you use an existing route handling an entity that has been extended, medusa is not aware about that, and therefor the underlying validators does not take that in count.
To fix that problem, you can extend the underlying validator to add the constraint on your custom field and make medusa aware about it.
Let see and example
import { Validator } from 'medusa-extender';
import { AdminPostProductsReq } from '@medusajs/medusa/dist/api/routes/admin/products/create-product'
import { IsString } from 'class-validator';

@Validator({ override: AdminPostProductsReq })
class ExtendedClassValidator extends AdminPostProductsReq {
  @IsString()
  customField: string;
}
In that example, we imagine that you add a custom field on the product entity. But without doing anything else, medusa will handle it through the underlying handler for the creation but will now be aware of that field and therefor will take care of saving it. Otherwise, you will end up with an error thrown by the validator to tell you that this fields is not recognised.
This decorator allow to aggregate any modules and components in one place to simplify the usage by the medusa-extender loader and allows you to simplify you exports and organise your features by group.
Let see an example
import { Module } from 'medusa-extender';
import { Product } from './product.entity';
import ProductRepository from './product.repository';
import ProductService from './product.service';

@Module({
    imports: [
        Product,
        ProductRepository,
        ProductService
    ],
})
export class ProductModule {}
Then this module can be imported into the main file as the following example
import express = require('express');
const config = require('../medusa-config');
import { Medusa } from 'medusa-extender';
import { resolve } from 'path';
import { ProductModule } from './modules/product/product.module';

async function bootstrap() {
    const expressInstance = express();

    const rootDir = resolve(__dirname, '..');
    await new Medusa(rootDir, expressInstance).load([
        ProductModule
    ]);

    expressInstance.listen(config.serverConfig.port, () => {
        console.log('Server listening on port ' + config.serverConfig.port);
    });
}
bootstrap();It is also possible to create dynamic modules that enable to register component dynamically depending on some config or external call api for example.
Let see an example
import { Module } from 'medusa-extender';
import { Product } from './product.entity';
import ProductRepository from './product.repository';
import ProductService from './product.service';
import { MedusaDynamicModule,ModuleInjectionOptions } from "./types";

@Module(~~~~)
export class ProductModule implements MedusaDynamicModule {
    async forRoot(configModule: Record<string, unknown>): Promise<ModuleInjectionOptions> {
        return {
            imports: [
                Product,
                ProductRepository,
                ProductService
            ]
        };
    }
}
Then this module can be imported into the main file as the following example
import express = require('express');
const config = require('../medusa-config');
import { Medusa } from 'medusa-extender';
import { resolve } from 'path';
import { ProductModule } from './modules/product/product.module';

async function bootstrap() {
    const expressInstance = express();

    const rootDir = resolve(__dirname, '..');
    await new Medusa(rootDir, expressInstance).load([
        ProductModule
    ]);

    expressInstance.listen(config.serverConfig.port, () => {
        console.log('Server listening on port ' + config.serverConfig.port);
    });
}
bootstrap();This decorator is a special one and work in two ways, it allow to
- Emit a new event from a subscriber
- Listen to an event that has been emitted
Let see an example on how you can emit an event from a subscriber
import { Connection, EntitySubscriberInterface, EventSubscriber, InsertEvent } from 'typeorm';
import { eventEmitter, Utils, OnMedusaEntityEvent } from 'medusa-extender';
import { Product } from './product.entity';

@EventSubscriber()
export default class ProductSubscriber implements EntitySubscriberInterface<Product> {
    static attachTo(connection: Connection): void {
        Utils.attachOrReplaceEntitySubscriber(connection, ProductSubscriber);
    }

    public listenTo(): typeof Product {
        return Product;
    }

    public async beforeInsert(event: InsertEvent<Product>): Promise<InsertEvent<Product>> {
        return eventEmitter.emitAsync<InsertEvent<Product>>(OnMedusaEntityEvent.Before.InsertEvent(Product), {
            event,
            transactionalEntityManager: event.manager,
        });
    }
}
Here is how you can register it in medusa
import { NextFunction, Response } from 'express';
import {
    MEDUSA_RESOLVER_KEYS,
    MedusaAuthenticatedRequest,
    MedusaMiddleware,
    Middleware
} from 'medusa-extender';
import { Connection } from 'typeorm';
import ProductSubscriber from './product.subscriber';

@Middleware({ requireAuth: true, routes: [{ method: 'post', path: '/admin/products/' }] })
export class AttachProductSubscribersMiddleware implements MedusaMiddleware {
    public consume(req: MedusaAuthenticatedRequest, res: Response, next: NextFunction): void {
        const { connection } = req.scope.resolve(MEDUSA_RESOLVER_KEYS.manager) as {
            connection: Connection;
        };
        ProductSubscriber.attachTo(connection);
        return next();
    };
}
And finally, we will add a new handler to listen to this particular event
@Service({ override: MedusaProductService, scope: 'SCOPED' })
export default class ProductService extends MedusaProductService {
    private readonly manager: EntityManager;

    constructor(private readonly container: ConstructorParams) {
        super(container);
        this.manager = container.manager;
    }

    /* ... */

    @OnMedusaEntityEvent.Before.Insert(Product, { async: true })
    public async attachStoreToProduct(
        params: MedusaEventHandlerParams<Product, 'Insert'>
    ): Promise<EntityEventType<Product, 'Insert'>> {
        const loggedInUser = this.container.loggedInUser;
        const { event } = params;
        event.entity.store_id = loggedInUser.store_id;
        event.entity.handle = loggedInUser.store_id.replace('store_', '') + '-' + event.entity.handle;
        return event;
    }

    /* ... */

}
Here, we are listening to the product creation, and before the entity is
inserted into the database, we are retrieving the loggedInUser through the container
and attach the store_id to the product entity.
Here are the utilities that this package provides you.
this utility is used mainly by the subscriber in order to help you attach a new subscriber on the fly with ease.
It will take the connection as an argument and manage to remove the previous subscriber and attach the new one if needed.
See how to use it here.
This utility is mandatory when you extend an existing repository. Since that to be able to work the repository must extend multiple classes in order to reflect the original repository and the custom extension that you've made. See how to use it here.
The Omit utility allows you to omit a set of properties from a class.
In some cases, extending a class to change the type of a property makes
typescript complains about the typings. In such cases, omitting the parent
property in order to re-create it with your own type in the child class.
ATTENTION!! This usage must be done carefully to avoid to break things without noticing it.
Let see a use case where you want to override the type of an existing property from the parent class
import { Entity, Column } from 'typeorm';
import { Entity as MedusaEntity, Utils } from 'medusa-extender';
import { User as MedusaUser} from '@medusajs/medusa/dist/models';

enum UserRolesExtended {
    BRANCH_STAFF = 0
}

@MedusaEntity({ override: MedusaUser })
@Entity()
export class User extends Utils.Omit(MedusaUser, ['role']) {
    @Column({
        nullable: true,
        enum: UserRolesExtended,
        default: UserRolesExtended.BRANCH_STAFF}
    )
    role: UserRolesExtended;
}
In that repository, you will find two starters
The server starter is a medusa app that include the medusa-extender as well as an example of extending an existing feature.
Follow that link to go to the starter and see how to install it. Server
The plugin module starter is providing you a starting point to create your own plugin (shareable module).
Follow that link to go to the starter and see how to install it. Plugin module
The meudsa-extender comes with some internal modules that provide a simple but complete solution. With the time, it is possible that more internal modules will be provided.
If you choose to not use an internal module, none of its dependencies will be installed. The only time the dependencies are downloaded is at run time if you choose to use an internal module.
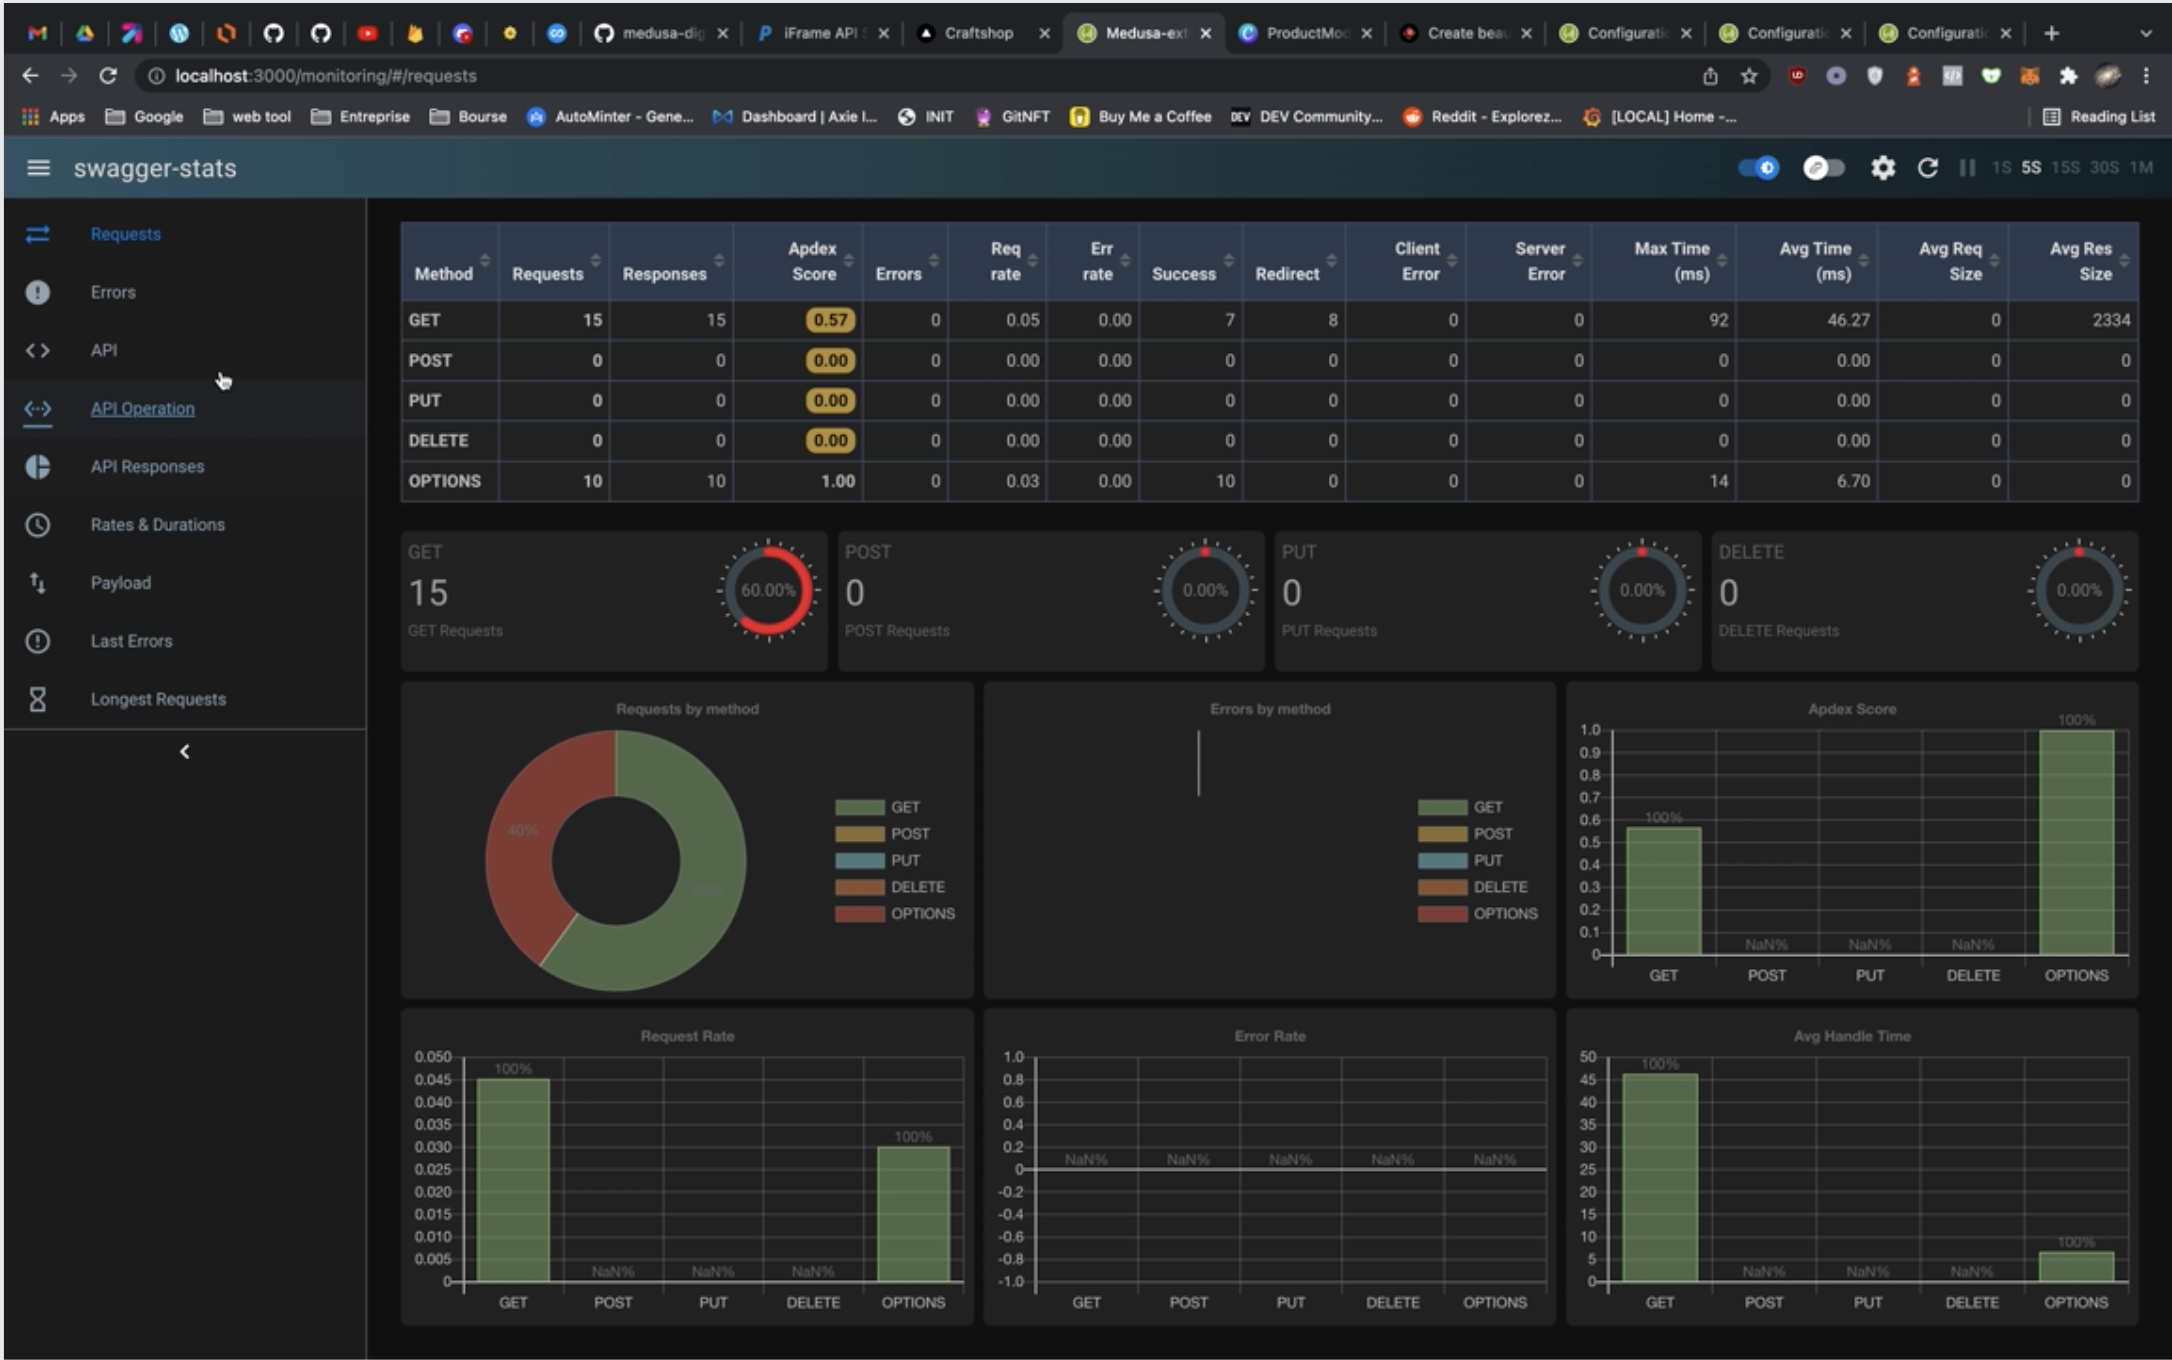
If you want to monitor whats going on on your app, you must specify the config
in your medusa-config file.
Here are the expected config
interface MonitoringOptions {
    version?: string;
    hostname?: string;
    ip?: string;
    timelineBucketDuration?: number;
    swaggerSpec?: string | OpenAPI.Document;
    uriPath: string;
    durationBuckets?: number[];
    requestSizeBuckets?: number[];
    responseSizeBuckets?: number[];
    apdexThreshold?: number;
    onResponseFinish?: (req: Request, res: Response, next: NextFunction) => void | Promise<void>;
    authentication?: boolean;
    sessionMaxAge?: number;
    elasticsearch?: string;
    onAuthenticate?: (req: Request, username: string, password: string) => boolean | Promise<boolean>;
}
so your medusa-config.js will looks like
const config = {
    /* ... */
    monitoring: {
        uriPath: '/monitoring'
    },
    /* ... */
};
Now, run your app and go to /monitoring url to get access to your dashboard.
For more information about the configuration, you can have a look at the documentation
👉 Here is a demo video
As part of the extender, you can choose to use a multi-tenancy architecture or a single-tenancy architecture depending on your needs.
Here is a schema of different architecture, with this module we are in the Multi-tenant 1 schema.

However, you must read some articles about pros and cons of this type of architecture and be fully aware of those before making your choice.
Here is the expected config
interface MultiTenancyOptions {
    enable: boolean;
    tenantCodeResolver: (req: MedusaRequest) => string;
}
so your medusa-config.js will looks like
const config = {
    /* ... */
    multiTenancy: {
        enable: true,
        tenantCodeResolver: (req) => req.headers['x-tenant']
    },
    /* ... */
};
Ant hat's it, you can now run your server and play around your multi-tenancy architecture.
Here are some resources that are using the medusa-extender, more of them will come in time 🚀.
Here is a tutorial repository that will be followed by a series of article to guide you
through the process of creating your marketplace using @medusajs and the medusa-extender.
Here is the link to the Marketplace tutorial repo and Here is the link to the Marketplace tutorial plugin
Here is the first tutorial using the medusa-extender package, Open source ecommerce platform for multi-vendor marketplaces
If you are interesting to participate in any discussions you can follow that links
This project needs a ⭐ from you. Don't forget to leave a star ⭐. If you found the package helpful consider supporting me with a coffee
Contributions are welcome! You can look at the contribution guidelines