You signed in with another tab or window. Reload to refresh your session.You signed out in another tab or window. Reload to refresh your session.You switched accounts on another tab or window. Reload to refresh your session.Dismiss alert
关于如何开发一个新的webpack插件,通过搜索可以发现,基本上很少有这方面的资料。除了官方文档里面的寥寥数语就只有几篇博客稍微介绍了一下。原因是编写webpack插件需要首先去通读compile和 compilation的源码,有一定的门槛。这里是官方的how to write a plugin的介绍。并且给出了一个插件的基本结构如下:
functionHelloWorldPlugin(options){// Setup the plugin instance with options...}HelloWorldPlugin.prototype.apply=function(compiler){compiler.plugin('done',function(){console.log('Hello World!');});};module.exports=HelloWorldPlugin;
functionFileListPlugin(options){}FileListPlugin.prototype.apply=function(compiler){compiler.plugin('emit',function(compilation,callback){// Create a header string for the generated file:varfilelist='In this build:\n\n';// Loop through all compiled assets,// adding a new line item for each filename.for(varfilenameincompilation.assets){filelist+=('- '+filename+'\n');}// Insert this list into the Webpack build as a new file asset:compilation.assets['filelist.md']={source: function(){returnfilelist;},size: function(){returnfilelist.length;}};callback();});};module.exports=FileListPlugin;
webpack中的插件
webpack中的插件主要是为webpack添加功能的,webpack中的每个插件都会在webpack启动时被安装一次,webpack主要是通过调用插件的apply方法来安装它们,插件可以完成更多loader不能完成的功能。插件的使用一般是在
webpack的配置信息plugins选项中指定。下面是一个简单的使用webpack插件的配置代码:如上面的配置信息所示,该配置文件使用了
extractTextplugin和WebpackMd5Hash这两个插件。关于webpack的更多插件信息可以移步这里.怎么样编写一个插件
关于如何开发一个新的webpack插件,通过搜索可以发现,基本上很少有这方面的资料。除了官方文档里面的寥寥数语就只有几篇博客稍微介绍了一下。原因是编写webpack插件需要首先去通读
compile和compilation的源码,有一定的门槛。这里是官方的how to write a plugin的介绍。并且给出了一个插件的基本结构如下:也就是需要定义一个含有
apply的原型方法的对象并将其导出。原因是这个apply方法在安装插件时将被webpack编译器调用一次,apply方法提供了一个对应的编译器对象的引用,从而可以在回调函数中访问到compile对象。但是这个文档也是写得很简单,所以笔者在接触和实践的时候还是花了很多时间去看已经有的webpack 插件的源码。编写webpack插件的关键部分是要在
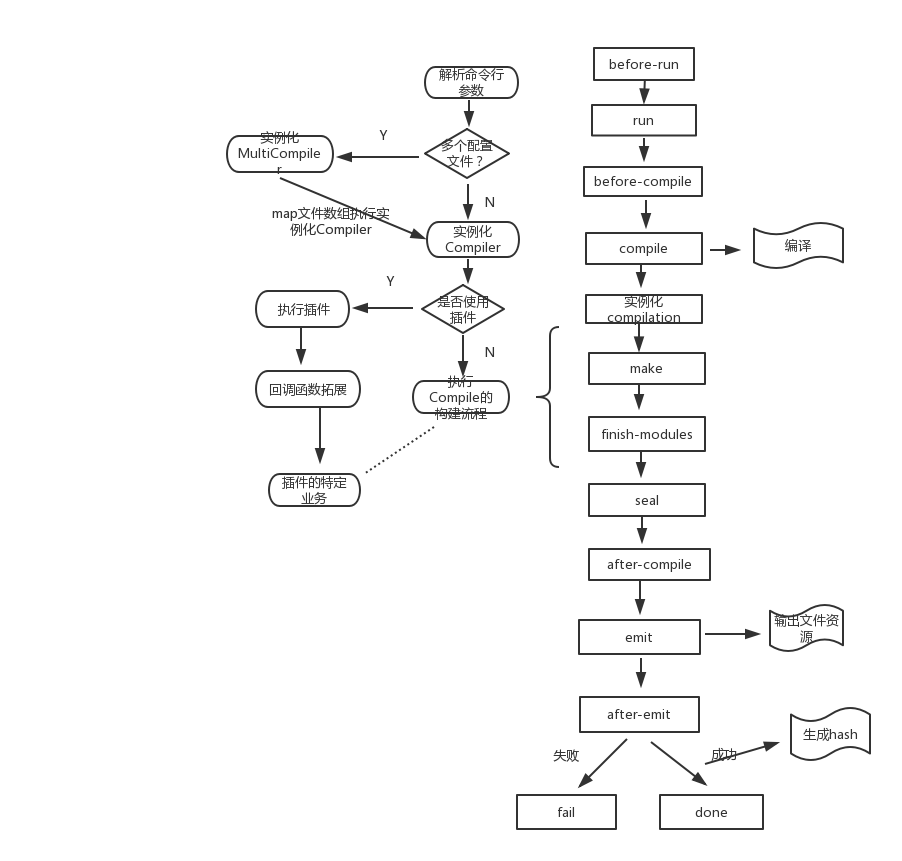
compile和compilation对象的构建流程中进行提供回调函数来进行拓展处理。关于compile和compilation的回调和信息,以及一些重要的对象,可以参考这里下面就根据下面这个例子来讲解:
上面这个例子主要是将
compilation生成的assets模块写进filelist.md这个文件中。上面是在compile对象的emit构建阶段提供来一个回调函数来进行拓展处理。查阅官方文档可以知道,emit流程时,编译器开始输出生成资源。这里是插件向
c.assets数组添加生成资源的最后机会,这样的话就会在指定目录中生成一个filelist.md文件,而不用自己去写fs.writeFileSync去生成该文件,而是借助于webpack帮我们生成。
当然根据开发人员不同的业务需求,对插件的要求不一样,所以可以在
compile和compilation的不同构建流程来提供一些拓展的回调函数,从而可以达到自己的业务需求。下面是笔者通过阅读源码而总结的从命令行敲入命令后,

webpack编译器执行的一系列流程:参考资料:
The text was updated successfully, but these errors were encountered: