- Homebrew
- VSCode
- iTerm2
- iTerm2 Configuration
- iTerm2 Themes
- Zshell
- Zshell Agnoster Theme - Discussion
- Zshell Agnoster Theme - Extra Config
- Zshell Dracula Theme
- imgur
- XCode and Command Line Tools
- Homebrew
- VSCode
- Alias
- Git
- Node.js
- PostgreSQL
- MongoDB
- Python
- Django
- Spectacle
- imgur
-
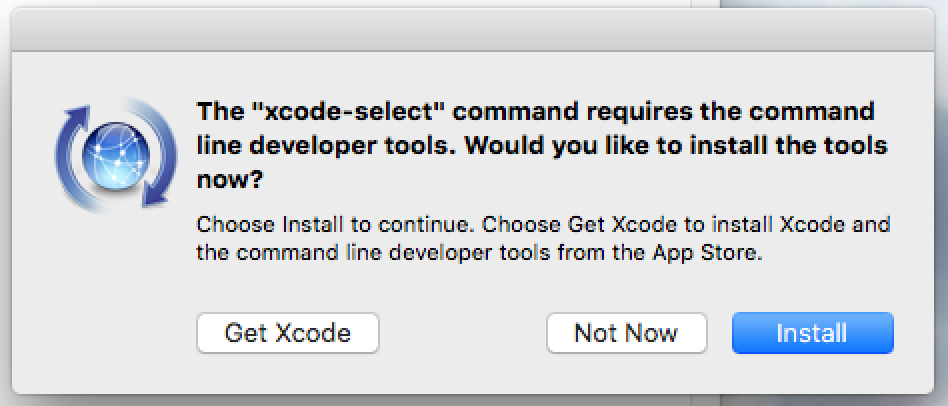
On terminal, type:
xcode-select --install -
It will pop up a dialog box like the following.
-
Check if it was successfully installed, run:
xcode-select -p
-
It should show the directory where Xcode is installed.
ruby -e "$(curl -fsSL https://raw.githubusercontent.com/Homebrew/install/master/install)"-
To make sure Homebrew installed, run:
brew doctor -
If brew doctor says
Your system is ready to brew, then everything worked properly.
-
In the future, run brew update to get the latest Homebrew formulas, and brew upgrade to update to the latest versions of installed applications.
brew install wget
brew cask install visual-studio-code
-
In terminal
- Type:
open ~/.bash_profile - Delete everything and insert:
export EDITOR="code -w"
- Type:
-
In visual studio code
- Press:
CMD + SHIFT + P - Insert: install code and select from autocomplete menu shell command:
Install 'code'in command PATH
- Press:
Create shortcuts for terminal Bash or Zshel.
-
Open terminal, type:
code ~/.zshrc -
Add your shortcuts:
   alias z="code ~/.zshrc"
   alias sz="source ~/.zshrc"
   alias ls="ls -al"
   export EDITOR="code -w"
-
After you finish editing your
.zshrcreload the file:source ~/.zshrc
-
Open terminal, type:
code ~/.bash_profile -
Add your shortcuts:
   alias b="code ~/.bash_profile"
   alias sb="source ~/.bash_profile"
   alias ls="ls -al"
   export EDITOR="code -w"
-
After you finish editing your
.bash_profilereload the file:source ~/.bash_profile
-
On terminal, type:
brew install git
-
Create a global
.gitignoreglobal file:touch ~/.gitignore_global -
Set as a defaul file:
git config --global core.excludesfile ~/.gitignore_global -
Add the following files and extensios:
   # This is a list of rules for ignoring files in every Git repositories on your computer.
   # See https://help.github.com/articles/ignoring-files

   # Compiled source #
   ###################
   *.class
   *.com
   *.dll
   *.exe
   *.o
   *.so

   # Packages #
   ############
   # it's better to unpack these files and commit the raw source
   # git has its own built in compression methods
   *.7z
   *.dmg
   *.gz
   *.iso
   *.jar
   *.rar
   *.tar
   *.zip

   # Logs and databases #
   ######################
   *.log

   # OS generated files #
   ######################
   ._*
   .DS_Store
   .DS_Store?
   .Spotlight-V100
   .Trashes
   ehthumbs.db
   Thumbs.db

   # Testing #
   ###########
   .rspec
   capybara-*.html
   coverage
   pickle-email-*.html
   rerun.txt
   spec/reports
   spec/tmp
   test/tmp
   test/version_tmp

   # node #
   ########
   node_modules

   # CTags #
   #########
   tags

   # Env #
   #######
   .env

   # Python #
   #######
   *.pyc
   __pycache__/
Node is a JavaScript engine for the backend. We use it to power our web servers and connect to our databases.
-
On terminal, type:
brew install node -
Verify the installation afterwards by running:
node -v npm -v -
The above commands should display versions without any errors. To verify that all the required permissions are set correctly, try to install a package such as the useful nodemon globally:
npm install -g nodemon
-
Install the PostgreSQL database mangement system (DBMS) using Homebrew with this command:
brew install postgresql -
After Postgres is installed run this command:
brew services start postgresql -
Followed by this command to test the install by creating a new database named the same as the current system user:
createdb
This is a custom Homebrew tap for official MongoDB software.
-
You can add the custom tap in a MacOS terminal session using:
brew tap mongodb/brew
Once the tap has been added locally, you can install individual software packages with:
-
Install the latest available production release of MongoDB Community Server (including all command line tools). This will currently install MongoDB 4.2.x:
brew install mongodb-community
In addition to installing the MongoDB server and tool binaries, the mongodb-community formula creates:
- a configuration file:
/usr/local/etc/mongod.conf - a log directory path:
/usr/local/var/log/mongodb - a data directory path:
/usr/local/var/mongodb
-
To have
launchdstartmongodimmediately and also restart at login, use:brew services start mongodb-community -
If you manage
mongodas a service it will use the default paths listed above. To stop the server instance use:brew services stop mongodb-community
-
If you don't want or need a background MongoDB service you can run:
mongod --config /usr/local/etc/mongod.conf -
Note: if you do not include the
--configoption with a path to a configuration file, the MongoDB server does not have a default configuration file or log directory path and will use a data directory path of/data/db. -
To shutdown
mongodstarted manually, use theadmindatabase and rundb.shutdownServer():mongo admin --eval "db.shutdownServer()"
- This tap was created using the Homebrew documentation on How to Create and Maintain a tap.
- You can find additional information in the Homebrew project README.
Brew is also used to install Python 3. (Python 2 is already installed on your Mac.)
-
Install Python using Homebrew with this command:
brew install python. -
You can test the installation by running
python3 --version. -
Python 3's package manager,
pip3should have automatically been installed with Python 3. Test that it was installed by runningpip3 --version.
We will use pip3 to install Django, a robust web framework for Python. We will be installing the latest version (2.x.x):
-
On terminal, type:
pip3 install Django -
You need to have Django installed in order to create new Django projects. After the project is created (or if you're working with an existing Django project), you'll be using the bundled versions of Django specific to your project.
pip install Django
-
Never run sudo in front of these pip commands, or it may install to the wrong folder.
-
Django might take a while to install. When the installation is done, you can look at your installed Python modules by running
pip list
-
Verify that Django is there and that the version is at least
2.1.4. Run:django-admin --version
-
It should say (at least)
2.1.4.
-
You should create a directory where you can put all of your work. Run:
mkdir ~/Documents/work -
This will create a
workdirectory inside the OS XDocumentsfolder. The words 'directory' and 'folder' are interchangeable. 'Folder' is the word generally used by non-technical people and 'directory' is the word generally used by technical people. Now that you are being initiated as techies, we'll use the 'directory' term! -
The
~symbol refers to your Home Directory. You should put all of your work for this course inside the work directory, or some other directory of your choosing if you have another preference. -
Go inside your work directory:
cd ~/Documents/work
-
and then make a new Django project:
django-admin startproject my_awesome_app
-
This step will probably take a few minutes the first time you create a new Django project. The next time, it'll run much faster.
-
Next, go into your new project directory
cd my_awesome_app -
then run:
python manage.py runserver
-
Visit
http://localhost:8000in your browser. If you see the The install worked successfully! Congratulations! page, congrats – Django works! -
You can type
ctrl + cinto your terminal to stop the Django application. -
In this course, you're going to be running the
python manage.py runserverandctrl + ccommands very, very often, so go ahead and memorize them now!
-
Finally, you can open up the project files in VS Code with the following command:
code . -
The
.symbol means 'this directory', so the command means 'open VS Code in this directory'. -
Poke around the project files as much as you like. Soon we'll be learning all about what makes a Django app tick. Isn't it exciting?
-
Now, close the editor and continue to the next step.
-
To keep your work directory clean, let's delete the new project you just created.
-
You are currently in your project directory. Check that by running:
pwd -
It should say something like
/Users/username/Documents/work/my_awesome_app. -
Let's go back up one directory, to your work directory.
cd .. -
Double check where you are:
pwd -
It should say something like
/Users/username/Documents/work. -
Double check the contents of the directory
ls
-
If you've followed all the directions so far, there should only be single item called
my_awesome_app. Go ahead and delete this project, it has served its purpose.rm -r my_awesome_app
-
Be careful running this
rm -rcommand! It's a command you need to learn, but always double and triple check what you're deleting. More information on the rm -r command
- Install Spectacle for resizing windows.
- This free "productivity" tool is invaluable when it comes to minimizing the time spent sizing windows using the mouse.