- https://docs.docker.com/get-docker/
- If you're running Windows you'll want to set up WSL 2 before installing Docker. For more details see Windows Install.
git clone https://github.com/MacRover/Rover.git
docker build -f docker/wsl/Dockerfile -t macrover/rover:wsl .
This may take a while the first time you run it.
docker/wsl/start_wsl_docker.bash
- Here's the official how-to guide: https://docs.microsoft.com/en-us/windows/wsl/install-win10
- Recommended distro is Ubuntu 18.04 LTS or 20.04 LTS
- Set up a new user
- You may also want to install Windows Terminal for an improved terminal prompt UI https://www.microsoft.com/en-ca/p/windows-terminal/9n0dx20hk701
- Make sure you're setting up WSL 2 and not just WSL 1. WSL 2 requires a few extra steps to configure. Docker won't work properly if you use WSL 1.
- https://hub.docker.com/editions/community/docker-ce-desktop-windows
- Stable version recommended
- Make sure docker is set to "Use the WSL 2 based engine"
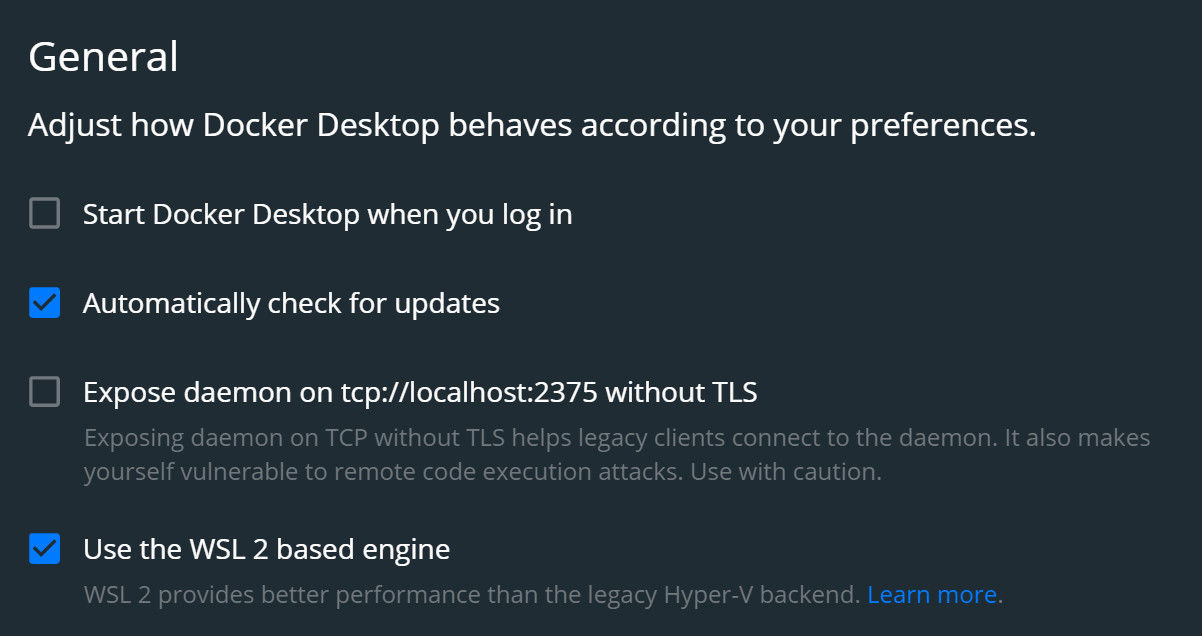
- Make sure that integration with your Ubuntu distro is enabled

- Recommended to install VcXsrv https://sourceforge.net/projects/vcxsrv/ as it is actively developed and open-source
- This runs on your base Windows OS
-
In your Ubuntu terminal prompt (Should be able to search for "Ubuntu" in the start menu to find this), type:
nano ~/.bashrcDon't delete anything, but paste the following lines at the end of the file (use arrow keys to scroll down):
# Connect to Windows X11 server
export DISPLAY=`grep -oP "(?<=nameserver ).+" /etc/resolv.conf`:0.0
export LIBGL_ALWAYS_INDIRECT=1
Press
Ctl+Xand thenYto save and exit.Finally, run
source ~/.bashrc -
Open XLaunch on Windows (search for XLaunch in the start menu)
Select
Multiple Windowsand set display number to-1. Click next.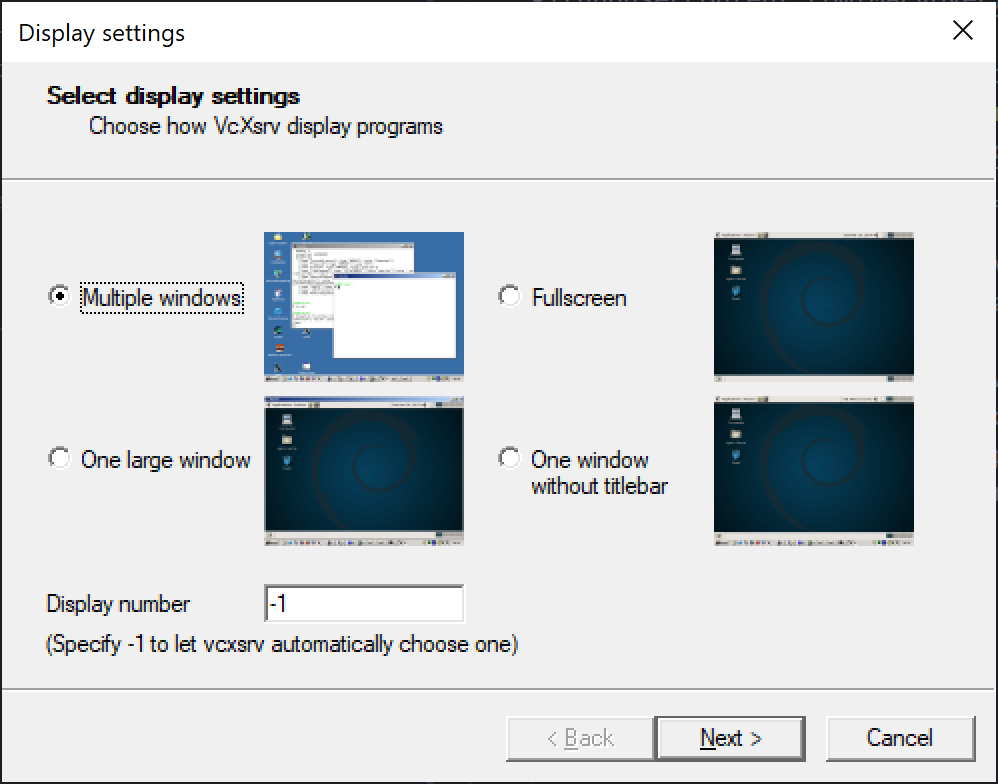
Select
Start no client. Click next.Uncheck
Native OpenGLand checkDisable access control. Click next.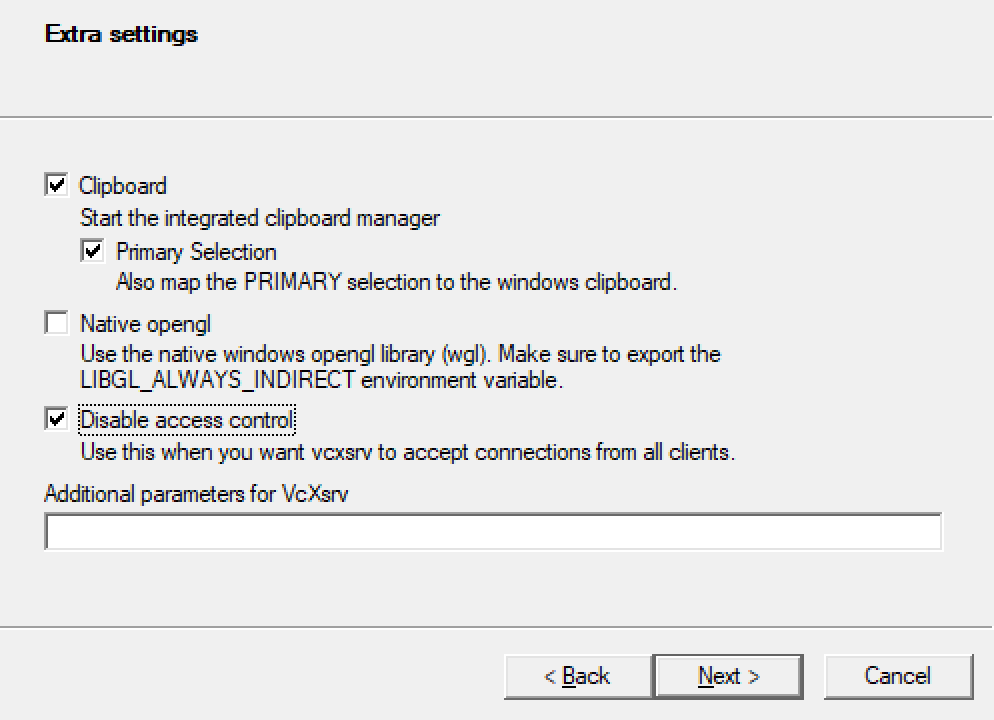
Save the configuration file somewhere you can remember. Next time you can just open this and skip the config options. Click finish.
If you get a prompt from Windows firewall, make sure to allow permissions on both private and public networks.
-
In the terminal on Ubuntu, type:
git clone https://github.com/MacRover/Rover.git -
You can clone it to wherever you want in your Linux install, just make sure you know where it is.
-
After cloning,
cdinto the repocd Rover
-
Inside the git repo (where you should already be), type:
docker build -f docker/wsl/Dockerfile -t macrover/rover:wsl .If you run into issues where the docker command is not found, make sure docker is running and that you've set up integration with your Ubuntu distro. If all else fails, try rebooting and see if it works. Just make sure to start up the X11 server (using the saved config file from before), start up docker, and
cdinto the clonedRovergit repository again when the computer completes the reboot.Now you're ready to start the docker container. Type the following into your Ubuntu terminal window:
docker/wsl/start_wsl_docker.bashThe extra flags here allow the X11 server running on Windows to interact with the docker container. To start the container in the background, replace the
-itflag with-d.NOTE: Sometimes after a reboot of your computer the
DISPLAYvariable will change. If this happens, the X11 link will stop working and you won't be able to open any GUI elements. To fix this you will have to create a new docker container using the samedocker runcommand above the newDISPLAYvariable will be used automatically.
-
Download and install the Remote Development Extension Pack
-
Open the
Remote Explorerpane. SelectContainersin the dropdown and open the macrover/rover container. If it's not already running, VSCode will start the container.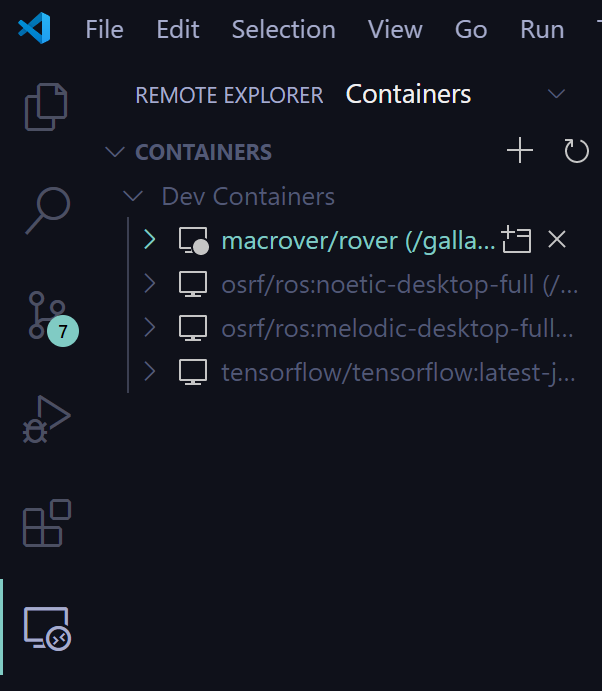
From here you can open
/root/Roveror/root/Rover/ROS_WS. -
If you open the latter (
/root/Rover/ROS_WS), you are in the catkin workspace. This means the VSCode ROS extension will automatically detect your version.
This set of instructions applies only if running on linux with and nvidia gpu. This install assumes you have the most recent nvidia GPU drivers (v440+)
-
Install prerequisites
sudo apt updatesudo apt install apt-transport-https ca-certificates curl gnupg-agent software-properties-common -
Add gpg key and verify
curl -fsSL https://download.docker.com/linux/ubuntu/gpg | sudo apt-key add -sudo apt-key fingerprint 0EBFCD88 -
Add docker repository
sudo add-apt-repository "deb [arch=amd64] https://download.docker.com/linux/ubuntu$(lsb_release -cs)stable" -
Install docker engine
sudo apt updatesudo apt install docker-ce docker-ce-cli containerd.io -
Check that docker install works
sudo docker run hello-worldNote: you may experience a permissions error here. This means you must add your current user to the
dockergroup. To do this, do the following:sudo usermod -aG docker $USERAnd then reload the groups to register the changes:
newgrp dockerTry running the hello-world image again and it should work.
-
Follow the deb (network) instructions found here https://developer.nvidia.com/cuda-downloads
-
For Ubuntu 20.04, the installation commands are:
$ wget https://developer.download.nvidia.com/compute/cuda/repos/ubuntu2004/x86_64/cuda-ubuntu2004.pin $ sudo mv cuda-ubuntu2004.pin /etc/apt/preferences.d/cuda-repository-pin-600 $ sudo apt-key adv --fetch-keys https://developer.download.nvidia.com/compute/cuda/repos/ubuntu2004/x86_64/7fa2af80.pub $ sudo add-apt-repository "deb https://developer.download.nvidia.com/compute/cuda/repos/ubuntu2004/x86_64/ /" $ sudo apt update $ sudo apt -y install cuda -
Please check the website for your specific install commands
- Add nvidia repos
curl -s -L https://nvidia.github.io/nvidia-docker/gpgkey | sudo apt-key add -distribution=$(. /etc/os-release;echo $ID$VERSION_ID)curl -s -L https://nvidia.github.io/nvidia-docker/$distribution/nvidia-docker.list | sudo tee /etc/apt/sources.list.d/nvidia-docker.listsudo apt update - Install nvidia-docker2
sudo apt install nvidia-docker2 - Restart docker daemon
sudo systemctl restart docker - Verify that nvidia-docker2 works
If your installed CUDA release is not 10.2, check the verison using the following command:
docker run --gpus all nvidia/cuda:10.2 nvidia-smiand replacenvcc --versionnvidia/cuda:10.2with your installed release.
- Clone the current repo
git clone https://github.com/MacRover/Rover.git - cd into the repo and build the dockerfile
cd Roverdocker build -f docker/nvidia/Dockerfile -t macrover/rover:nvidia .
-
There is a special script to start the docker container with X11 forwarding
chmod +x docker/nvidia/start_nvidia_docker.bashdocker/nvidia/start_nvidia_docker.bash -
To test that the X11 forwarding works. In a new terminal pane type:
docker exec -it macrover /bin/bashrvizRviz should open. If it fails shut down the container, run
sudo rm -rf /tmp/.docker.xauthand then run the start script again.
-
NOTE THE INSTALL SCRIPT DELETES THE CONTAINER EACH TIME IT IS TURNED OFF!!
This means that shutting down the container without commiting changes will delete all progress you have done inside the container!
To disable this "feature", remove the
--rmflag and the--nameflag fromstart_nvidia_docker.bash.