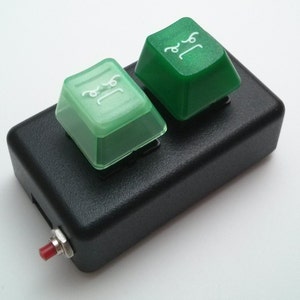
- Keyboard Maintainer: Christopher Wróbel
- Hardware Supported: LED osu! Keypad (r2)
- Hardware Availability: https://www.etsy.com/de/shop/thnikk (discontinued)
- Original Firmware Source: https://github.com/thnikk/oldKeypad/blob/master/proMicroPadNew/proMicroPadNew.ino (for single color leds)
This is an alternative firmware using qmk for the LED osu! Keypad (r2). This firmware improves the handling of the side button, to behave like a normal ESC key. This is needed for osu!lazer, as the pause menu requires the ESC button to be held for a short time. Currently just tapping the side button equates to a 170ms ESC key press, holding can extend that time to however long you press the button.
- Z and X keys
- ESC key as the side button
- enter bootloader when rapidly tappig side button 5 times
- LEDs
- set up QMK
- drop the whole
osu_keypadfolder intokeyboards, or clone it as a git submodule - run
qmk compile -kb osu_keypad -km default
- run
qmk flash -kb osu_keypad -km default - wait until it says
Waiting for USB serial port - reset your controller now - Open and close the Serial port to the Arduino Leonardo with a baudrate of 1200 to get into the bootloader (simplest way is using the Serial Monitor of the Arduino IDE, but other methods should work too)
- Flashing should start as soon as the board gets detected
- run
qmk flash -kb osu_keypad -km default - wait until it says
Waiting for USB serial port - reset your controller now - press the side button quickly 5 times to get into the bootloader
Unfortunatly qmk doesn't allow for accessing the bootloader by opening an exposed serial port. As such flashing with the Arduino IDE doesn't work. Thus we will use the Arduino IDE to compile the code, and flash it with AVRdude.
If you have the Arduino IDE installed you should already have AVRdude. On Linux it should be executable by typing avrdude into the command line. On Windows it should be somewhere in the Arduino IDE installation (For me it is in C:\Program Files (x86)\Arduino\hardware\tools\avr\bin\avrdude.exe). Of course you can download AVRdude additionally, just substitute the paths.
- download the original Arduino sketch
- open it in the Arduino IDE
- go to Tools -> Board and choose Arduino Leonardo
- if not available, install "Arduino AVR Boards" in the Board Manager
- press the button in the top left with the checkmark to compile the sketch
- if the compiler complains about missing libraries go to Tools -> Manage Libaries
- Install "Bounce2" and "Keyboard"
- export the compiled binary by going to Sketch -> Export compiled binary
- go into to Sketch -> Show Sketch Folder
- there should be a file called proMicroPadNew.ino.leonardo.hex
- open Terminal and navigate to the binary
In quick succession:
#press the side button quickly 5 times to enter bootloader
sudo avrdude -p m32u4 -c avr109 -P /dev/ttyACM0 -U flash:w:proMicroPadNew.ino.leonardo.hex:i
It might be necessary to change the tty or filename
- In the folder with the binary SHIFT + right click
- Click "Open Powershell here"
- press the side button quickly 5 times (wait for the windows disconnect sound)
- immideatly run
[System.IO.Ports.SerialPort]::getportnames() - the command should return a COMn port with n being number
I recommend preparing the command beforehand:
- Substitute avrdude path if needed
- Substitute avrdude config path if needed
- Substitute COMn for your COM port
- If needed substitute the file name
In quick succession (wait for the windows disconnect sound):
#press the side button quickly 5 times to enter bootloader
C:\"Program Files (x86)"\Arduino\hardware\tools\avr\bin\avrdude.exe -p m32u4 -c avr109 -C C:\"Program Files (x86)"\Arduino\hardware\tools\avr\etc\avrdude.conf -P COMn -U flash:w:proMicroPadNew.ino.leonardo.hex:i
See the build environment setup and the make instructions for more information. Brand new to QMK? Start with our Complete Newbs Guide.
