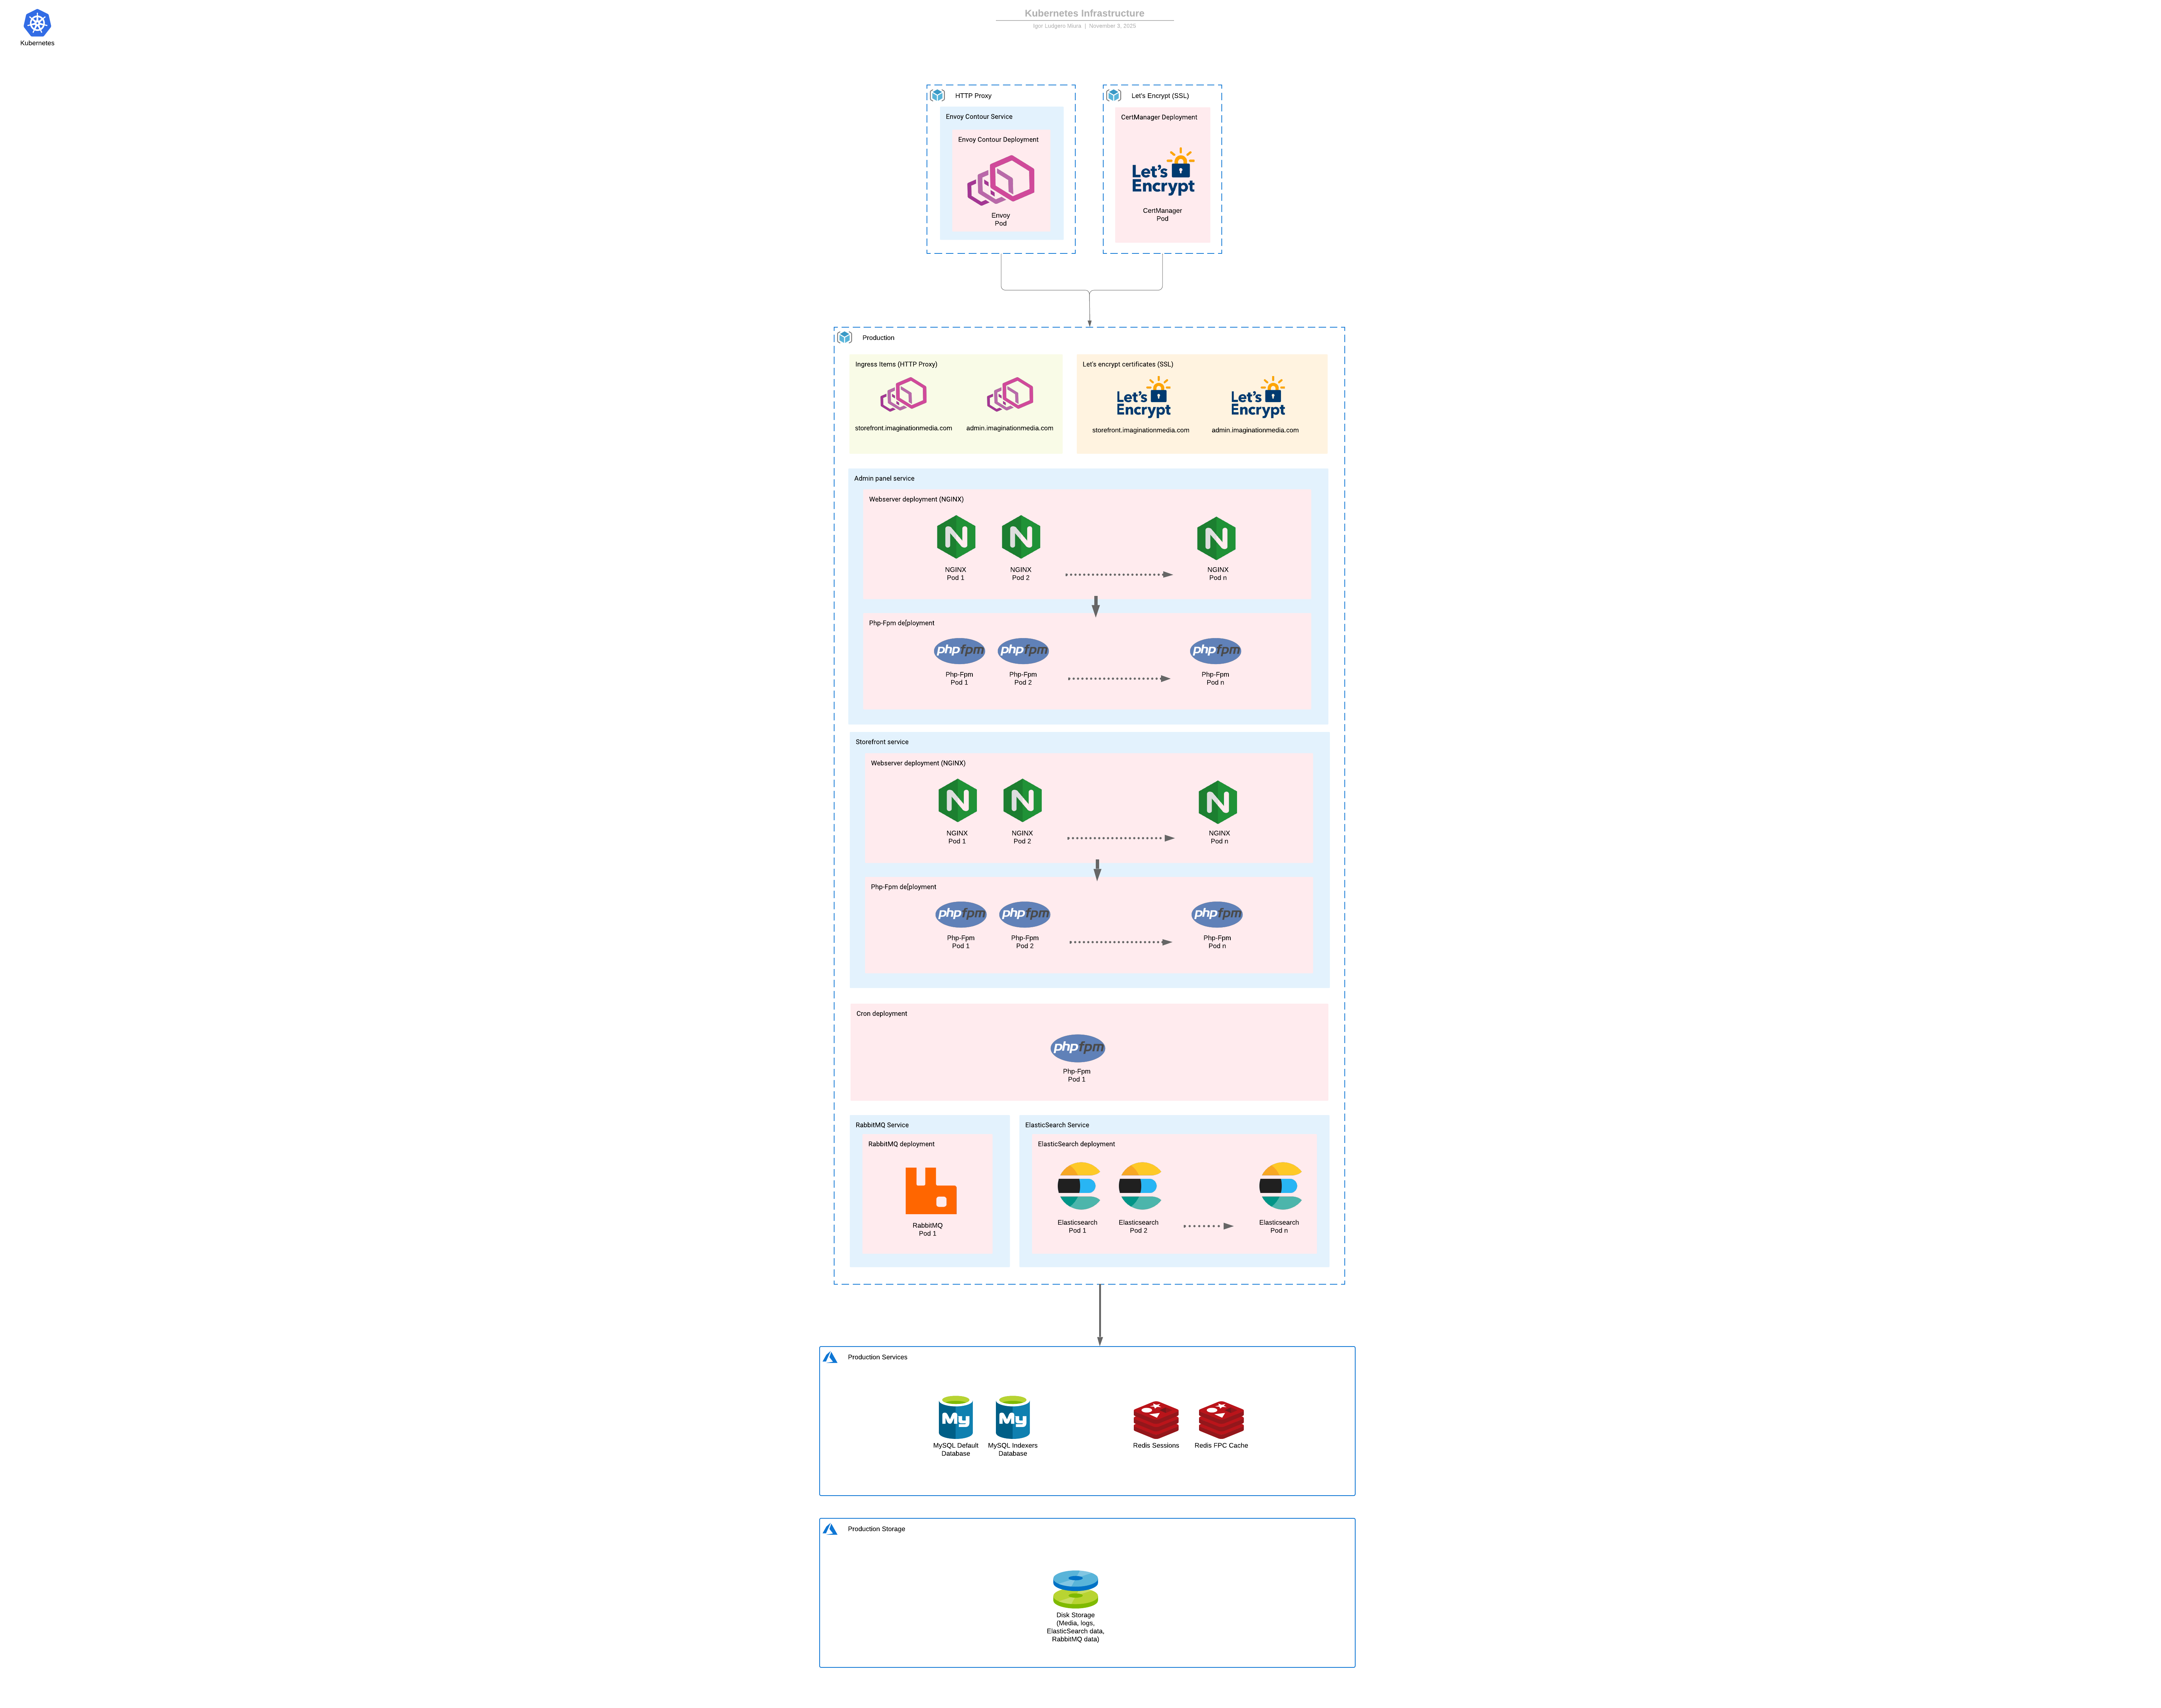
Magento 2 deployed with Kubernetes splitting the cron, admin panel, and storefront in different instances.

Deploy a Kubernetes production (or development) infrastructure for a Adobe Commerce (Magento) store. This infrastructure is ready to scale up and down as needed, and suits any store size, from a small merchant to an enterprise one. These scripts and images were created based on the official PHP, Nginx, Redis images, optimized and configured to offer a complete infrastructure for a Magento 2 website.
The infrastructure for a Magento 2 website is made of the services required by the application such as the database, Redis for sessions, RabbitMQ for asynchronous jobs, etc.
Then, we have NGINX & PHP-FPM instances that are going to serve the website.
To determine what version of PHP, RabbitMQ, Redis, and database to use, please check the official Adobe Commerce documentation. Versions may vary depending on the Adobe Commerce version the store is running.
As an approach to maintain security and integrity across all the servers, the code base in the server is read-only, meaning SSH users can't modify anything except the pub/media and the var directories. This also prevents issues related to auto-scale and the codebase shared accross the different node pools (frontend, admin, and cron).
Root access isn't allowed for SSH users. No one can login as root on the application servers.
No instance is exposed to the internet through SSH, except the admin panel PHP-FPM pod. That's the only one instance users can SSH and check the code base.

Access denied error when trying to delete files

These are the services required by Magento to execute. We use the official docker images, and the version of each service may vary depending on the Adobe Commerce version.
These services aren't exposed to the internet. They are only available inside the cluster.
For the database, we always recommend using a database service offered by your cloud provider. Their services always come with backup routines and read/write replicas, and they can easily scale up and down the database instances for you. In that way, you don't need to manually manage all of that.
For the database we always recommend to use MariaDB instead of MySQL as it has some improvements and performs a little bit better when compared to MySQL. But both versions are supported by our infrastructure.
The Magento application mainly consists on two services, the webserver NGINX, and PHP-FPM.
Our infrastructure will (for production apps) split the application into three different node pools. One will host Nginx & Php-fpm pods for the storefront traffic, one will host Nginx & Php-fpm pods for the admin traffic, and one will host one Php-fpm pod for the Magento cron. In that way, we dedicate resources to each one of these node pools to serve their traffic, the cron pod is never scaled up to prevent duplicated cron jobs, and the admin panel can be restricted only to specific IP addresses and also never scaled up.
For development environments, we can have just one node pool for all three services, but for production, it's highly recommended to split them.

We use Envoy Contour as the load balancer and proxy for the application.
Envoy was created by Lyft's team to solve issues and attend requirements they had that weren't possible to attend/solve with other solutions like NGINX and HAProxy.
With Envoy we route the traffic to the admin and storefront instances, and it's used as the load balancer instead of the default load balancer offered by the cloud providers.
To set up Envoy we run the https://github.com/Imagination-Media/magento-k8s/blob/master/scripts/gcp/21-ingress/production/21-contour.yaml script.
Then, we use https://github.com/Imagination-Media/magento-k8s/blob/master/scripts/gcp/21-ingress/production/23-ingress.yaml to define the domains that are going to be managed by Envoy and what k8s service is going to be used to serve each one of them.
Our Kubernetes infrastructure uses cert-manager to generate and manage SSL certificates.
With that, we can generate and renew Let's Encrypt certificates whenever needed.
To start the cert manager service we use the https://github.com/Imagination-Media/magento-k8s/blob/master/scripts/gcp/21-ingress/production/22.1-cert-manager.yaml script.
Then, we use https://github.com/Imagination-Media/magento-k8s/blob/master/scripts/gcp/21-ingress/production/22.2-lets-encrypt.yaml to create the certificate issuer.
And finally, https://github.com/Imagination-Media/magento-k8s/blob/master/scripts/gcp/21-ingress/production/22.3-domains.yaml to define the certificates that are going to be generated and maintained.
The only instance (pod) exposed to the internet and that accepts SSH connections is the admin panel pod. As all of the pods are read-only pods, the SSH user can access and modify some directories, but the code base can't be modified.
All SSH connections are managed through SSH keys. So, in order to give SSH access to a developer we must add their private key to the authorized keys. Please, read the GitHub Secrets section to know more about this.
This is the welcome message when SSHing the admin pod:

We developed two custom images, one for NGINX and one for PHP-FPM. These images have all the required plugins, configuration, and optimization for Magento 2 websites, so all the infrastructure deployed by our solution was created based on these two images along with images for other services.
The Php-Fpm image was created based on the official Php-Fpm image.
Our image has installed all the PHP extensions/libraries required by Magento. We also optimized the PHP-FPM configuration, adjusted server permissions, installed the cron, customized the SSH welcome message, and installed tools such as n98-magerun and grunt to help us to develop and maintain the Magento code base inside the container.
The dockerfiles for each PHP version are available inside https://github.com/Imagination-Media/magento-k8s/tree/master/php-fpm.
We currently have images for:
Each PHP version will have 3 released versions, phpversion-amd64, phpversion-arm64, and phpversion. For example, 8.2-amd64, 8.2-arm64, and 8.2.
phpversion and phpversion-amd64 are the images for regular x64 CPU, the most common CPU architecture used by hosting providers.
phpversion-arm64 is the image for ARM CPUs. We highly recommend using these processors if possible. They can offer up to 50% of performance improvements with up to 40% less costs when compared to a x64 CPU.

The NGINX image was created based on the official NGINX image. We are using the version 1.23.2.
We customized the NGINX configuration to use the PHP-FPM container to execute any PHP code, it also uses different domains for the storefront and the admin panel, it has config fields that allow us to restrict IPs to access the storefront and the admin panel.
The NGINX dockerfile and NGINX config files are available in https://github.com/Imagination-Media/magento-k8s/tree/master/nginx.
Shared directories are the directories that should be mounted as volumes across all the Nginx and Php-Fpm pods. They have files that are managed by the application.
These directories are going to be:
- pub/media - It's the directory where Magento stores the catalog, cms and any other images.
- var/log - The Magento logs.
- var/report - The Magento error reports.
- var/export - The Magento exported files from export profiles.
- var/importexport - Files to imported into import profiles.
Everything else, except the subdirectories inside the var directory are read only. SSH users can't modify any file or directory.
The following topics are going to describe how to set up a Kubernetes infrastructure using this template and automating it with your GitHub repository.
In your Github Magento code base, please create this directory structure:
├── codebase
│   ├── server
│   ├──├── docker
│   ├──├──├──nginx
│   ├──├──├──phpfpm
│   ├──├── k8s
The docker directory will host our custom images for our Magento project, and k8s will host the Kubernetes scripts used to set up the infrastructure.
First we need to use setup two images, one for Nginx & Php-Fpm. They are going to be created based on our base images. These images are going to have the Magento code base, the compiled static content and the PHP scripts.
Inside the nginx directory, please create a Dockerfile file with this content:
FROM ghcr.io/imagination-media/magento-k8s/nginx:latest

ARG APP_ETC_ENV

# Copy repository
COPY repository.zip /var/www/html/
RUN unzip -q /var/www/html/repository.zip -d /var/www/html
RUN rm -rf /var/www/html/repository.zip

# Create app/etc/env.php from environment variable
RUN mkdir -p /var/www/html/app/etc
RUN rm -rf /var/www/html/app/etc/env.php
RUN echo "$APP_ETC_ENV" | base64 --decode > /var/www/html/app/etc/env.php

# Set the permissions for the Magento directory
RUN cd /var/www/ && chown -R root:nginx html && chmod -R 750 html
RUN cd /var/www/html/ && chmod -R 770 generated
RUN cd /var/www/html/ && chmod -R 775 var
RUN cd /var/www/html/ && chmod -R 770 pub/media
RUN cd /var/www/html/ && chmod -R 750 app/etc/

EXPOSE 80
CMD ["nginx", "-g", "daemon off;"]
The first line defines the image we are going to use for our NGINX image. We must use ghcr.io/imagination-media/magento-k8s/nginx:latest by default.
This image will download the repository, install composer packages, deploy the static content files, and then compile the PHP code.
The name of our image will be ghcr.io/my-company/my-repository/nginx:myenvironment. So, we will be generating images for each environment and use different tags for each one of these environments.
Inside the phpfpm directory, please create a Dockerfile file with this content:
FROM ghcr.io/imagination-media/magento-k8s/php-fpm:8.1

ARG SSH_AUTHORIZED_KEYS
ARG APP_ETC_ENV

# User root
USER root

# Copy authorized keys
RUN mkdir -p /home/nginx/.ssh
RUN echo "$SSH_AUTHORIZED_KEYS" >> /home/nginx/.ssh/authorized_keys
RUN chown -R nginx:nginx /home/nginx/.ssh/
RUN chmod 400 /home/nginx/.ssh/authorized_keys

# Copy repository
COPY repository.zip /var/www/html/
RUN unzip -q /var/www/html/repository.zip -d /var/www/html
RUN rm -rf /var/www/html/repository.zip

# Create app/etc/env.php from environment variable
RUN mkdir -p /var/www/html/app/etc
RUN rm -rf /var/www/html/app/etc/env.php
RUN echo "$APP_ETC_ENV" | base64 --decode > /var/www/html/app/etc/env.php

# Adjust permissions
RUN chown -R nginx:nginx /var/www/html/

# Set the permissions for the Magento directory
RUN cd /var/www/ && chown -R root:nginx html && chmod -R 750 html
RUN cd /var/www/html/ && chmod -R 770 generated/code
RUN cd /var/www/html/ && chmod -R 770 generated/metadata
RUN cd /var/www/html/ && chmod -R 777 var
RUN cd /var/www/html/ && chmod -R 770 pub/media
RUN cd /var/www/html/ && chmod -R 750 app/etc
RUN cd /var/www/html/ && chmod -R 770 app/etc/config.php
RUN cd /var/www/html/ && chmod u+x bin/magento

# This file will be allowed to be modified in order to run setup:upgrade
RUN cd /var/www/html/ && chmod -R 770 app/etc/env.php

# Expose SSH port
EXPOSE 22

# Execute the startup bash script on the startup
ENTRYPOINT ["/bin/bash", "/root/startup.sh"]
The first line defines the image we are going to use for our Php-Fpm image.
This image will download the repository, install composer packages, deploy the static content files, and then compile the PHP code.
The name of our image will be ghcr.io/my-company/my-repository/php-fpm:myenvironment. So, we will be generating images for each environment and use different tags for each one of these environments.
In order to execute the di:compile and static deployment commands, we need to add the website scope configuration to the app/etc/config.php file. We can do that by running bin/magento app:config:dump scopes.
On this section we are going to describe the scripts involved on this infrastructure, what each script is used for, and how to deploy them.
All the Kubernetes scripts are inside the https://github.com/Imagination-Media/magento-k8s/tree/master/scripts folder. Check "eks" and "gcp" subfolders for a respective cloud.
The namespace as the name suggests, it's a namespace, or in other words, an isolated environment where things get deployed. For your project, we suggest having a different namespace per environment if they are going to share the same Kubernetes cluster.
So the first script we must run is https://github.com/Imagination-Media/magento-k8s/blob/master/scripts/gcp/1-namespace.yaml.
kubectl apply -f=scripts/gcp/1-namespace.yaml
Configmaps are values that are going to be used as environment variables in our pods. Our images require a couple of values to be set, to define things like the crontab if we run or not setup:upgrade, if we enable or not SSH, etc.
In the https://github.com/Imagination-Media/magento-k8s/blob/master/scripts/gcp/2-configmap.yaml file, we create these configmaps for all of our application pods. So, we have different configmaps for the NGINX and PHP-FPM pods for the admin, for the storefront, and also for the cron.
- admin-configmap-phpfpm - PHP-FPM admin panel configmap.
- admin-configmap-nginx - NGINX admin panel configmap.
- cron-configmap-phpfpm - PHP-FPM cron configmap.
- front-configmap-phpfpm - PHP-FPM storefront configmap.
- front-configmap-phpfpm - PHP-FPM storefront configmap.
These are the required values required by each configmap type:
- setup_upgrade - Set 1 or 0 to define if we will run the setup:upgrade command during the pod stand-up. If this option is set to 1, the pod will run setup:upgrade, di:compile, and then deploy:static:content.
- magento_static_content_jobs - number of simultaneous jobs that are going to run when running the deploy static content command. This option is only used if the setup_upgrade option was set to 1.
- environment_name - This variable is just used to help us to identify what environment is this environment,
- enable_ssh - This option accepts 1 or 0 as the value, and it's used to define if we will initialize the SSH service or not for this pod.
- cron_jobs - This variable expects a base64 encoded value with the crontab configuration. This variable is mainly used by the cron PHP-FPM pod, to execute the Magento cron. So, we will always have here the Magento cron job along with any other cron job you may need to execute in your application. To have the Magento cron, we will have something like this as the original value:
* * * * * php /var/www/html/bin/magento cron:run > /var/www/html/var/log/cron.logAnd then, the base64 value will be:
KiAqICogKiAqIHBocCAvdmFyL3d3dy9odG1sL2Jpbi9tYWdlbnRvIGNyb246cnVuID4gL3Zhci93d3cvaHRtbC92YXIvbG9nL2Nyb24ubG9nCg==
- admin_domain - The domain where the Magento admin panel is going to be served. For example, admin-magento-open-source.imaginationmedia.com.
- frontend_domain - The domain where the Magento storefront is going to be served. For example, admin-magento-open-source.imaginationmedia.com.
- admin_store - Store code used by the admin store in Magento. By default, it's always admin.
- frontend_store - Store code used by the storefront store in Magento. For example, store1.
- magento_mode - Accepts the values 1 or 0, and it's used to define if Magento is running in production mode.
- php_fpm_service - This is the variable where we define what the PHP-FPM service NGINX is going to use to process any PHP file. As we consistently deployed a PHP-FPM pod along with an NGINX pod, NGINX is just the web server, and any PHP code will be PHP-FPM's pod responsibility. So, on this variable, we will have something like magento-admin-phpfpm-service.magento-demo-production:9001 as the value. It's the name of the service + the namespace + the port. The port will always be 9001, but the name of the service and the namespace may vary depending on your configuration.
- ip_addresses - This is an optional value that can be used to restrict the IP addresses that are allowed to access the storefront. This is useful for development environments, blocking access from out of our team.
- admin_ip_addresses - This is an optional value that can be used to restrict the IP addresses that are allowed to access the admin panel. This is a good practice for development and production environments, restricting access from out of our team.
These are the scripts responsible to stand-up the services used by Magento.
Redis is going to be used as the service to store the Magento Full Page Cache, and we deploy it using the scripts https://github.com/Imagination-Media/magento-k8s/blob/master/scripts/gcp/3-redis-fpc-deployment.yaml and https://github.com/Imagination-Media/magento-k8s/blob/master/scripts/gcp/6-redis-fpc-service.yaml.
kubectl apply -f=scripts/gcp/3-redis-fpc-deployment.yaml
kubectl apply -f=scripts/gcp/6-redis-fpc-service.yaml
Magento uses ElasticSearch to index search results, layered navigation filters, etc.
To deploy ElasticSearch we use the scripts https://github.com/Imagination-Media/magento-k8s/blob/master/scripts/gcp/4-elasticsearch-deployment.yaml and https://github.com/Imagination-Media/magento-k8s/blob/master/scripts/gcp/7-elasticsearch-service.yaml.
kubectl apply -f=scripts/gcp/4-elasticsearch-deployment.yaml
kubectl apply -f=scripts/gcp/7-elasticsearch-service.yaml
Magento uses RabbitMQ for asynchronous jobs.
To deploy RabbitMQ we use the scripts https://github.com/Imagination-Media/magento-k8s/blob/master/scripts/gcp/5-rabbitmq-deployment.yaml and https://github.com/Imagination-Media/magento-k8s/blob/master/scripts/gcp/8-rabbitmq-service.yaml.
kubectl apply -f=scripts/gcp/5-rabbitmq-deployment.yaml
kubectl apply -f=scripts/gcp/8-rabbitmq-service.yaml
We use Redis for the customer and admin sessions. Redis has a better performance when compared to session files, and also when compared to database sessions.
We can use one of the AWS, GPC, Azure services to spin up a Redis instance for sessions, because they are data we can't lose in case of a pod restart, they should be a persistent volume.
But in case you also want to deploy it as a Kubernetes pod we can use the https://github.com/Imagination-Media/magento-k8s/blob/master/scripts/gcp/9-session/9-redis-sessions.yaml script.
kubectl apply -f=scripts/gcp/9-session/9-redis-sessions.yaml
We use GitHub's container registry service to generate and store container images. And as our repositories are private, only authenticated users can access them and download these images.
Kubernetes has this guide that explains how to pull images from a private registry.
Once we generate the token we can have an image script like https://github.com/Imagination-Media/magento-k8s/blob/master/scripts/gcp/17-image-secret.yaml.
If you are running a development environment you can deploy a database pod within a Kubernetes service using the https://github.com/Imagination-Media/magento-k8s/blob/master/scripts/gcp/10-database/10-database.yaml script as an example.
The database name will be magento, the password for the root user is going to be root, and to access the database the host will be database-service.my-namespace-name on the port 33006.
For production environments please use of the one services provided by your cloud provider, like Cloud SQL (GCP), RDS (AWS), etc. These services provide multi-cluster environments that perform a lot better than compared to a single pod database, they also manage backups, etc.
As the Magento application has to exposed to the internet (the admin and the storefront), we must have a Kubernetes ingress to expose the services. On https://kubernetes.io/docs/concepts/services-networking/ingress/ we described our strategy to proxy this application, and to deploy the ingress service and its configuration we use the directories inside https://github.com/Imagination-Media/magento-k8s/tree/master/scripts/gcp/21-ingress.
We have two directories there, local and production. One, to be used for local environments. and the other one for production environments.
Before deploying Envoy as the proxy/load balancer/ingress, we must deploy the cert manager service, responsible to be a service that generates SSL certificates.
We use the script https://github.com/Imagination-Media/magento-k8s/blob/master/scripts/gcp/21-ingress/production/22.1-cert-manager.yaml to deploy the cert manager service.
kubectl apply -f=scripts/gcp/21-ingress/production/22.1-cert-manager.yaml
To start the SSL management service, we also need to define who owns the SSL certificates. For that we need to deploy a ClusterIssuer.
We can deploy it running the script https://github.com/Imagination-Media/magento-k8s/blob/master/scripts/gcp/21-ingress/production/22.2-lets-encrypt.yaml.
On email: info@imaginationmedia.com you define the email address of who owns the SSL certificates.
Then, we have the https://github.com/Imagination-Media/magento-k8s/blob/master/scripts/gcp/21-ingress/production/22.3-domains.yaml script where we define the SSL certificates that are going to be generated, and what's the domain used on each one of them.
kubectl apply -f=scripts/gcp/21-ingress/production/22.2-lets-encrypt.yaml
kubectl apply -f=scripts/gcp/21-ingress/production/22.3-domains.yaml
To deploy Envoy Contour, we have the https://github.com/Imagination-Media/magento-k8s/blob/master/scripts/gcp/21-ingress/production/21-contour.yaml script.
Once Envoy is deployed we can configure the routes that are going to be managed by Envoy. So, we define the domains that attached to the Kubernetes services. We have the script https://github.com/Imagination-Media/magento-k8s/blob/master/scripts/gcp/21-ingress/production/23-ingress.yaml where we define all of that.
kubectl apply -f=scripts/gcp/21-ingress/production/21-contour.yaml
kubectl apply -f=scripts/gcp/21-ingress/production/23-ingress.yaml
The admin panel will be deployed with one PHP-FPM pod, and one NGINX pod. The PHP-FPM pod will be exposed to the internet for SSH connections (enable_ssh is set to 1 on the admin-configmap-phpfpm configmap). The magento setup:upgrade command will also be executed on the PHP-FPM pod, so any database change, upgrade, downgrade will be performed by this pod (setup_upgrade is set to 1 on the admin-configmap-phpfpm configmap).
Admin pods aren't scaled up, they are single instances.
To deploy the PHP-FPM and the NGINX pods we use the scripts https://github.com/Imagination-Media/magento-k8s/blob/master/scripts/gcp/18.1-magento-admin-phpfpm.yaml and https://github.com/Imagination-Media/magento-k8s/blob/master/scripts/gcp/18.2-magento-admin-nginx.yaml.
kubectl apply -f=scripts/gcp/18.1-magento-admin-phpfpm.yaml
kubectl apply -f=scripts/gcp/18.2-magento-admin-nginx.yaml
For the cron we deploy a single PHP-FPM cron pod, and this pod won't be scaled up. As the cron doesn't serve any HTTP/HTTPS traffic there's no need to have an NGINX pod.
The script we can use to deploy the cron pod is https://github.com/Imagination-Media/magento-k8s/blob/master/scripts/gcp/19-magento-cron-phpfpm.yaml.
kubectl apply -f=scripts/gcp/19-magento-cron-phpfpm.yaml
The storefront will be deployed with one PHP-FPM pod, and one NGINX pod. The scripts used to deploy it are https://github.com/Imagination-Media/magento-k8s/blob/master/scripts/gcp/20.1-magento-front-phpfpm.yaml and https://github.com/Imagination-Media/magento-k8s/blob/master/scripts/gcp/20.2-magento-front-nginx.yaml.
Storefront pods are scaled up and down according to the resources usage. To scale up and down the NGINX and the PHP-FPM instances we use HorizontalPodAutoscaler scripts.
We have https://github.com/Imagination-Media/magento-k8s/blob/master/scripts/gcp/20.3-magento-front-phpfpm-hpa.yaml to scale up and down the PHP-FPM pods, and https://github.com/Imagination-Media/magento-k8s/blob/master/scripts/gcp/20.4-magento-front-phpfpm-nginx.yaml for NGINX.
kubectl apply -f=scripts/gcp/20.1-magento-front-phpfpm.yaml
kubectl apply -f=scripts/gcp/20.2-magento-front-nginx.yaml
kubectl apply -f=scripts/gcp/20.3-magento-front-phpfpm-hpa.yaml
kubectl apply -f=scripts/gcp/20.4-magento-front-phpfpm-hpa.yaml
We have the https://github.com/Imagination-Media/magento-k8s/blob/master/scripts/gcp/21-clean-nodes-cron.yaml script which deploys our https://github.com/Imagination-Media/gcp-kubernetes-clean-nodes script (only for Google Cloud projects) which is used to clean up any temporary data and files from Kubernetes nodes.
To use the Redis, ElasticSearch, RabbitMQ and any service deployed by our Kubernetes scripts we always use as the host the name of the service + the namespace.
For example, for Redis FPC we use redis-fpc-service.magento-demo-production.
For ElasticSearch we use elasticsearch-service.magento-demo-production.
A node pool is a group of nodes (machines) we dedicate to deploy one or more type of pods. This is a good production practice because we can dedicate machines specifying what they are used for, and in that way we prevent nodes to be shared between different deployments.
Our scripts were designed to be deployed on Google Cloud, so we use GCP expressions to deploy those nods in specific node pools. For example:
affinity:
  nodeAffinity:
    requiredDuringSchedulingIgnoredDuringExecution:
      nodeSelectorTerms:
        - matchExpressions:
            - key: "cloud.google.com/gke-nodepool"
              operator: In
              values:
                - services
On this example (from https://github.com/Imagination-Media/magento-k8s/blob/master/scripts/gcp/4-elasticsearch-deployment.yaml), we deploy the ElasticSearch pods in the services node pool. So, we created a node pool named services, it has one or more nodes (instances) there, and they are used to deploy these pods.
Same for the cron PHP-FPM (https://github.com/Imagination-Media/magento-k8s/blob/master/scripts/gcp/19-magento-cron-phpfpm.yam), we have this:
affinity:
        nodeAffinity:
          requiredDuringSchedulingIgnoredDuringExecution:
            nodeSelectorTerms:
              - matchExpressions:
                  - key: 'cloud.google.com/gke-nodepool'
                    operator: In
                    values:
                      - cron
We have a cron node pool we nodes(instances) dedicated to this cron deployment.
Amazon Elastic Kubernetes Service is a shared responsibility Kubernetes cluster installation, yet with a full AWS integration, comparing to any standalone ways of installing Kubernetes on AWS. AWS IAM integration is the reason why we need admin access rights.
To start working with EKS, install the following utilities:
- aws-cli - https://docs.aws.amazon.com/cli/latest/userguide/getting-started-install.html
- kubectl - exactly version 1.23 needed, due to current EKS API-gateway issues. Version requirement may be relaxed in future. https://kubernetes.io/docs/tasks/tools/#kubectl
- eksctl - https://github.com/eksctl-io/eksctl/blob/main/README.md#installation
All EKS-related scripts and manifests are inside the https://github.com/Imagination-Media/magento-k8s/tree/master/scripts/eks folder.
Install EKS cluster. This will provide you with a cluster within 2 AZs, with EFS mount targets ready to be consumed by ReadWriteMany PVs.
- Check the create-cluster.sh script. Populate AWS_ACCESS_KEY_ID and AWS_SECRET_ACCESS_KEY variables, or comment them out if they are already exported in your environment. Set EKS_KUBE_VERSION to the latest EKS version at the moment of installation(at the moment of writing EKS version is 1.27, kubectl - 1.23(due to EKS bugs)). Tune other variables as needed(Currently we are using 2(scaling up to 3) of 32GB RAM, 8 core, ARM64(Graviton2) instances).
- ./create-cluster.sh and wait for the environment to stabilize.
- aws eks update-kubeconfig --region us-east-1 --name aws-demo - update your current ~/.kube/config file.
- kubectl get nodes - see the cluster of 2 worker nodes, exactly as you've specified in create-cluster.sh script.
- Check AWS EC2 console, ssh as ec2-user to every node with the key you've specified in ~/.kube/config file.
Install/update Magento manifests by running ./deploy-magento.sh. The script contents and manifests themselves are subject to further change.
Check the Magento namespace pods:
- kubectl -n magento-demo-production get pod
ARM is a new architecture for processors being used by a various number of manufacturers.
Most of the cloud providers have ARM instances that can be used to deploy the infrastructure. They are faster and cheaper than regular x86 and x64 instances.
Google Cloud has TAU instances, AWS has Graviton instances, Azure has Ampere instances.
This infrastructure is compatible with ARM instances, and we strongly recommend to use them. Make sure the PHP version, ElasticSearch version, and Redis version are compatible and support ARM instances. Some old versions of these services can not be compatible with the ARM architecture.
The following topics are going to describe how to use these scripts along with your Magento codebase repository, and how to set up your GitHub repository with environments, secrets, CI/CD, etc.
First of all, we need to create the environments in GitHub for each cloud environment we are going to have. So, for example, if we have the production website, a pre-production environment and a staging environment we will have to create these same three environments in GitHub.
To create the environments please follow this GitHub guide.
Please also assign specific branches for each environment. For example, set the master branch on the production branch, staging branch on the staging environment, etc.
GitHub secrets are variables used in our CI/CD process, and they store values as secrets, meaning they are not going to be visible for anyone. We need to set up global secrets and environment secrets. Global secrets are available for all environments, and environment secrets are going to be set on each one of the environments we have created, and they are shared between different environments.
- GOOGLE_APPLICATION_CREDENTIALS - This is used for Google Cloud projects. On this secret we store a base64 encoded service account key. This service account must have access to connect with the Kubernetes cluster where the application was deployed.
- NODE_AUTH_TOKEN - A token generated from a GitHub account. This token is used to publish the container images, so it must have access to read/publish containers.
- PROJECT_ID - This is the Google Cloud project id. Only used for Google Cloud projects.
- SLACK_WEBHOOK - The slack webhook URL to notify slack users when the deployment was completed.
- APP_ETC_ENV - the Magento app/etc/env.php file used by Magento. An example of this file is:
<?php
return [
    'backend' => [
        'frontName' => 'imadmin'
    ],
    'remote_storage' => [
        'driver' => 'file'
    ],
    'queue' => [
        'consumers_wait_for_messages' => 1,
        'amqp' => [
            'host' => 'rabbitmq-service.magento-demo-production',
            'port' => '5672',
            'user' => 'guest',
            'password' => '${RABBITMQ_PASSWORD}', // Use environment variable
            'virtualhost' => '/',
            'ssl' => 'false'
        ],
        'topics' => [
            'product_action_attribute.update' => [
                'publisher' => 'amqp-magento'
            ]
        ],
        'config' => [
            'publishers' => [
                'product_action_attribute.update' => [
                    'connections' => [
                        'amqp' => [
                            'name' => 'amqp',
                            'exchange' => 'magento',
                            'disabled' => false
                        ],
                        'db' => [
                            'name' => 'db',
                            'exchange' => 'magento',
                            'disabled' => true
                        ]
                    ]
                ]
            ]
        ],
        'consumers' => [
            'product_action_attribute.update' => [
                'connection' => 'amqp'
            ]
        ]
    ],
    'cron_consumers_runner' => [
        'cron_run' => true,
        'max_messages' => 0,
        'consumers' => [
            'product_action_attribute.update',
            'async.operations.all',
            'codegeneratorProcessor',
            'product_action_attribute.website.update',
            'eshopworld_catalog_product.export',
            'media.storage.catalog.image.resize',
            'matchCustomerSegmentProcessor',
            'exportProcessor',
            'urlRewriteImport',
            'media.content.synchronization',
            'media.gallery.renditions.update',
            'media.gallery.synchronization'
        ]
    ],
    'crypt' => [
        'key' => '${MAGENTO_ENCRYPTION_KEY}' // Use environment variable
    ],
    'db' => [
        'table_prefix' => '',
        'connection' => [
            'default' => [
                'host' => '34.28.146.205',
                'dbname' => 'magento',
                'username' => 'magento',
                'password' => '${DB_PASSWORD}', // Use environment variable
                'model' => 'mysql4',
                'engine' => 'innodb',
                'initStatements' => 'SET NAMES utf8;',
                'active' => '1',
                'driver_options' => [
                    1014 => false
                ]
            ],
            'indexer' => [
                'host' => '34.28.146.205',
                'dbname' => 'magento',
                'username' => 'magento',
                'password' => '${DB_PASSWORD}', // Use environment variable
                'active' => '1',
                'persistent' => null
            ]
        ]
    ],
    'resource' => [
        'default_setup' => [
            'connection' => 'default'
        ]
    ],
    'x-frame-options' => 'SAMEORIGIN',
    'MAGE_MODE' => 'production',
    'session' => [
        'save' => 'redis',
        'redis' => [
            'host' => 'redis-session-service.magento-demo-production',
            'port' => '6380',
            'password' => '',
            'timeout' => '2.5',
            'persistent_identifier' => '',
            'database' => '0',
            'compression_threshold' => '2048',
            'compression_library' => 'gzip',
            'log_level' => '3',
            'max_concurrency' => '6',
            'break_after_frontend' => '5',
            'break_after_adminhtml' => '30',
            'first_lifetime' => '600',
            'bot_first_lifetime' => '60',
            'bot_lifetime' => '7200',
            'disable_locking' => '1',
            'min_lifetime' => '60',
            'max_lifetime' => '2592000',
            'sentinel_master' => '',
            'sentinel_servers' => '',
            'sentinel_connect_retries' => '5',
            'sentinel_verify_master' => '0'
        ]
    ],
    'cache' => [
        'frontend' => [
            'default' => [
                'id_prefix' => '919_',
                'backend' => 'Magento\\Framework\\Cache\\Backend\\Redis',
                'backend_options' => [
                    'server' => 'redis-fpc-service.magento-demo-production',
                    'database' => '0',
                    'port' => '6379',
                    'password' => '${REDIS_PASSWORD}', // Use environment variable
                    'compress_data' => '1',
                    'compression_lib' => ''
                ]
            ],
            'page_cache' => [
                'id_prefix' => '919_',
                'backend' => 'Magento\\Framework\\Cache\\Backend\\Redis',
                'backend_options' => [
                    'server' => 'redis-fpc-service.magento-demo-production',
                    'database' => '1',
                    'port' => '6379',
                    'password' => '${REDIS_PASSWORD}', // Use environment variable
                    'compress_data' => '0',
                    'compression_lib' => ''
                ]
            ]
        ],
        'allow_parallel_generation' => false
    ],
    'lock' => [
        'provider' => 'db',
        'config' => [
            'prefix' => ''
        ]
    ],
    'directories' => [
        'document_root_is_pub' => true
    ],
    'cache_types' => [
        'config' => 1,
        'layout' => 1,
        'block_html' => 1,
        'collections' => 1,
        'reflection' => 1,
        'db_ddl' => 1,
        'eav' => 1,
        'customer_notification' => 1,
        'config_integration' => 1,
        'config_integration_api' => 1,
        'full_page' => 1,
        'translate' => 1,
        'config_webservice' => 1,
        'compiled_config' => 1,
        'target_rule' => 1,
        'config_urapidflow' => 1,
        'vertex' => 1,
        'teamwork_order_history' => 1,
        'globale' => 1,
        'im_menu_catalog' => 1,
        'im_menu_regular' => 1,
        'ec_cache' => 1
    ],
    'downloadable_domains' => [
        'magentodemo.test'
    ],
    'install' => [
        'date' => 'Wed, 12 May 2021 18:08:10 +0000'
    ],
    'system' => [
        'default' => [
            'smile_elasticsuite_core_base_settings' => [
                'es_client' => [
                    'servers' => 'elasticsearch-service.magento-demo-production:9200',
                    'enable_https_mode' => 0,
                    'enable_http_auth' => 1
                ]
            ],
            'admin' => [
                'url' => [
                    'use_custom' => '1'
                ]
            ]
        ]
    ],
    'http_cache_hosts' => [
        [
            'host' => 'varnish'
        ]
    ],
    'db_logger' => [
        'output' => 'disabled'
    ],
    'deployment' => [
        'blue_green' => [
            'enabled' => true
        ]
    ]
];
The admin path for the admin must be IMADMIN, it's the default admin path for our images.
- SSH_AUTHORIZED_KEYS - it's a file with all the public ssh keys that are authorized to SSH into the admin php-fpm pod. For example:
#Igor
ssh-rsa AAAAB3NzaC1yc2EAAAADAQABAAABAQChHpe8MuhsBZNdc9SEUPhAwOgtSAb8U9iU9i3tMzOM0qujliwcZ9J4M2sDky+63FkUOnEPEEwb5w2QEvppqHal7lsh1ZN9RNUVbV4pIg+ePjI5534JNlkqHqtHmCmtZW30IYsCEKl+jmub4sd1SG3PpE3P3fcGWxzHH4xfl6+RRrQXw1H/eoksh7KXWTR+zMY5bNJ1h/kk1cY+MobrzeXjnOKPzdp69cTkiMtzqmEDEZutTVpZD6LX02YNbZ7shNVk8ZNfpVZohZQ22DHfbGPkt2KFeQmLQrBJviSlzxxWThq0LGb/oGp93g9fRh4TGKaNd2quhOYfISHwRVWeNOKV igor@imaginationmedia.com
- IMAGE_TAG - the tag of the image that's going to be released. You can use the environment name (or code) here. For example production for the production website. staging for the staging website, etc.
For every environment that we are going to deploy, we must set one GitHub action script, using the example file https://github.com/Imagination-Media/magento-k8s/action-example.yaml.
On the php-version: '8.1' value please set the PHP version your project is using.
On platforms: linux/arm64 set the architecture of the servers you are going to use to host the application. Use platforms: linux/arm64 for arm machines, or platforms: linux/amd64 for x64 machines.
Adjust the name of the images to match your repository name. For example: name: imagination-media/magento-demo-open-source/nginx
To use this infrastructure with your Magento codebase first create a server directory in your codebase with two subdirectories, one named docker and another name k8s.
Inside the docker directory please copy the nginx and phpfpm directories from https://github.com/Imagination-Media/magento-k8s/project-images.
Inside k8s create one folder for each environment that you have. For example, production. And then, inside each one of these environment directories you copy the files from https://github.com/Imagination-Media/magento-k8s/scripts.
A couple of Magento tools are installed and available to be used on these environments (under the PHP-FPM container). They help developers if the containers are used for development purposes, and even to maintain the website.
n98-magerun2 CLI Tools provides some handy tools to work with Magento / Mage-OS / Adobe Commerce from command line.
mage2tv-cache-clean is a bin/magento cache:clean file watcher. It allows us to clean the cache for specific areas/pages once files that are used in those areas are modified.
magepack is a bold attempt in making Magento 2 frontend as fast as never before. It builds on experiences gained with Advanced JavaScript bundling guide and Baler to provide the best of both worlds - ease of use and superior performance.
Magento Core Diff is a tool released by Sansec that allow us to verify if the core code was modified, in that way we can not only see if someone edited the core but also if these changes were made by a malware.