This is a Laravel Nova tool to that provides features to import and export CSV files.
You can install the package in to a Laravel app that uses Nova via composer:
composer require coreproc/nova-data-syncPublish the package's config and migrations:
php artisan vendor:publish --provider="Coreproc\NovaDataSync\ToolServiceProvider"This package requires Laravel Horizon and comes with the package. If you have not gone through Horizon's install process yet, you can install it by running:
php artisan horizon:installMake sure to configure Horizon's environment processes in config/horizon.php.
You should also migrate the job batches table:
php artisan queue:batches-table

php artisan migrate
This package also requires spatie/laravel-media-library and comes with this package. If you have not gone through the installation process of Media Library, you should publish the migrations for it:
php artisan vendor:publish --provider="Spatie\MediaLibrary\MediaLibraryServiceProvider" --tag="medialibrary-migrations"

php artisan migrate
Publish Media Library's config file:
php artisan vendor:publish --provider="Spatie\MediaLibrary\MediaLibraryServiceProvider" --tag="medialibrary-config"Also run the following command to publish the config file for ebess/advanced-nova-media-library:
php artisan vendor:publish --tag=nova-media-libraryAdd the tool to your NovaServiceProvider.php:
public function tools()
{
return [
// ...
new \Coreproc\NovaDataSync\NovaDataSync(),
];
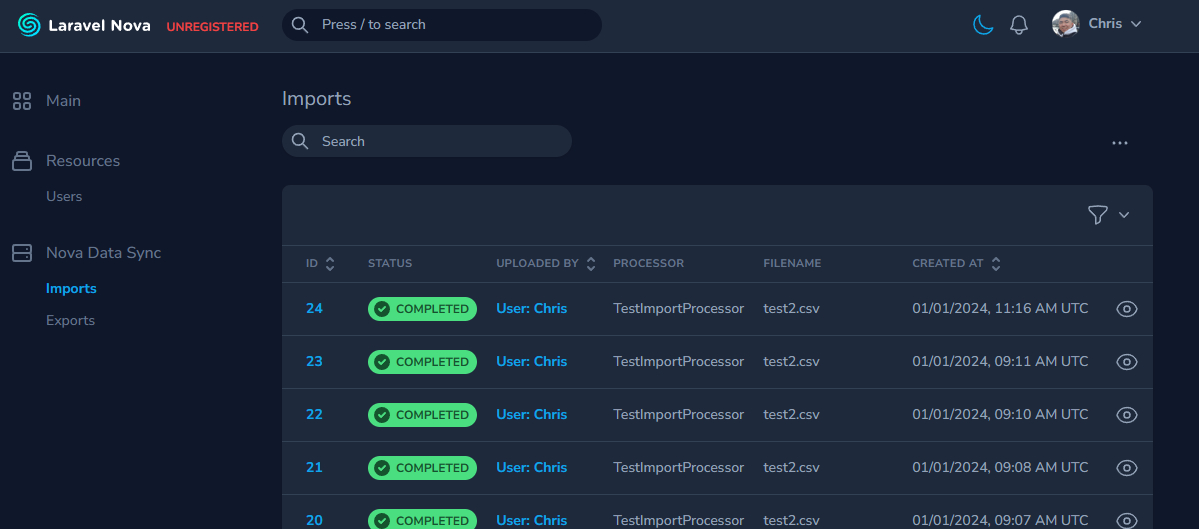
}The Nova Data Sync tool should now appear in Nova's sidebar.
To start with creating an Import feature, you will need two create two classes that extend the following:
- an
ImportActionclass that is essentially a Nova Action - and an
ImportProcessclass that contains the validation rules and process logic for each row of an imported CSV file.
Here is a sample ImportAction class:
<?php

namespace App\Nova\Imports\TestImport;

use Coreproc\NovaDataSync\Actions\ImportAction;

class TestImportAction extends ImportAction
{
    // A sample processor will be shown below
    public string $processor = TestImportProcessor::class;

    public function expectedHeaders(): array
    {
        return ['field1', 'field2'];
    }
}
Define the expected headers in the expectedHeaders() method. This will be used to validate the headers of the CSV. It
does not have to have the same order as the CSV file. It will thrown an error if it does not find the expected headers.
Next, create an ImportProcessor class and define it in the $processor value of your ImportAction.
Here is a sample ImportProcessor:
<?php

namespace App\Nova\Imports\TestImport;

use Coreproc\NovaDataSync\Jobs\ImportProcessor;
use Illuminate\Database\Eloquent\Model;
use Illuminate\Support\Facades\Log;

class TestImportProcessor extends ImportProcessor
{
    protected function process(array $row, int $rowIndex): void
    {
        Log::info('processing row ' . $rowIndex);

        // Put the logic to process each row in your imported CSV here
    }

    protected function rules(array $row, int $rowIndex): array
    {
        // Use Laravel validation rules to validate the values in each row.
        return [
            'field1' => ['required'],
            'field2' => ['required'],
        ];
    }
}
The process() method is where you can define the logic for each row of the CSV file. It will be passed the $row and
$rowIndex parameters. The $row parameter is an array of the CSV row's data. The $rowIndex parameter is the index.
If you throw an Exception inside the process() method, the row will be marked as failed and the exception message
will be shown in the failed report for the Import.
The rules() method is where you can define the validation rules for each row of the CSV file. It will be passed the
$row and $rowIndex parameters. The $row parameter is an array of the CSV row's data. The $rowIndex parameter is
the index. Return an array of Laravel's validation rules.
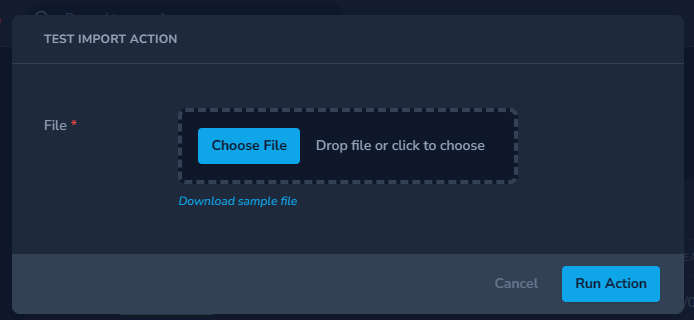
Next, put your ImportAction inside the actions() method of one of your Nova Resources:
public function actions(Request $request)
{
    return [
        new TestImportAction(),
    ];
}
It should look something like this:
You can find configuration options for the Import feature in config/nova-data-sync.php.
'imports' => [
    'disk' => env('MEDIA_DISK', 'public'),
    'chunk_size' => 1000,
    'queue' => 'default',
],Each import and export have a morphable user() relationship. This is used to determine who imported or exported the
data. You will need to define Nova resource of each user type that you want to use for the import and export features.
This can be done in the config/nova-data-sync.php file.
'nova_resources' => [

    /**
     * Since users are defined as morphable, we need to specify the Nova resource
     * associated with the users we want.
     */
    'users' => [
        \App\Nova\User::class,
    ],

],
By default, this already has the App\Nova\User::class resource. You can add more user resources like
App\Nova\BackendUser as needed.